How to answer phone calls with local AI models
The following tutorial will guide you through the steps of how to answer phone calls with local AI models using Ozeki AI Studio and Ozeki Chat Gateway. While setting up AI models and using them to answer phone calls might sound a bit difficult, with Ozeki, it's pretty straightforward and easy to understand. This tutorial will cover every possible step, starting from downloading the AI models, to set up the models along with the chat bot, to finally create a VoIP phone line. Additionally, you will even learn how to make a test phone call. Let's dive in!
What is a local AI model?
A local AI model is an artificial intelligence model that runs directly on a user's own computer, server, or device rather than relying on a remote, cloud-based system to process data.
What is a speech-to-text AI model?
A speech-to-text AI model is an artificial intelligence model designed to convert spoken language into written text. These models are widely used in applications that require real-time or recorded voice transcription, and they rely on advanced neural networks trained on large datasets of human speech to accurately interpret spoken words.
What is a text-to-speech AI model?
A text-to-speech AI model is an artificial intelligence system designed to convert written text into spoken audio. These models use advanced machine learning algorithms to analyze text input, predict pronunciation, and synthesize natural-sounding speech.
How to answer phone calls with local AI models (Quick Steps)
- Download speech-to-text model
- Download LLama 3 model
- Setup the AI Models
- Setup the chat bot
- Create VoIP phone line
- Make a test phone call
Download an AI model for speech to text
You can use the following Speech to Text model
https://huggingface.co/ggerganov/whisper.cpp
Download Speech to Text model (Video tutorial)
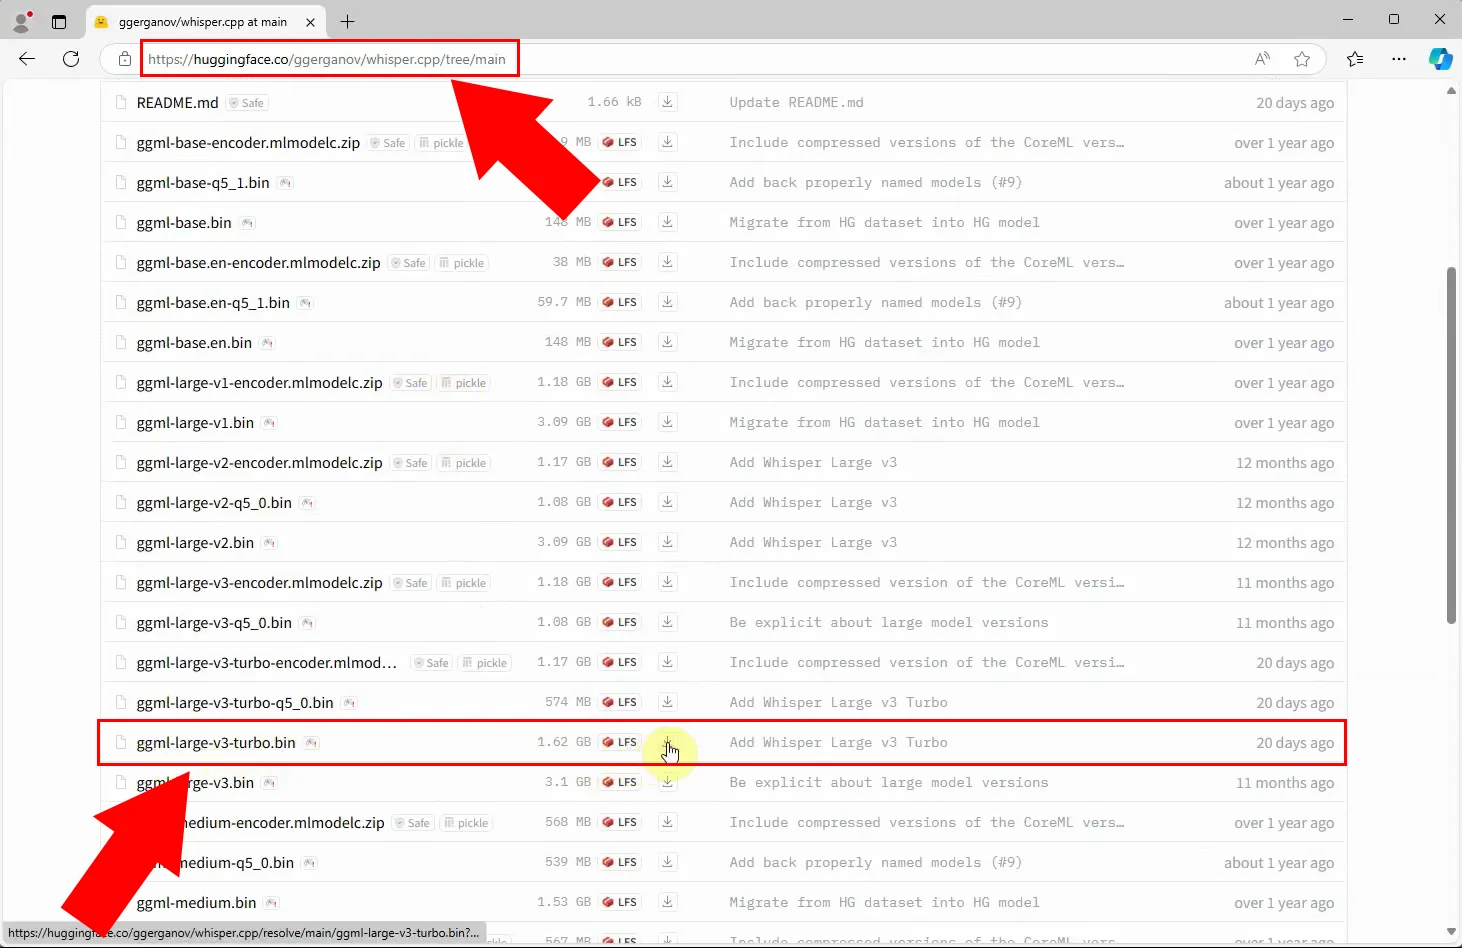
To answer phone calls with a local AI model, your first step is to download a speech to text model. The following video will show you how to do that in only 32 seconds. From the video you how to navigate to the website you can download the model from. The video also shows the exact file to download. Finally, you will also see how to copy your file to the AIModels folder.
Your first step is to navigate to the huggingface website. Hugging face is a really popular platform focused on natural language processing, machine learning, and artificial intelligence. You can see the full link above, or in Figure 1. Once you're in the website, you will find many versions of avaliable models. Download the model highlighted in Figure 1.
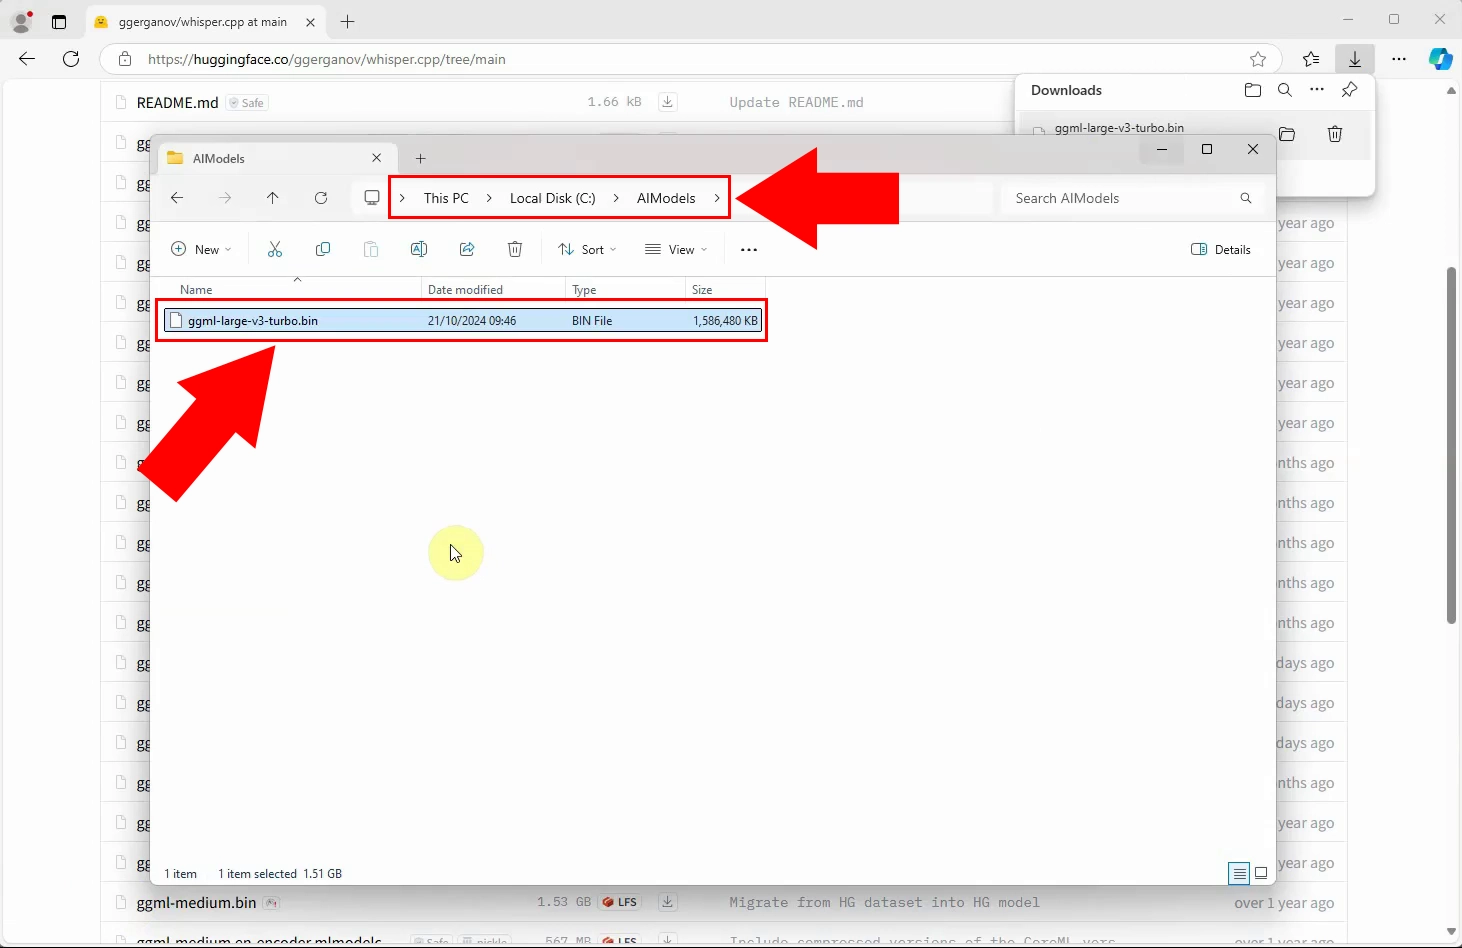
After downloading the model, the only step is to copy the file to the C:\\AIModels folder (Figure 2).
Download LLama 3 model from Hugging face (Video tutorial)
In the following video, you'll be guided through the process of downloading a GGUF-based language model from Hugging Face to use with Ozeki Chat. The video starts by navigating to huggingface.co, where you'll learn how to access the Models section, filter by Libraries, and search for your preferred GGUF model. Once you've found the right model, the video will show you how to download the GGUF file and properly place it in the C:\AIModels directory, preparing it for integration with your Ozeki Chat setup.
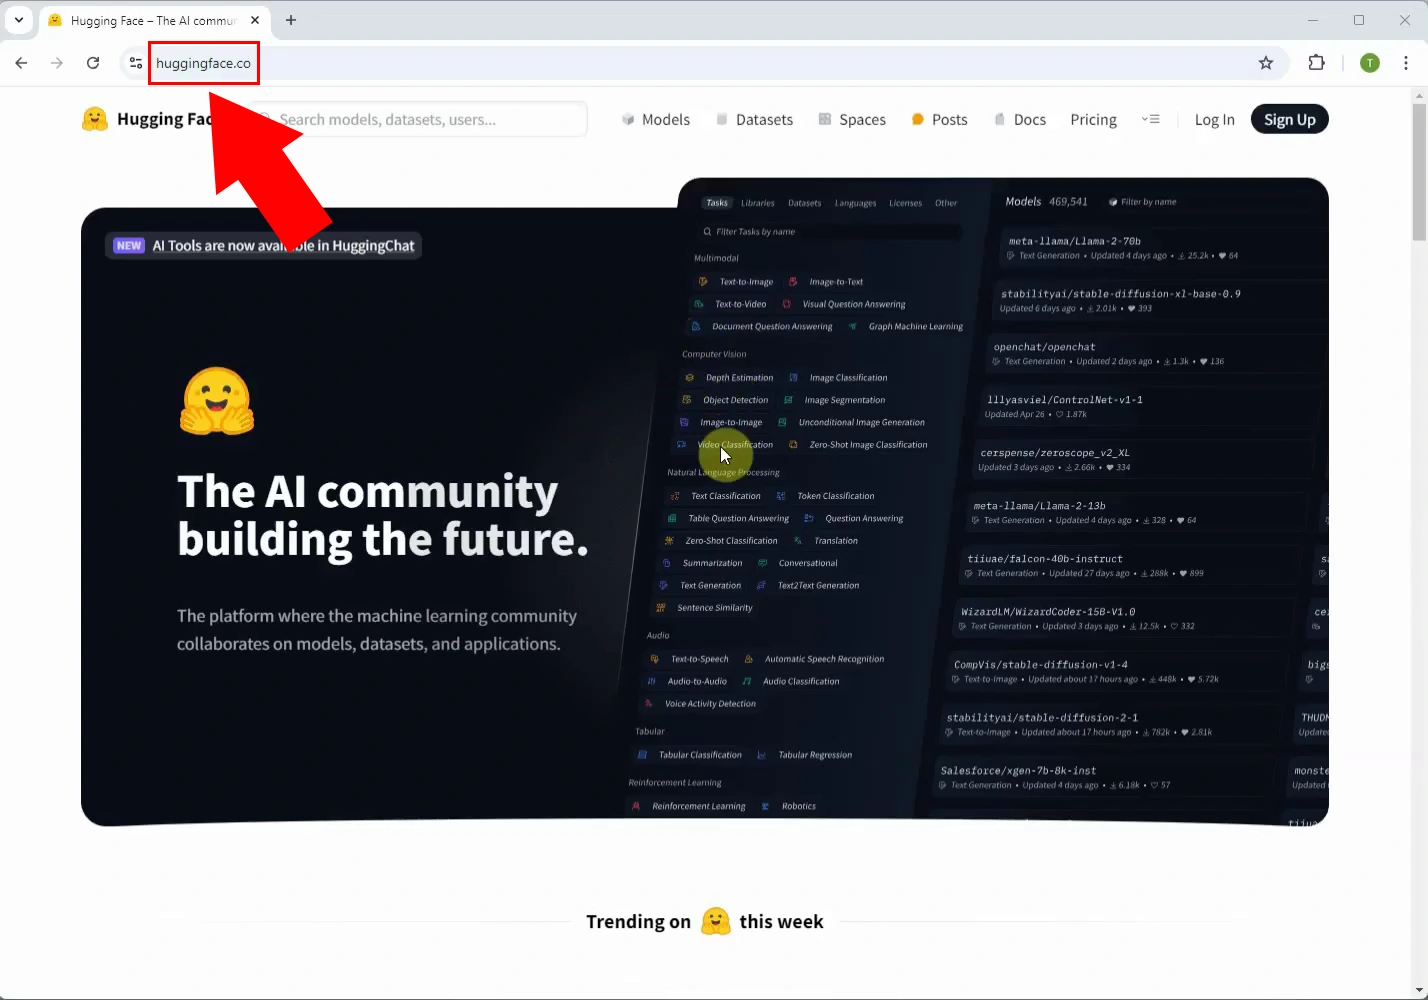
Navigate to the huggingface.co website, highlighted in Figure 3.
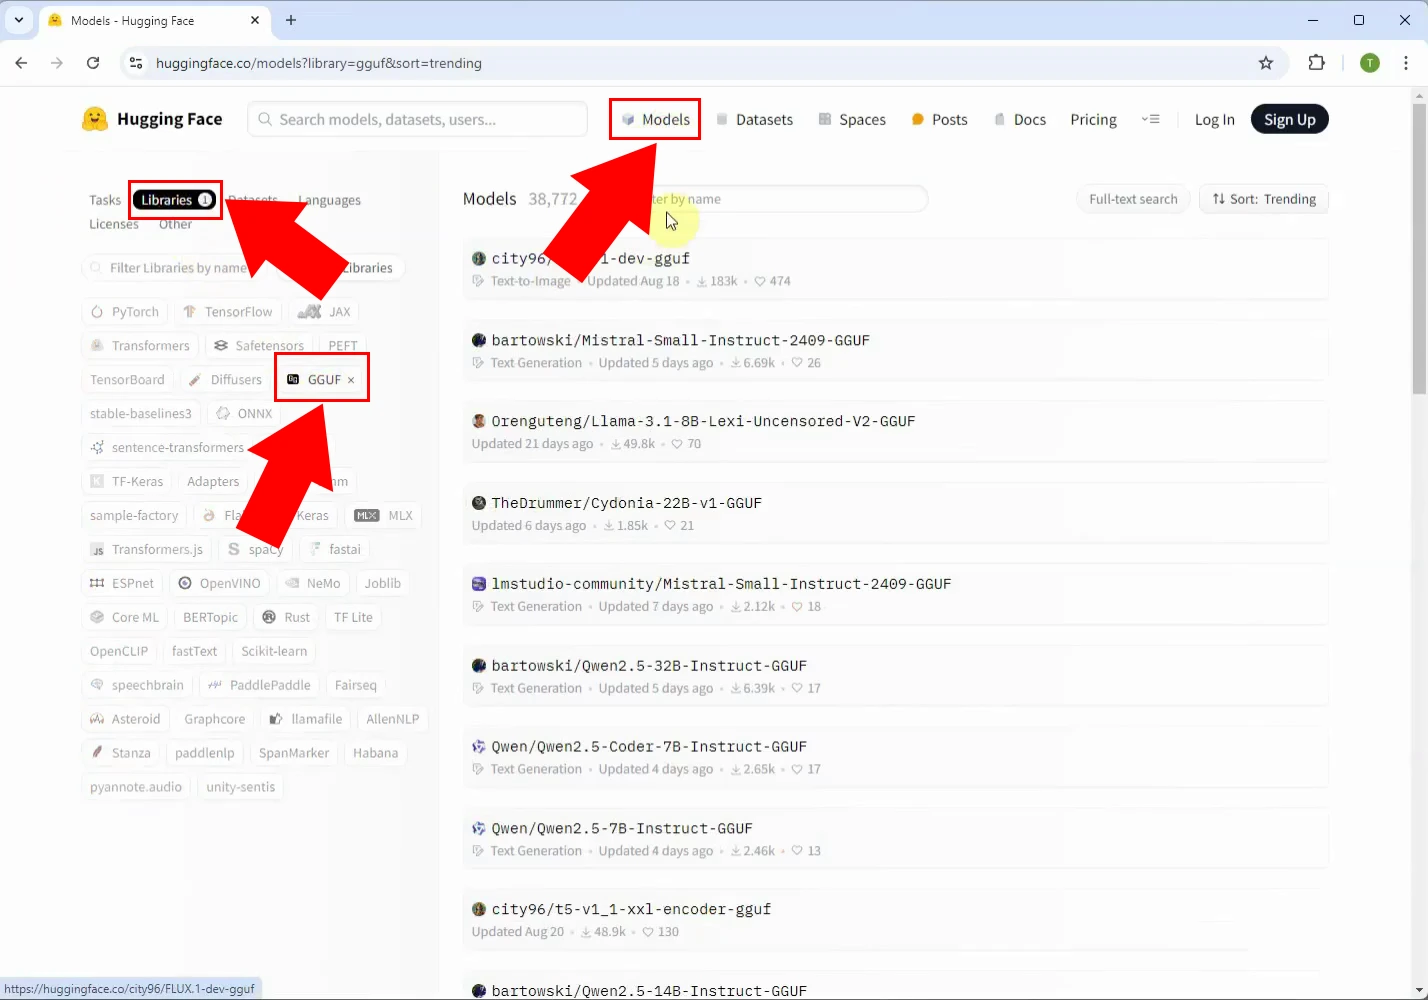
Click the Models tab near the top edge of the screen, filter for Libraries, then GGUF in the left panel, as you can see in Figure 4.
Search for the model you wish to install, and click it (Figure 5). In this example, we'll be using the following model:
Meta-Llama-3.1-8B-Instruct-hf-Q4_K_M-GGUF
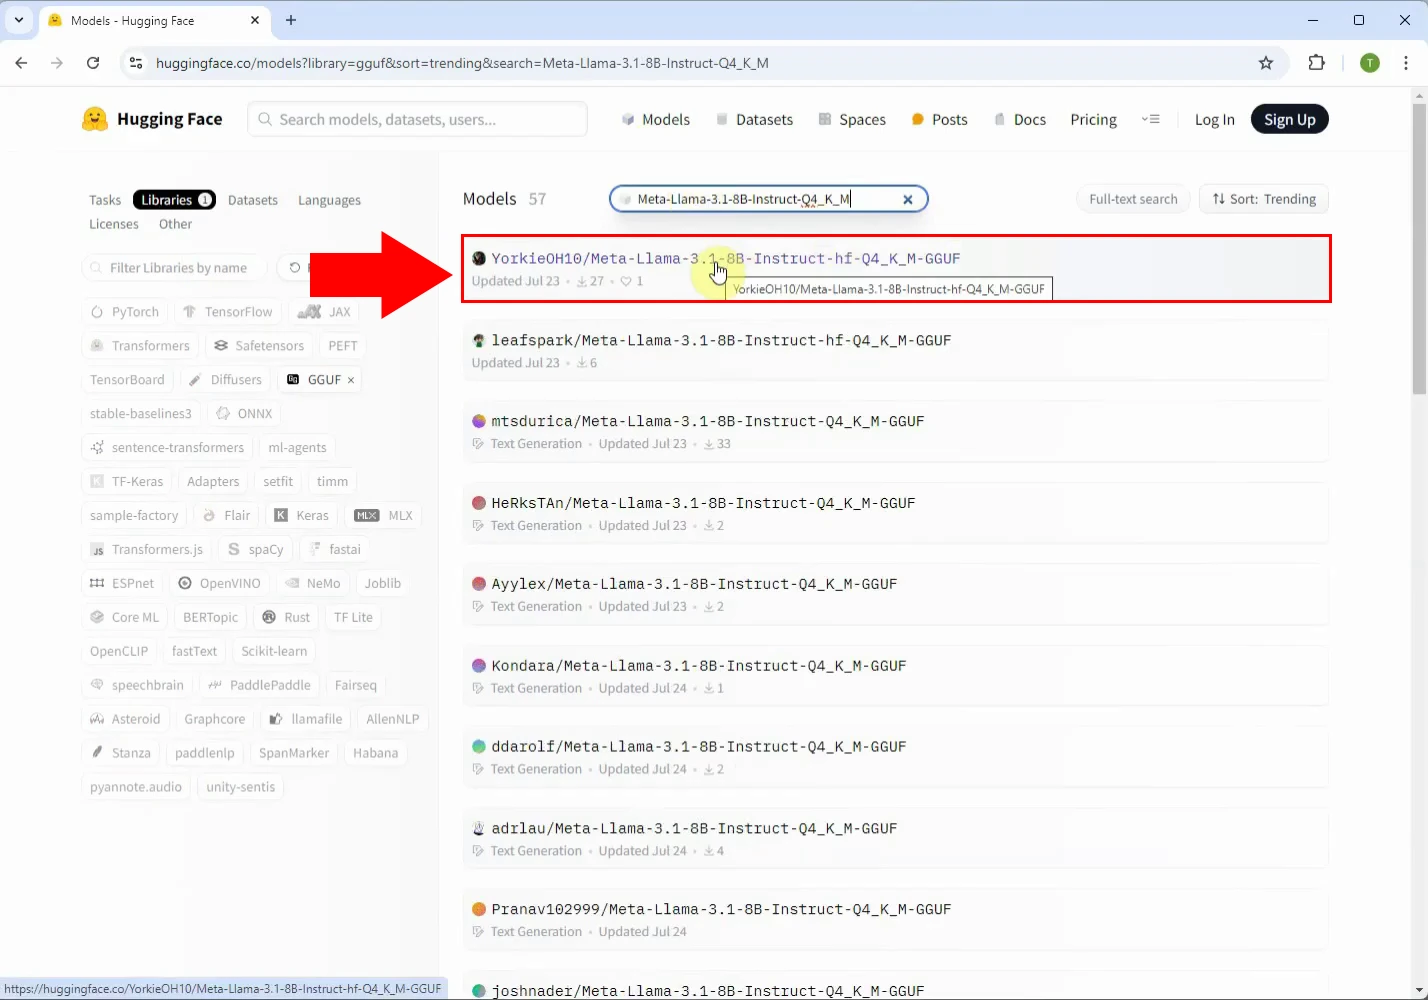
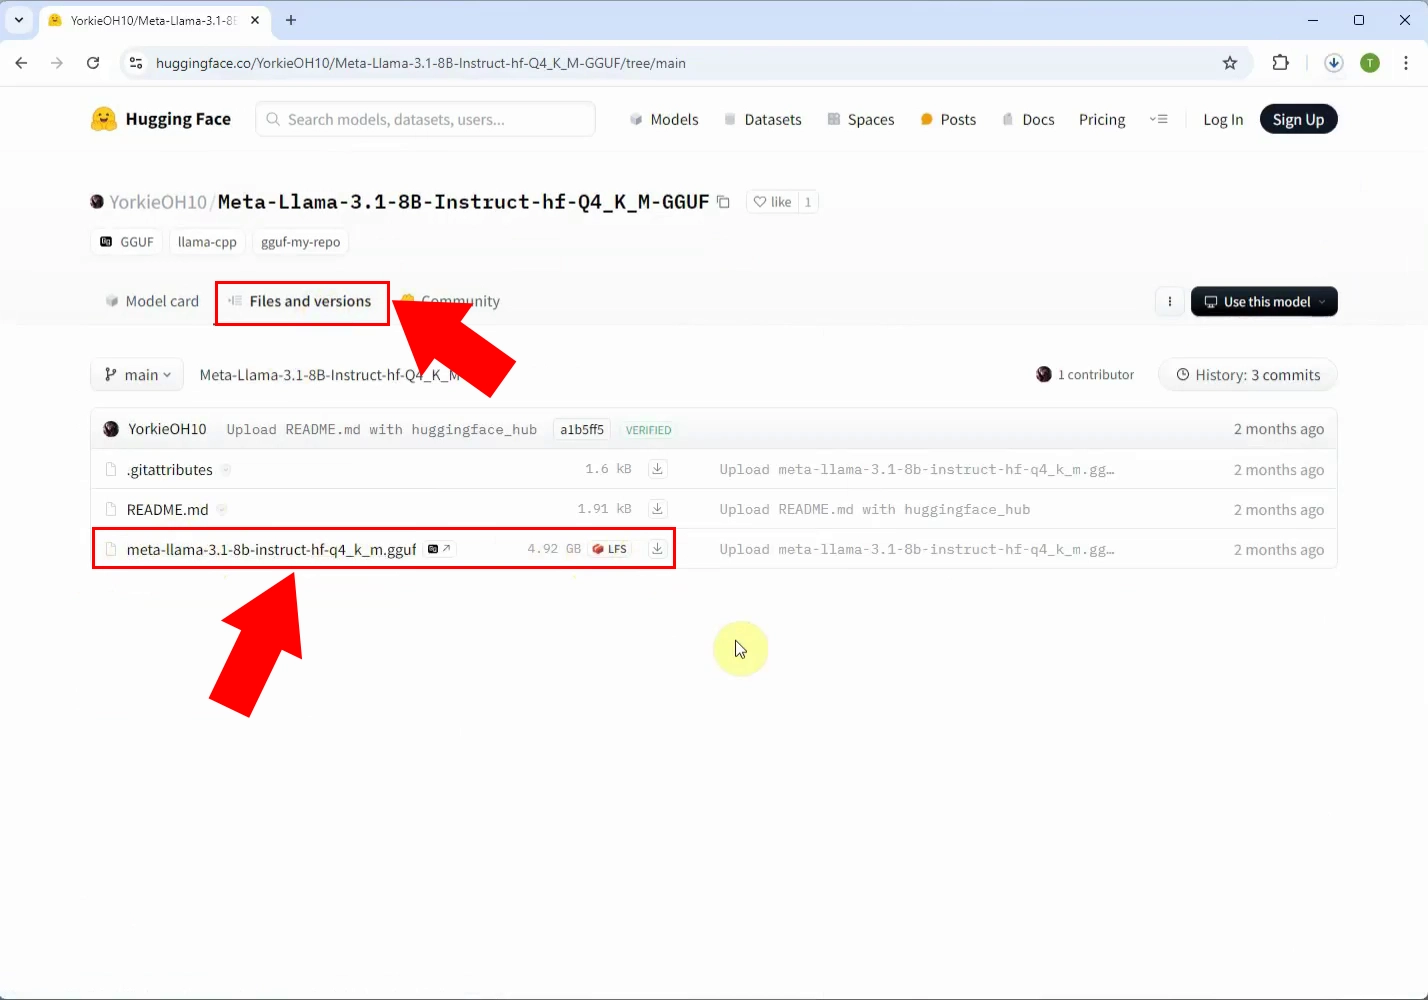
Open the model's Files and versions tab. Look for the .GGUF file and download it, as illustrated in Figure 6.
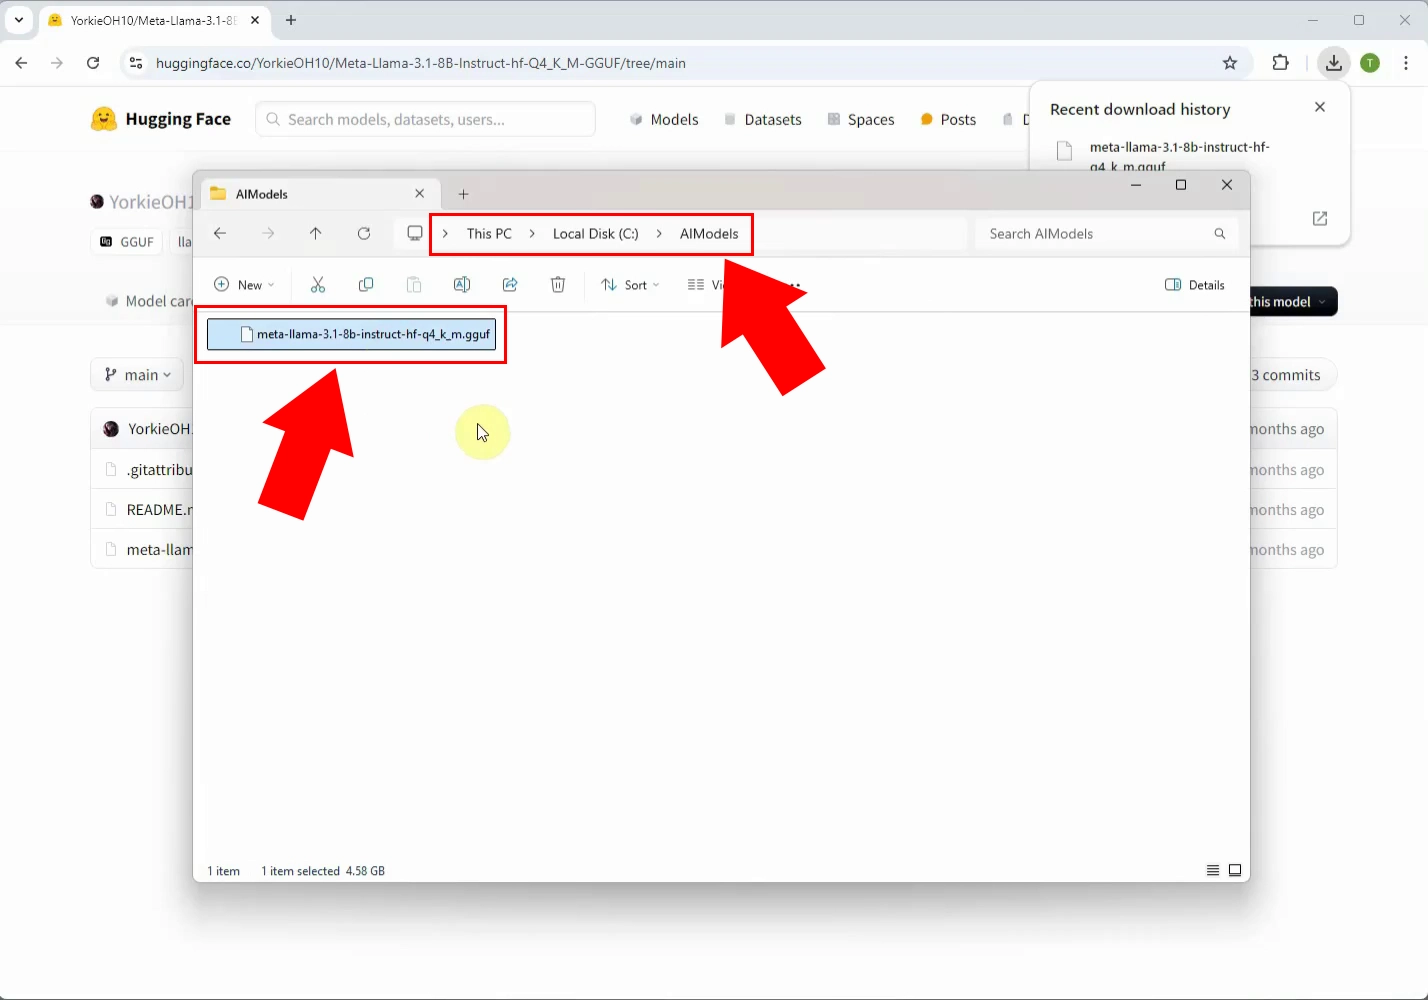
Locate the file you have just downloaded, and place it in this folder, as depicted in Figure 7:
C:\AIModels
Setup AI models and chat bot (Video tutorial)
In the following video, you will learn about the process of how to set up AI models and chat bots using Ozeki AI Studio. With the usage of Ozeki AI Studio, setting up your AI Models will be really straightforward. By completing the steps in this just under-a-minute video, you will be able to create three types of models: Firstly, a speech-to-text model, secondly, a text-to-speech model, and lastly a GGUF model. Finally, you will also learn to set up your chat bot.
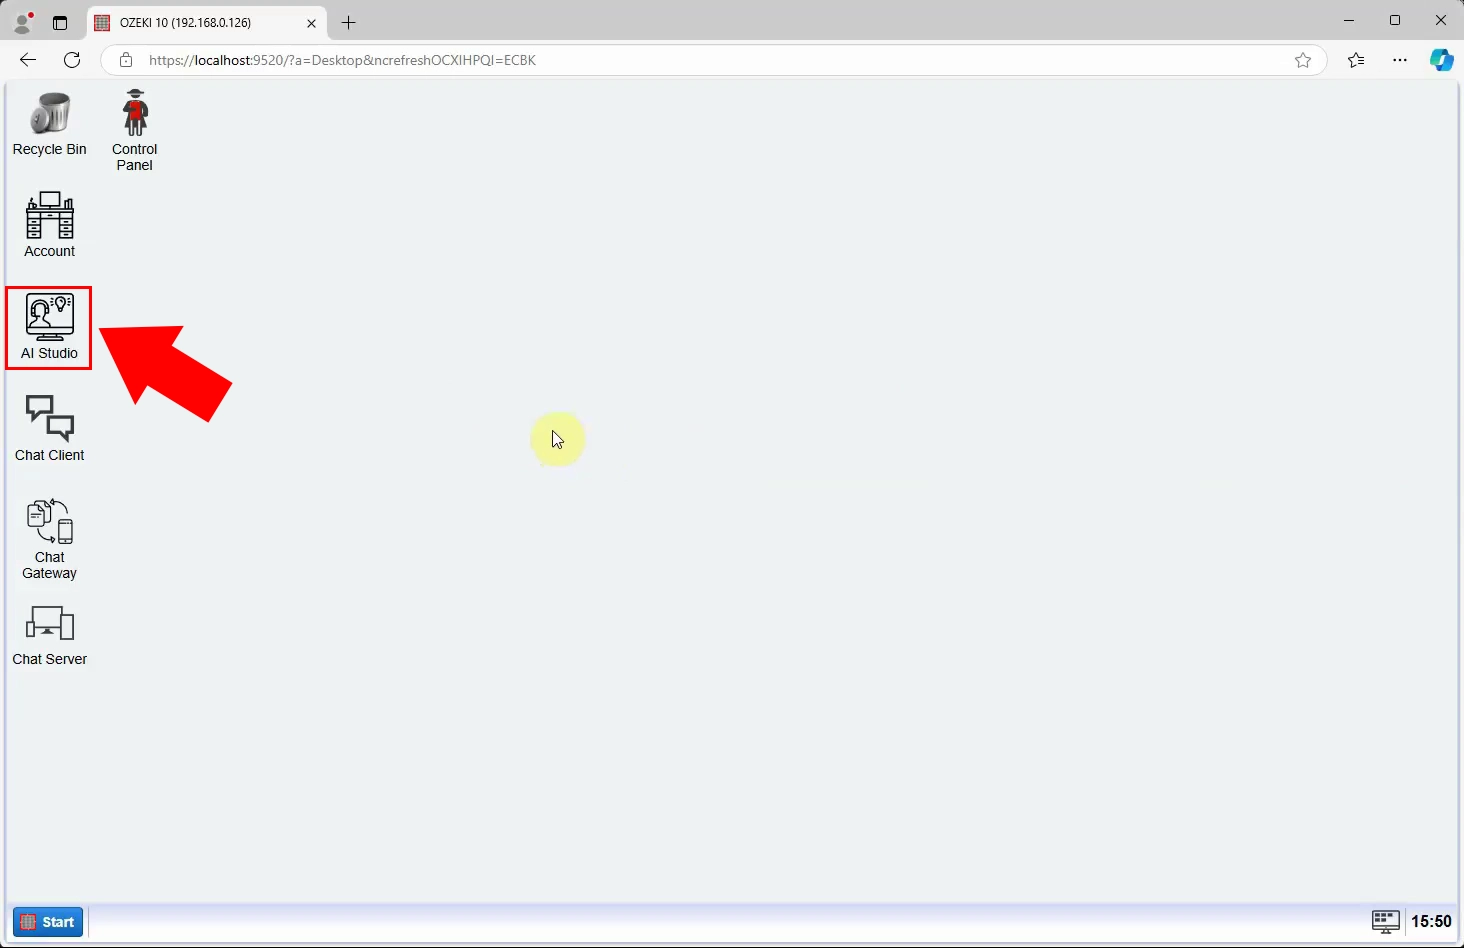
The AI Studio is a feature within the Ozeki 10 platform, so make sure you have Ozeki 10 installed. Once it’s open, navigate to AI Studio, which can be found on the left side of the screen, as highlighted in Figure 8. This will take you to the home page of AI Studio.
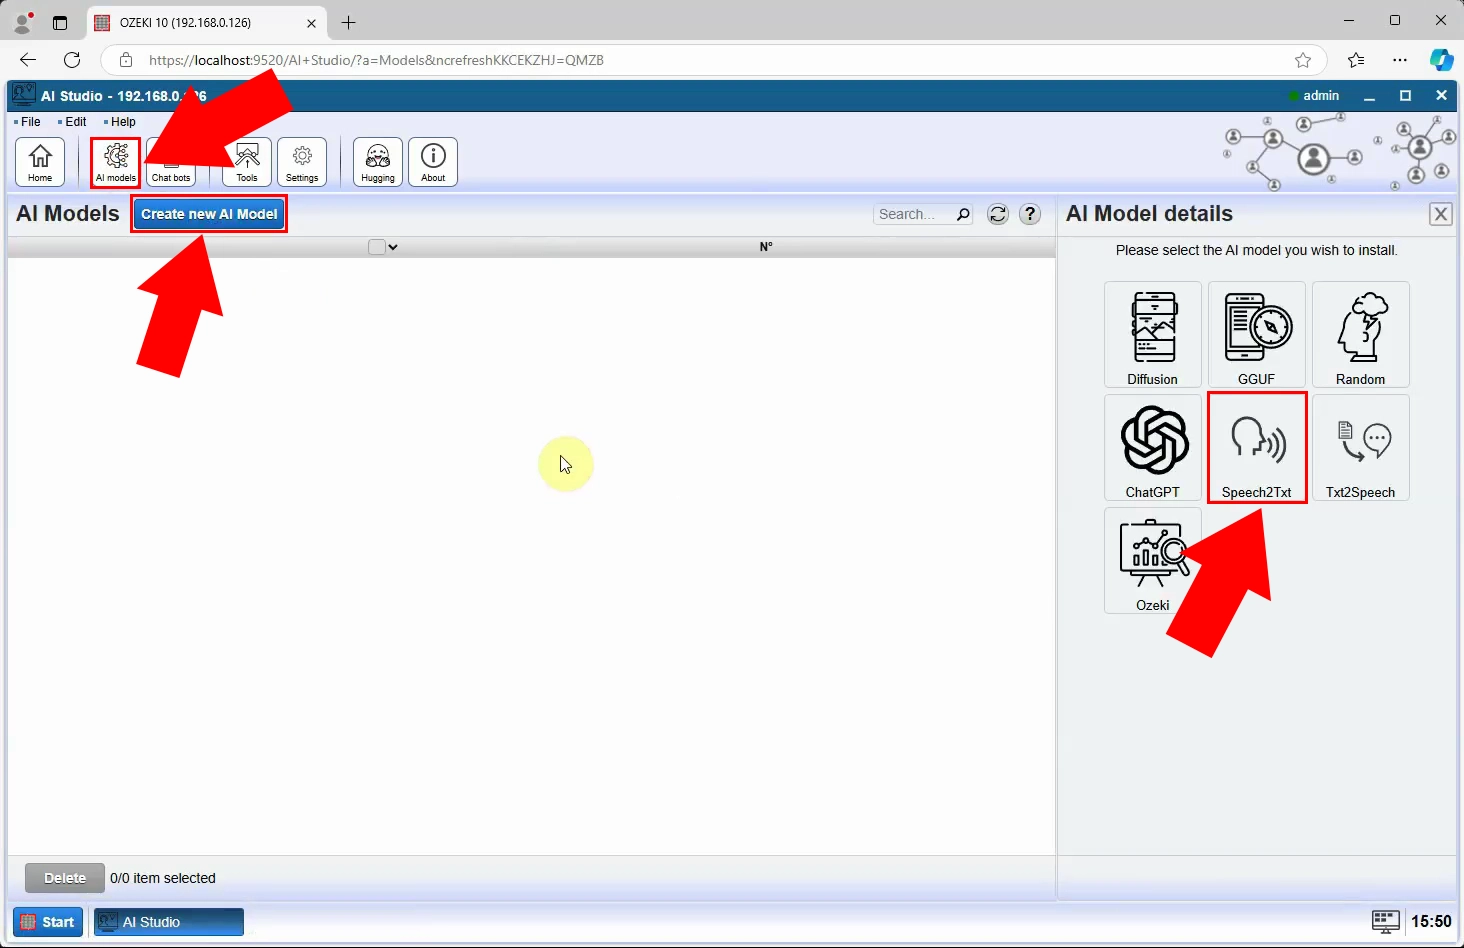
The next step is to create a speech-to-text model. To achieve that, firstly, click the AI models button, which you can find on the toolbar. After that, click the blue Create new AI model button under the toolbar. On the AI Model details panel, select Speech2Txt, as highlighted in Figure 9.
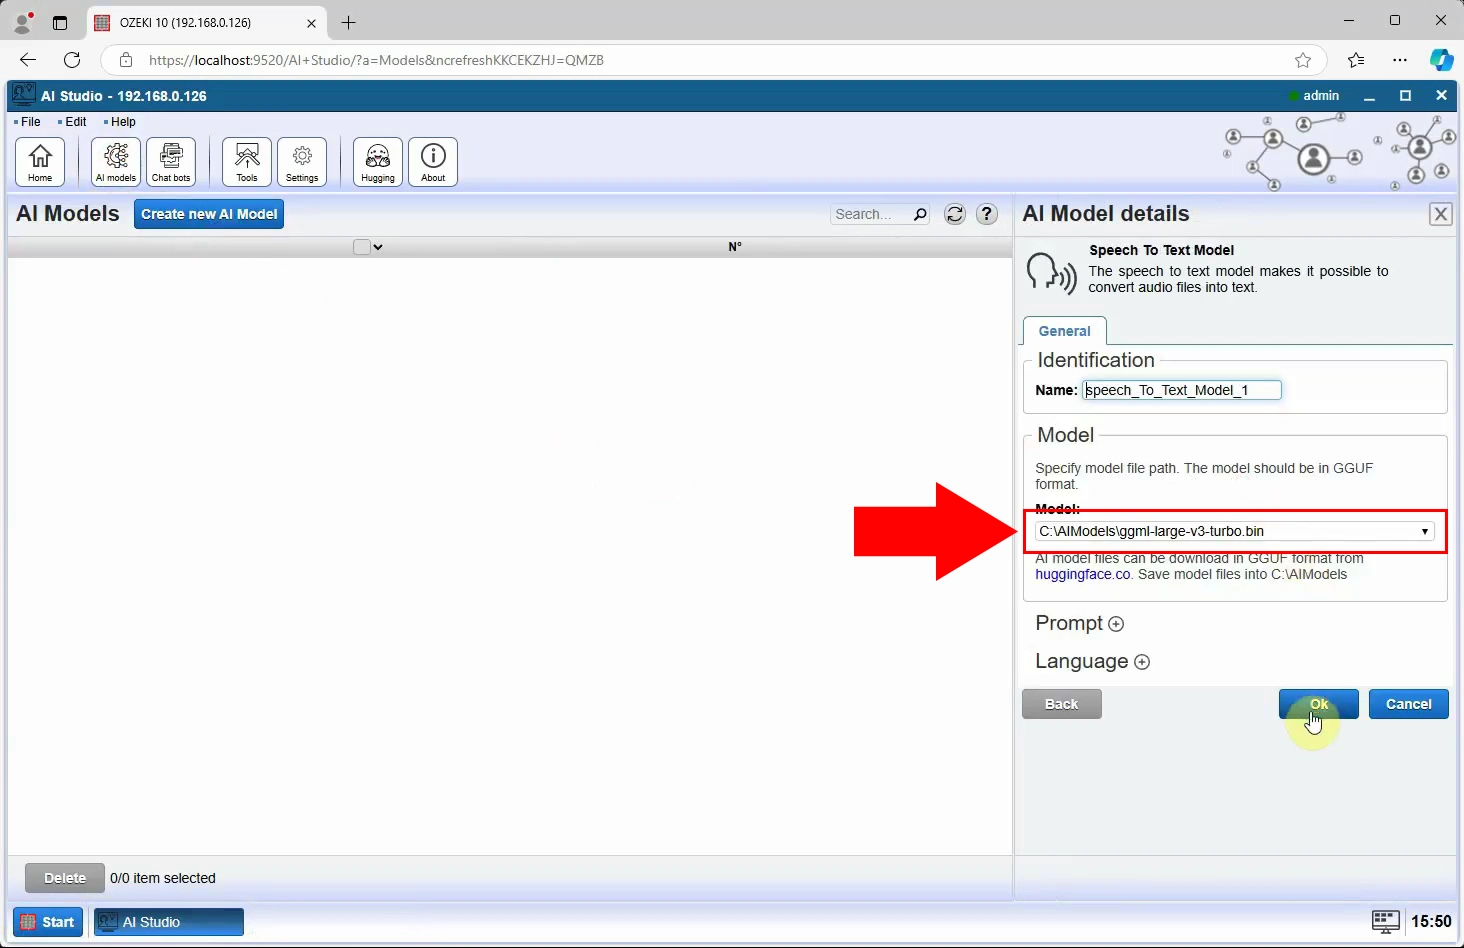
After you selected the speech-to-text model, select the model file you've downloaded from the huggingface website (Figure 10).
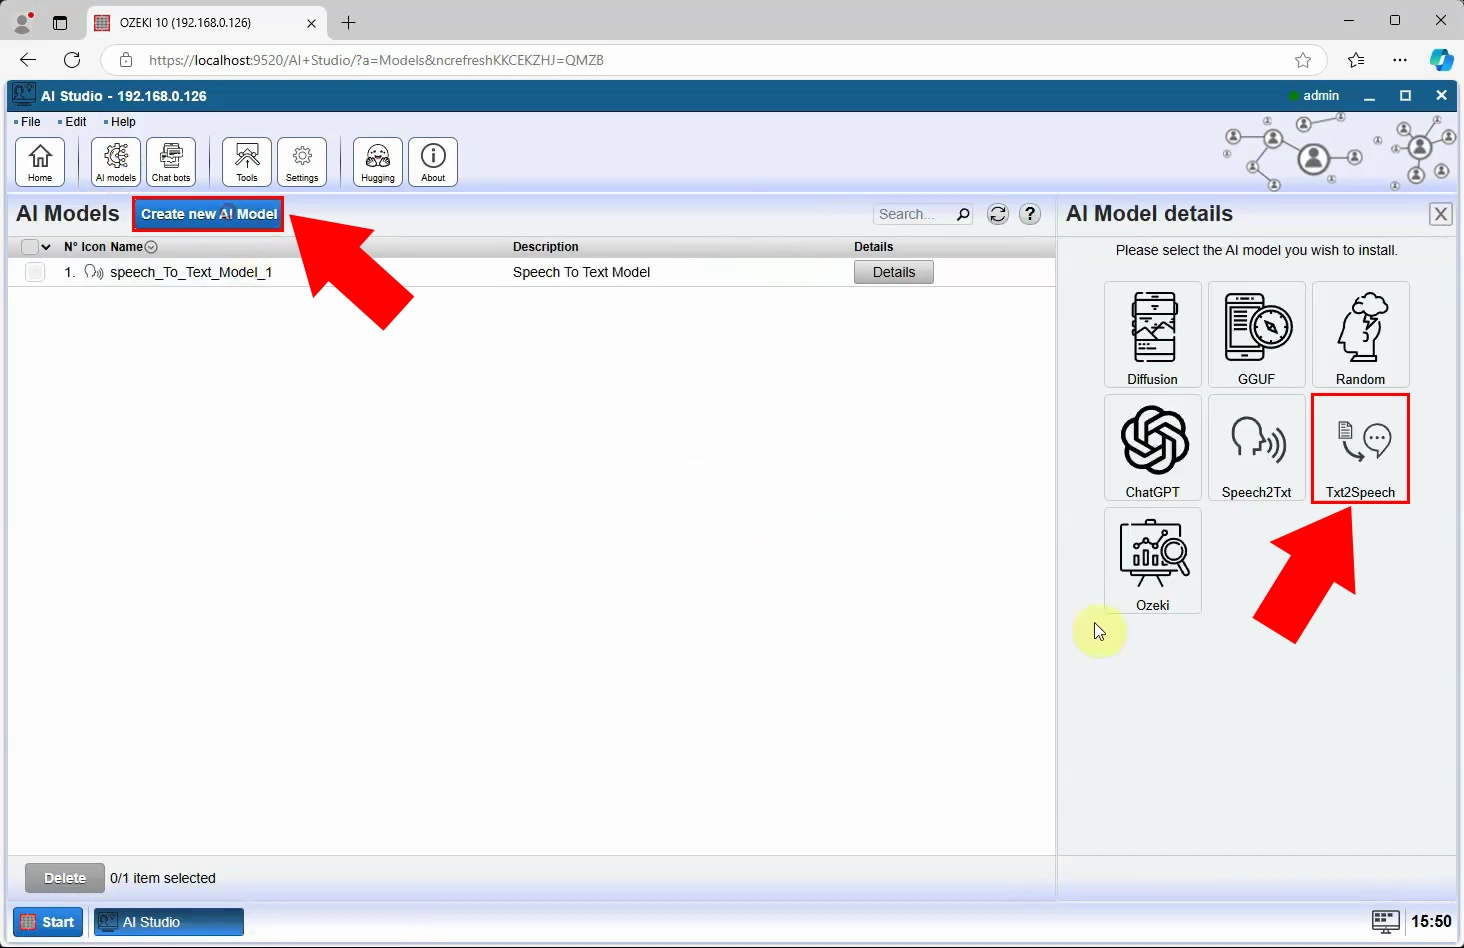
The second model to create is a text-to-speech model. Just as before, click the blue Create new AI Model button. In the right panel, select the Txt2Speech option.
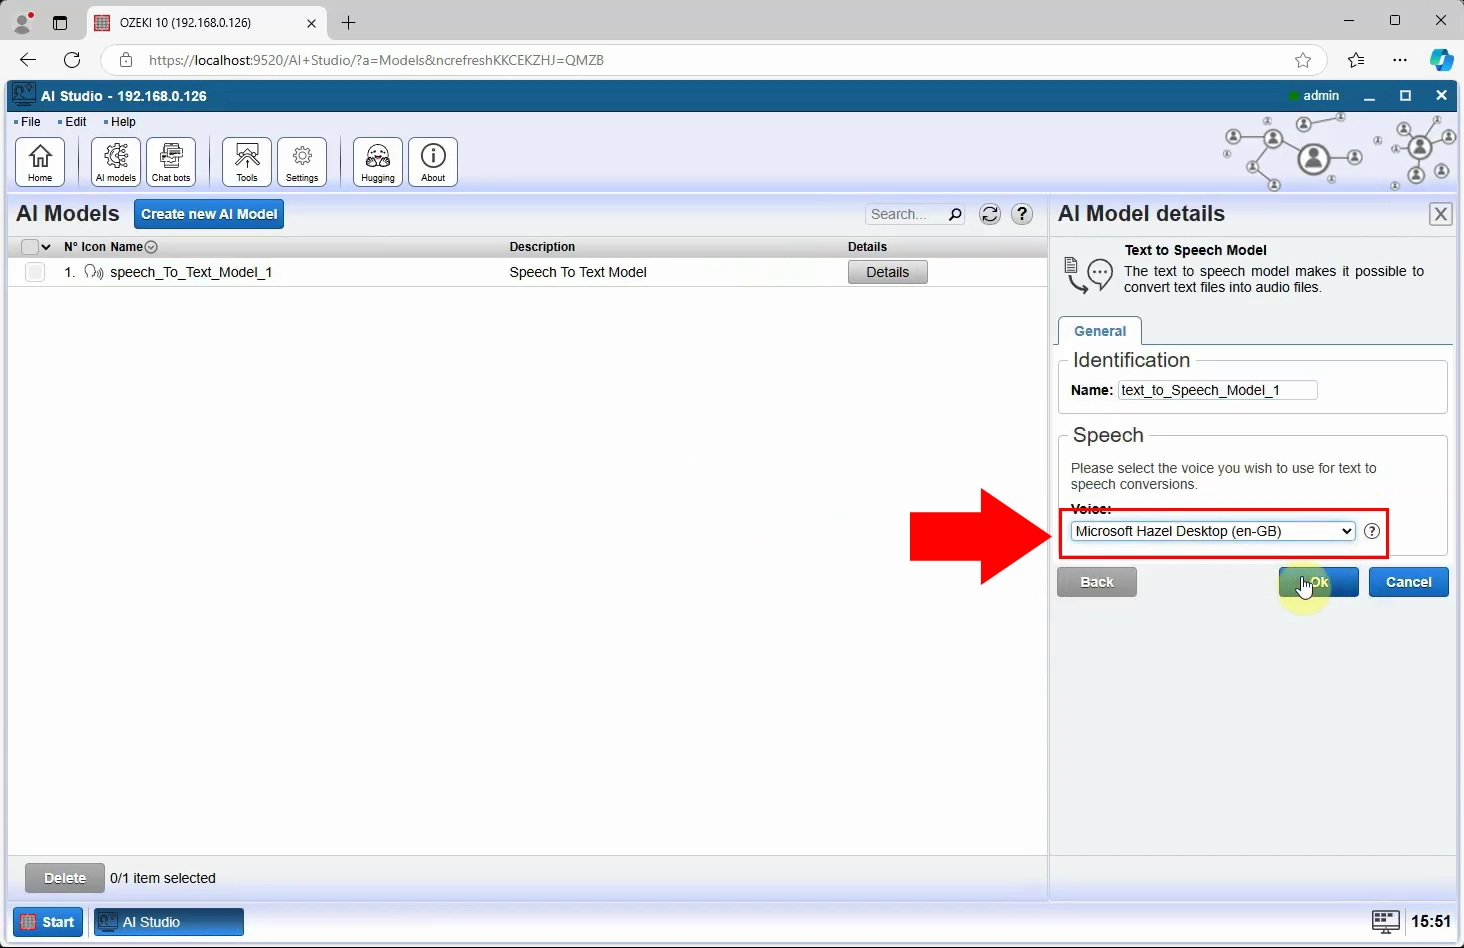
You can select the voice in the AI Model details panel on the right, as shown in Figure 12. Here select Microsoft Hazel Desktop (en GB).
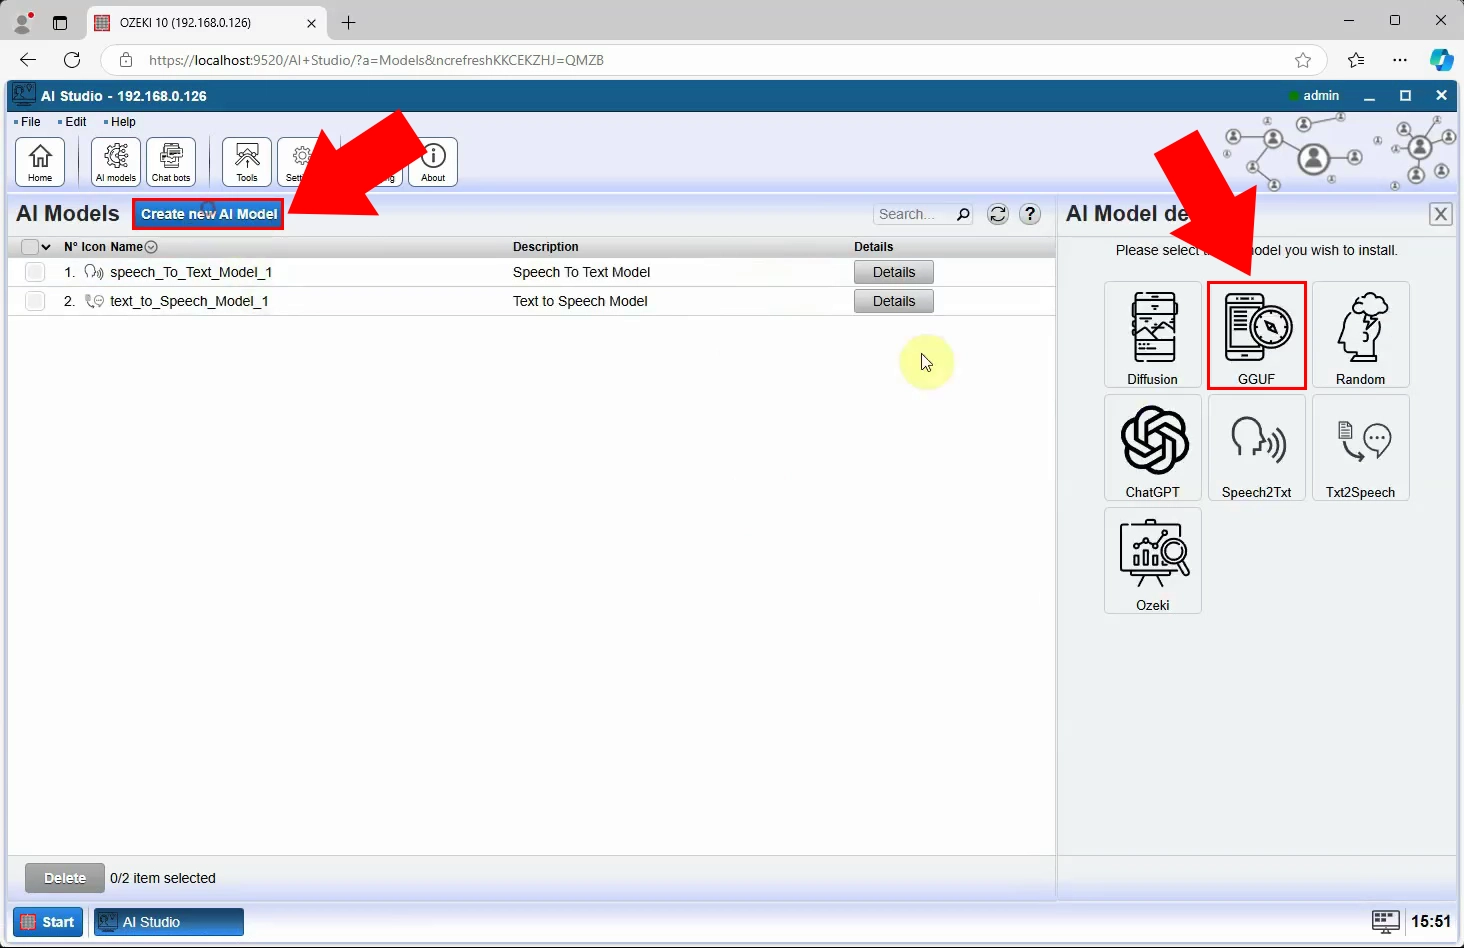
The last to create is the GGUF model. For this, do the same steps you did earlier, but this time select the GGUF option on the AI Model details panel.
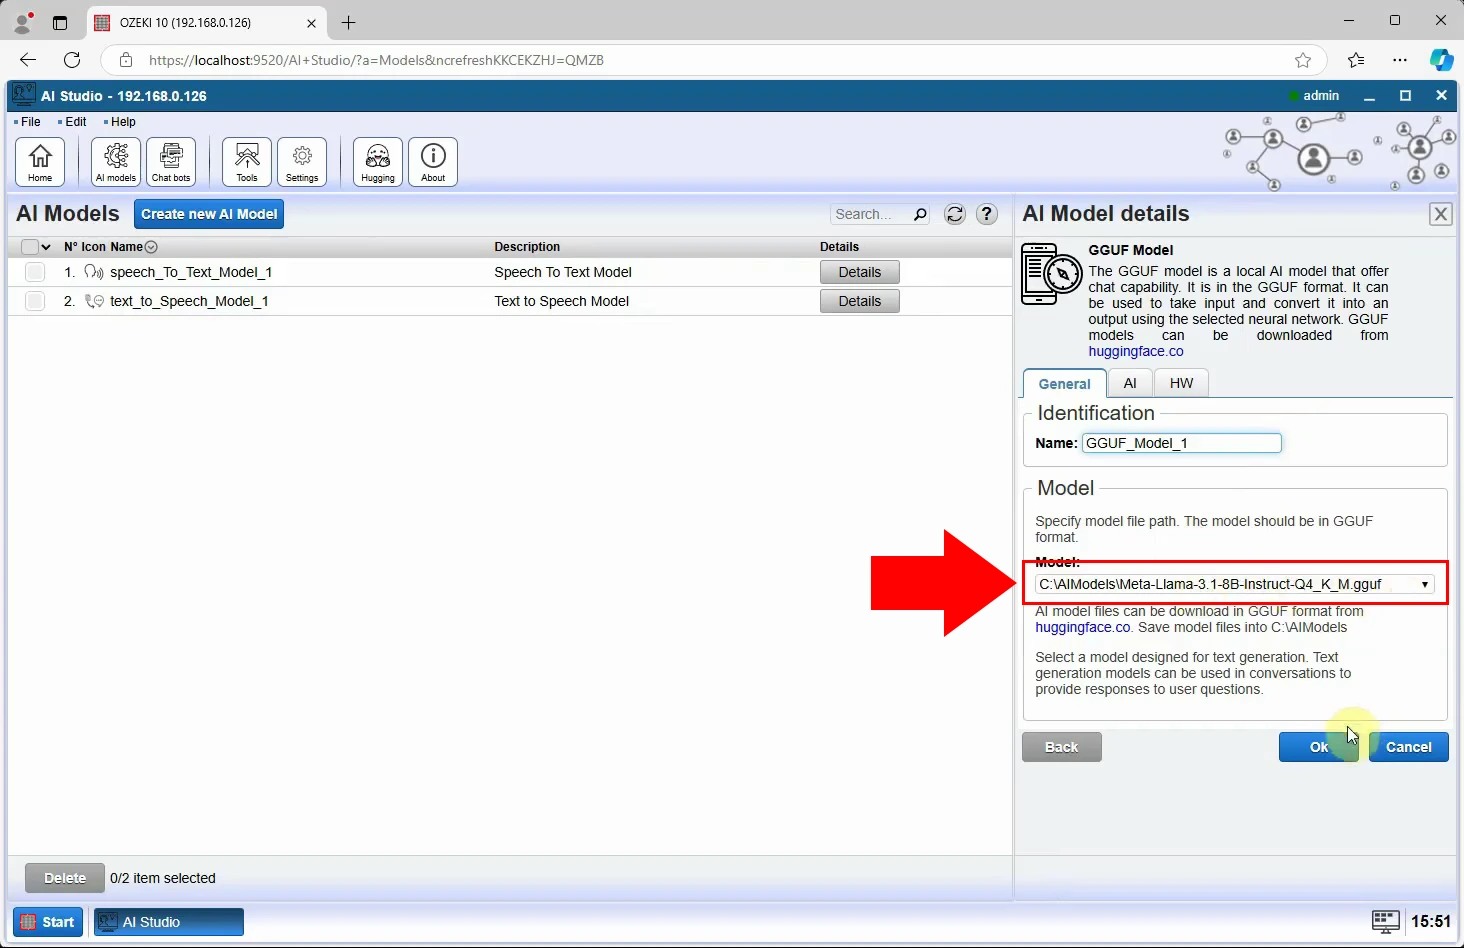
Select the LLama 3 model you've downloaded previously from Huggingface.
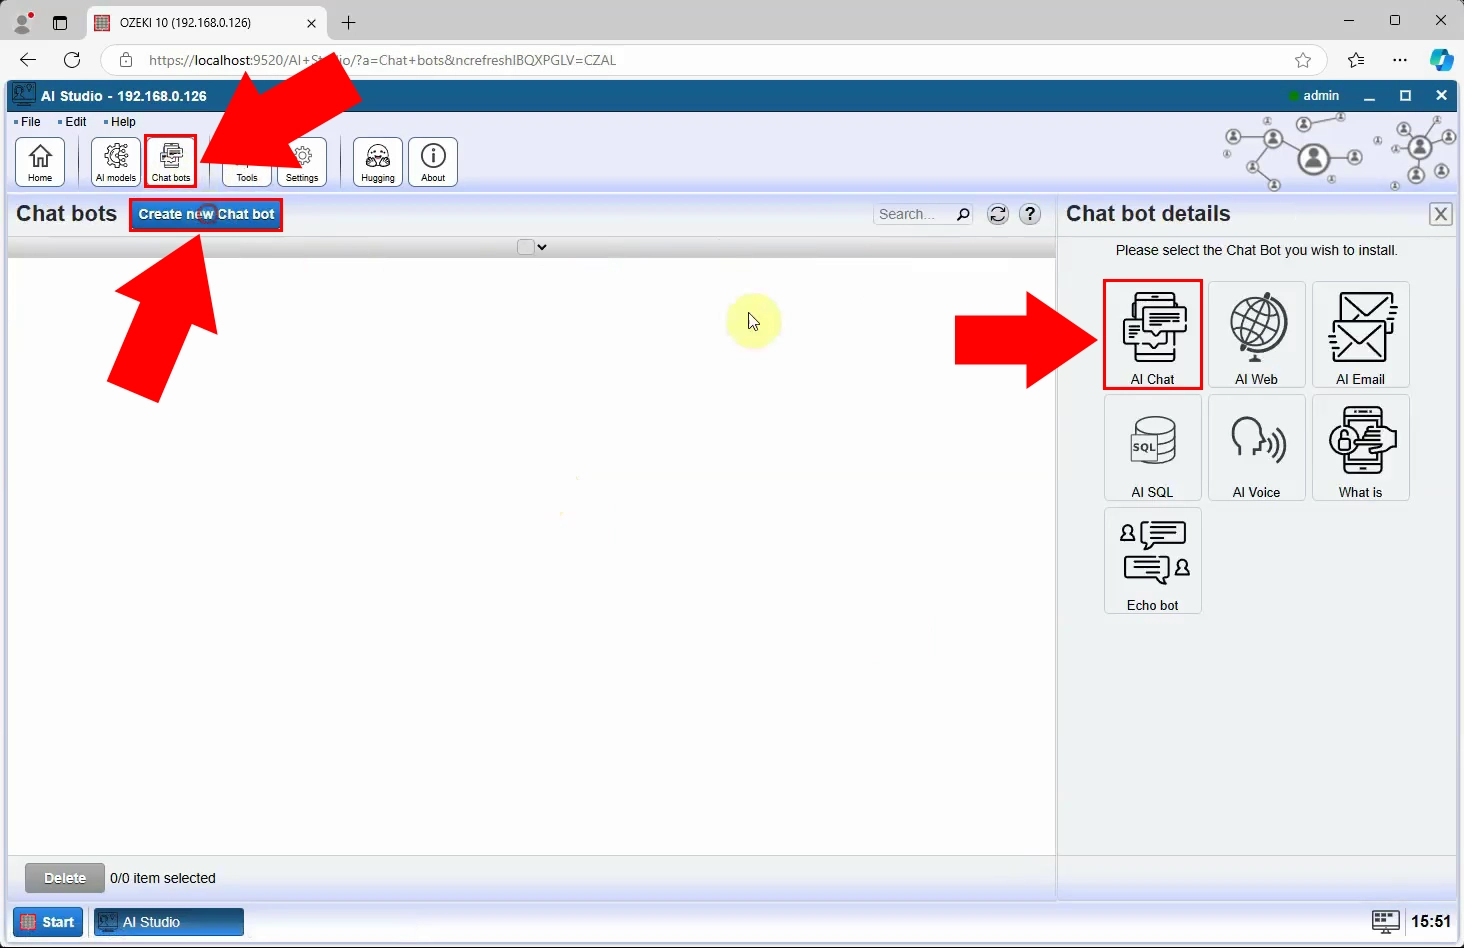
The last step is to create an AI Chat bot. This time, select the Chat bot option on the toolbar. Click the Create new Chat bot button under the toolbar. On the Chat bot details panel, select AI Chat.
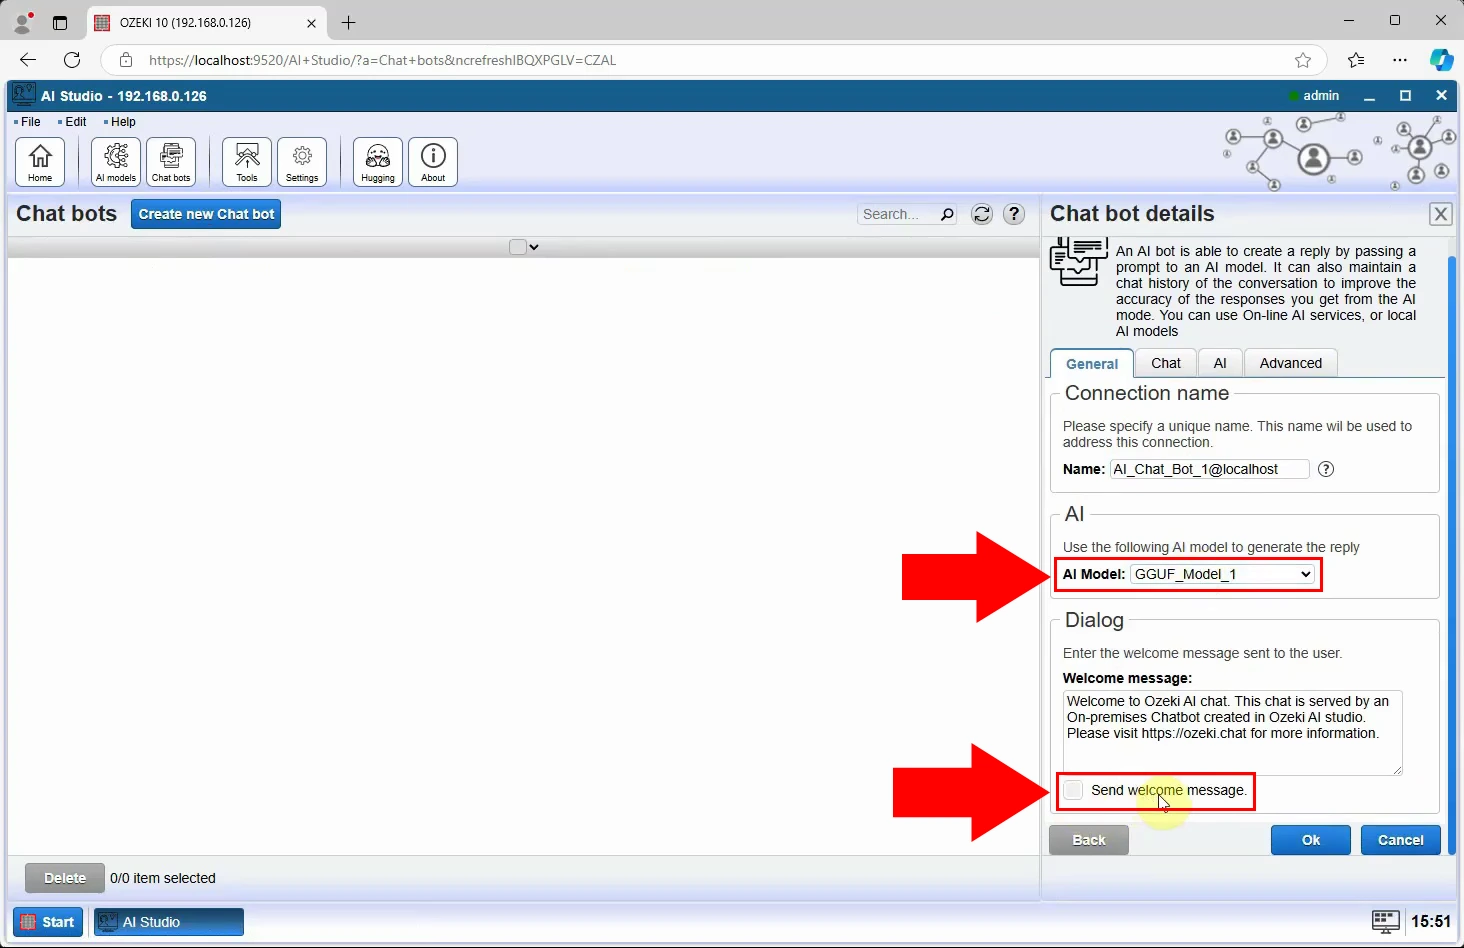
On the panel on the right, select the GGUF model. You can see it highlighted in Figure 16. After that, disable the welcome message by unchecking the Send welcome message checkbox.
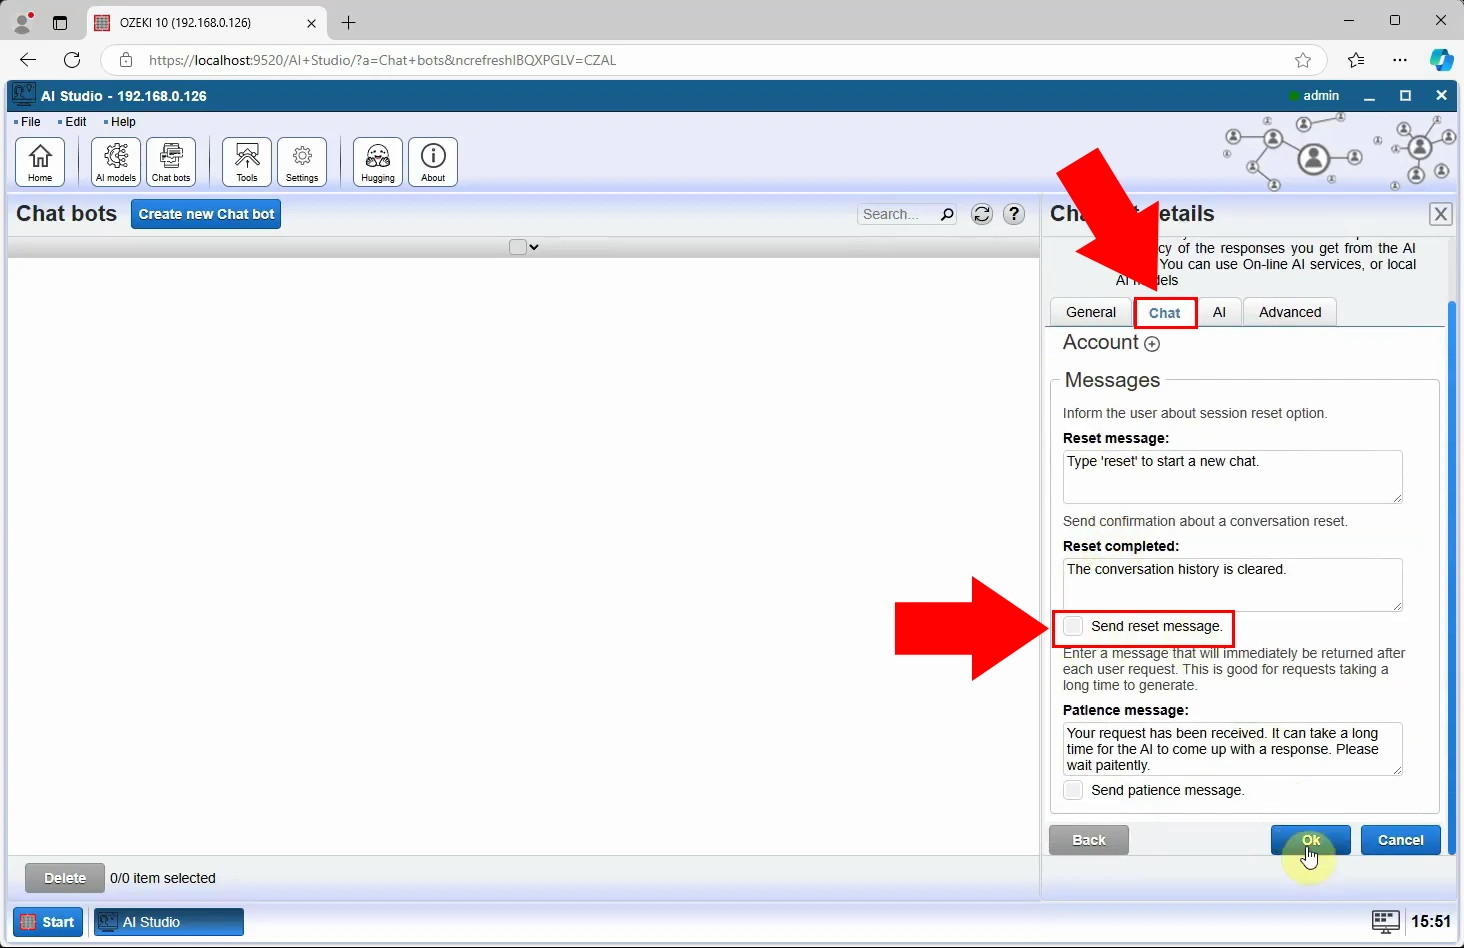
After that, disable the reset message. This is located under the Chat tab, so first, click on it. Once you're done, just uncheck the Send reset message checkbox. Lastly, click the blue Ok button, and your chat bot is sucsessfully set up.
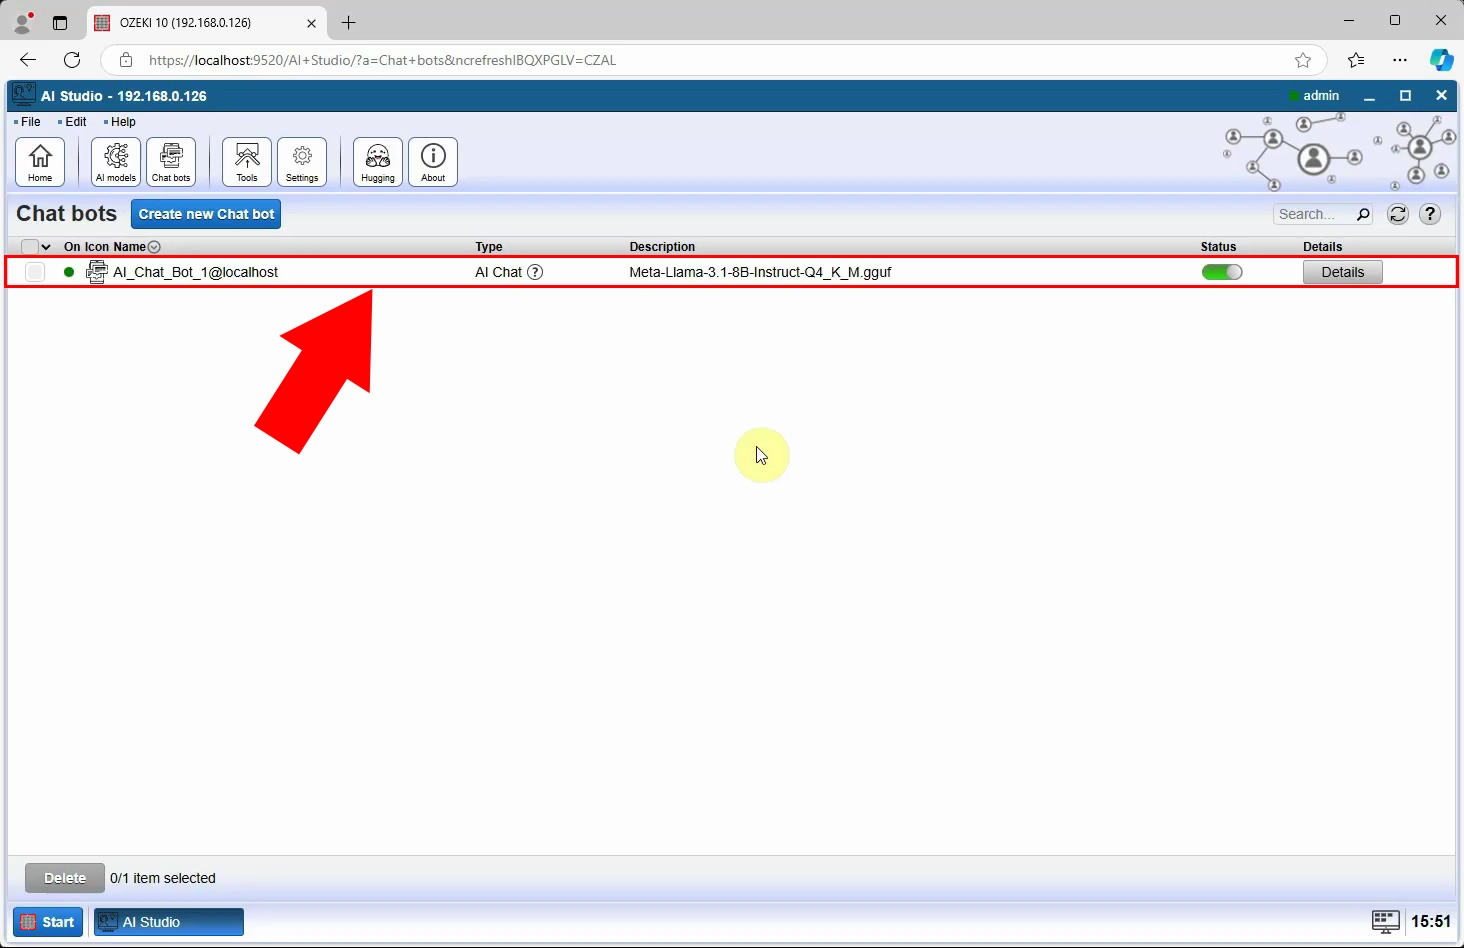
If you’ve completed the previous steps correctly, your chat bot should now appear on the screen (see Figure 19). It’s fully set up, and the only thing left to do is to enable it. Simply click the toggle button under Status.
Create VoIP phone line (Video tutorial)
In this video, you’ll find a detailed tutorial on creating a VoIP phone line using Ozeki Chat Gateway. It begins by showing you how to open Chat Gateway and add a new AI agent. Next, it walks you through installing a VoIP phone connection, setting up SIP settings, and configuring your AI models. You’ll also learn how to connect to a PBX system. The video concludes with instructions on setting up inbound and outbound routes.
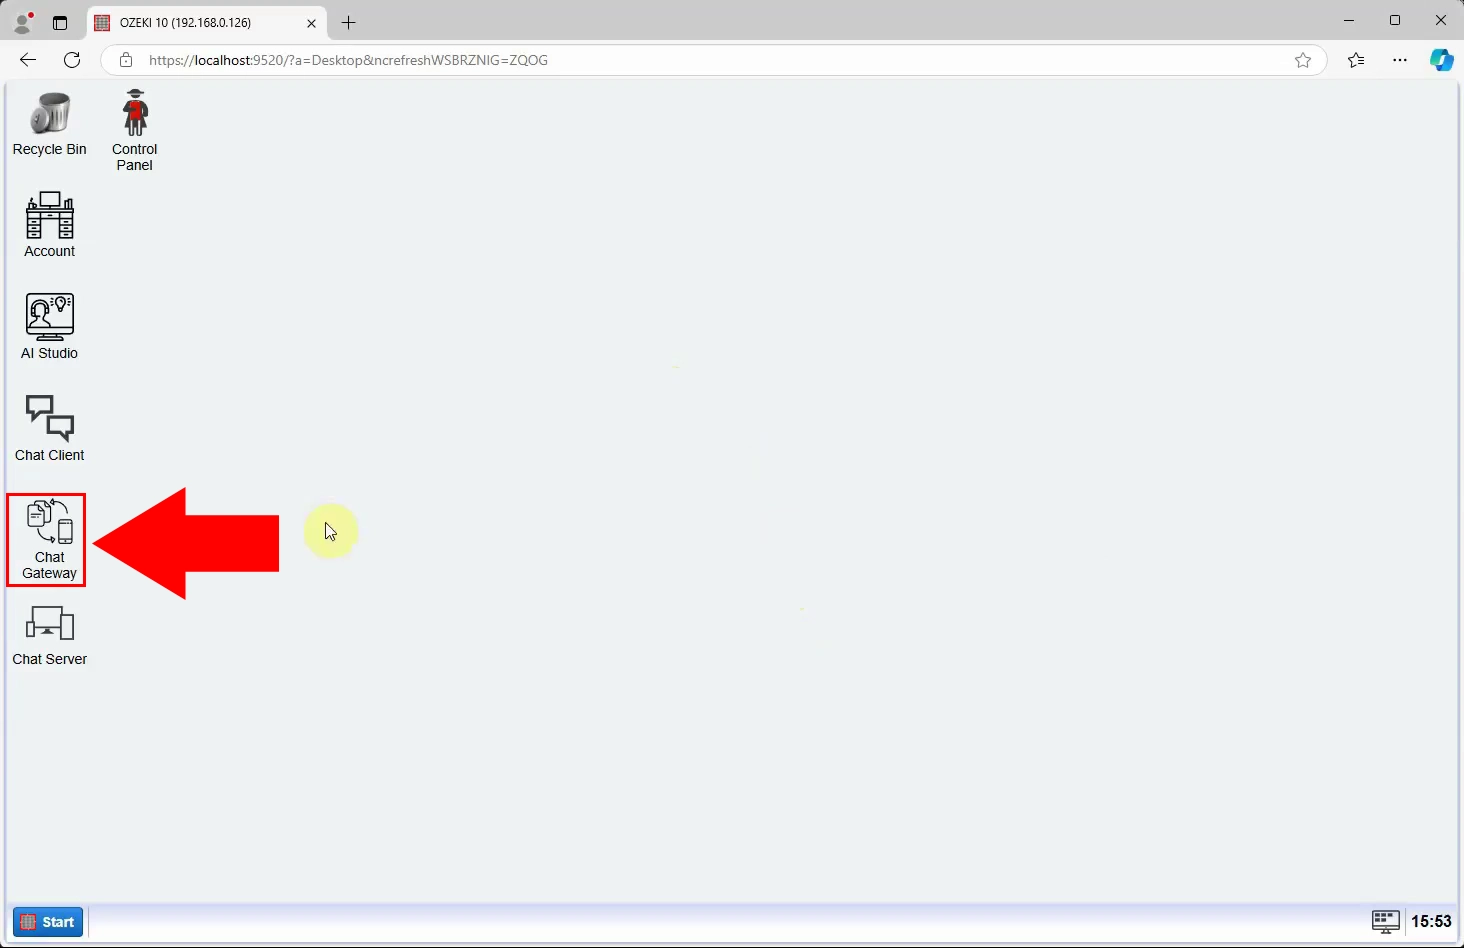
Once you've opened the Ozeki 10 platform, select Chat Gateway on the left, as highlighted in Figure 19.
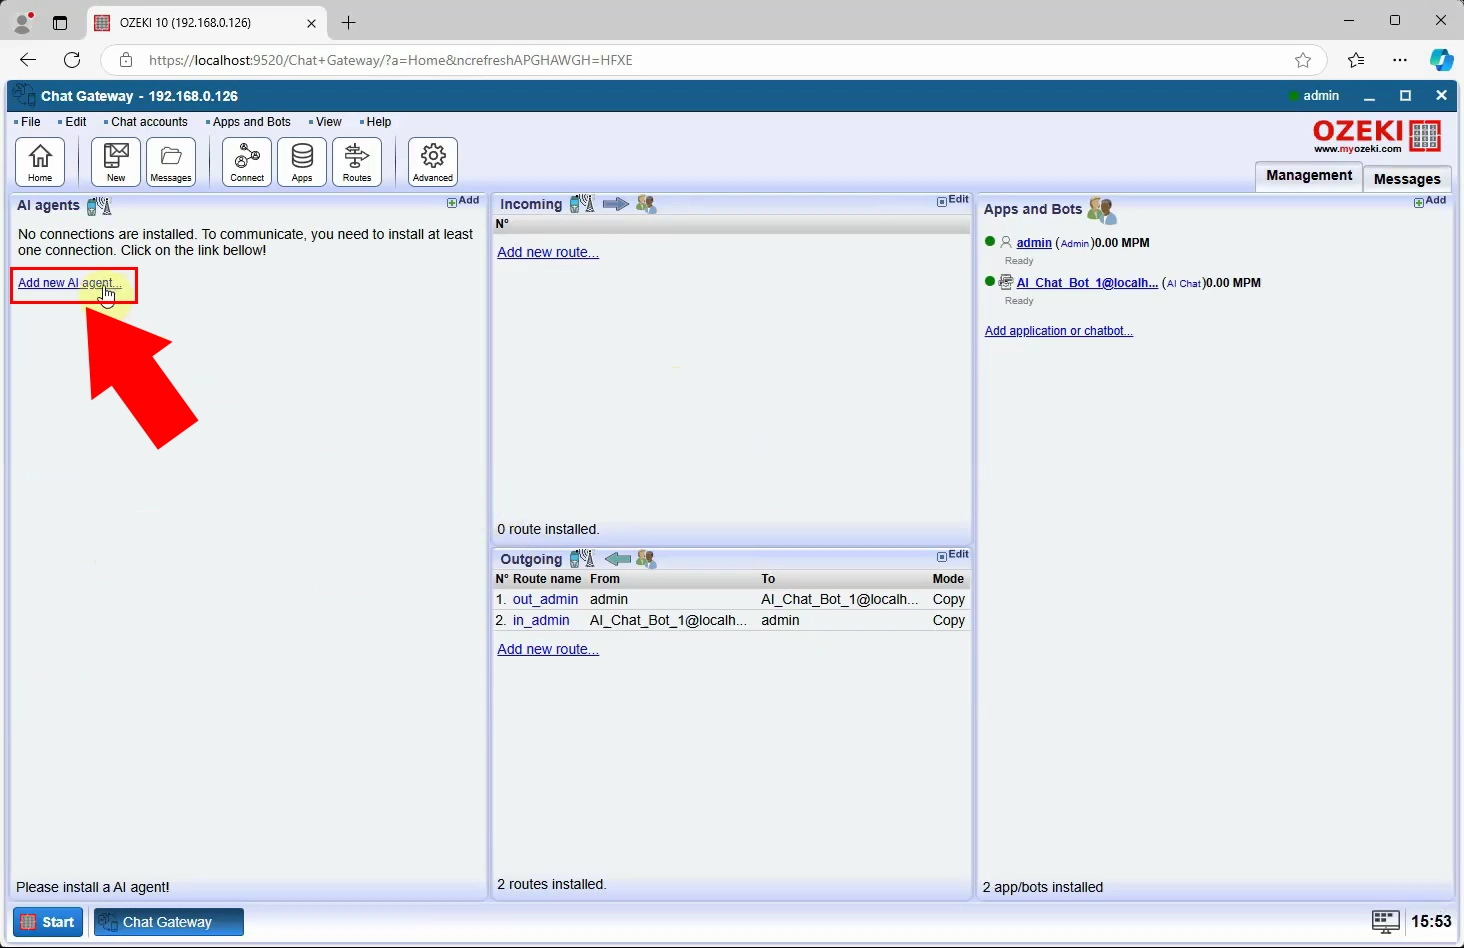
The next step is to add a new AI agent. This is located under the left panel named AI agents (Figure 20). By doing this step the install section will appear.
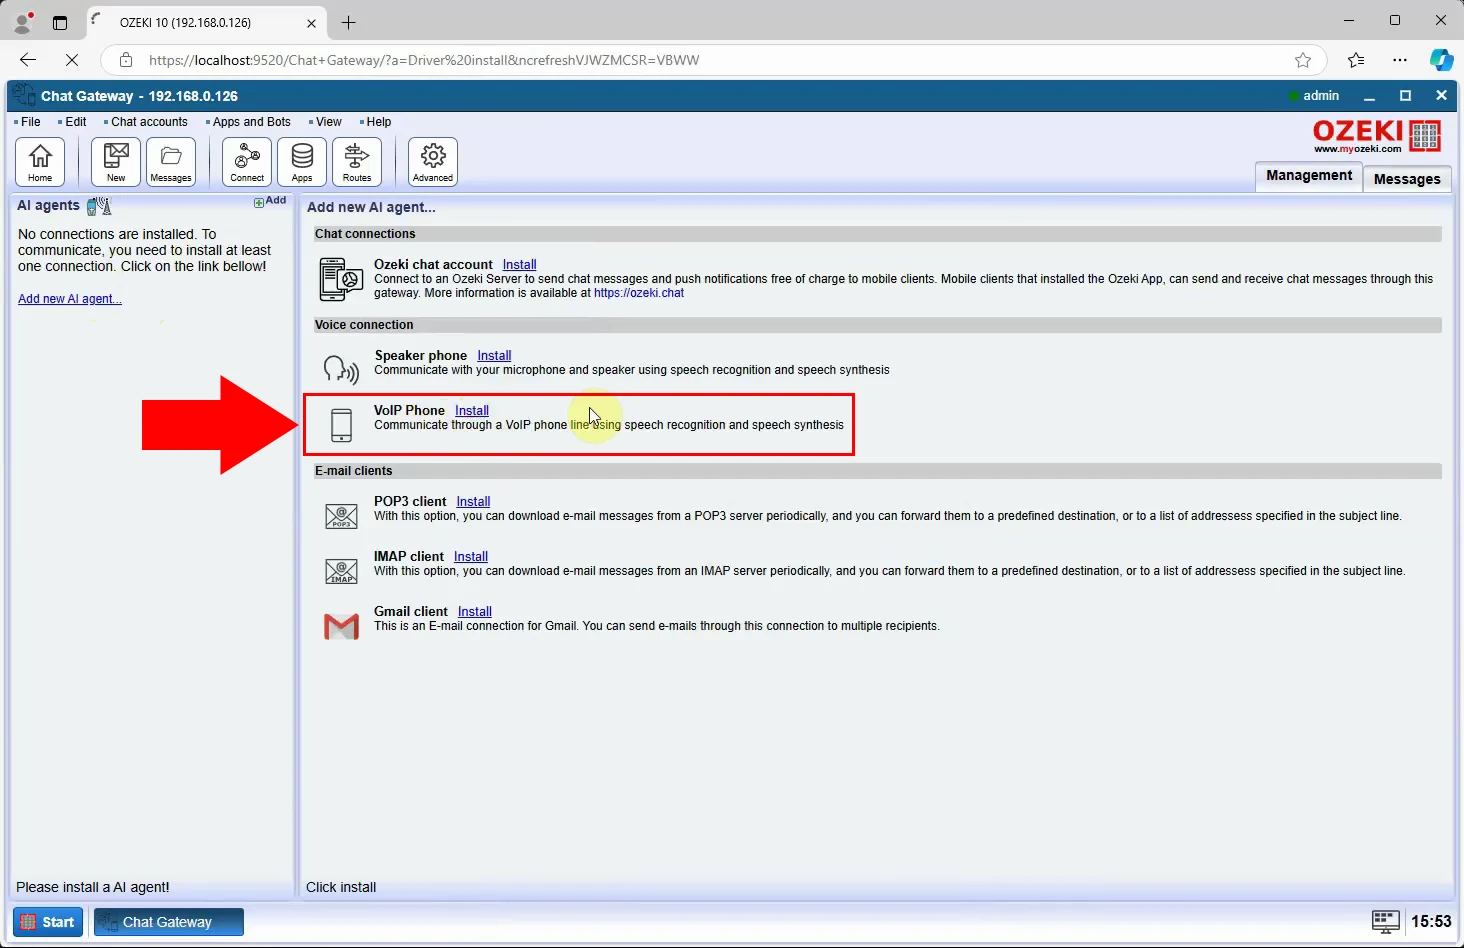
After the last step, you have to select the type of AI agent you want to choose. Once you located it, select VoIP Phone.
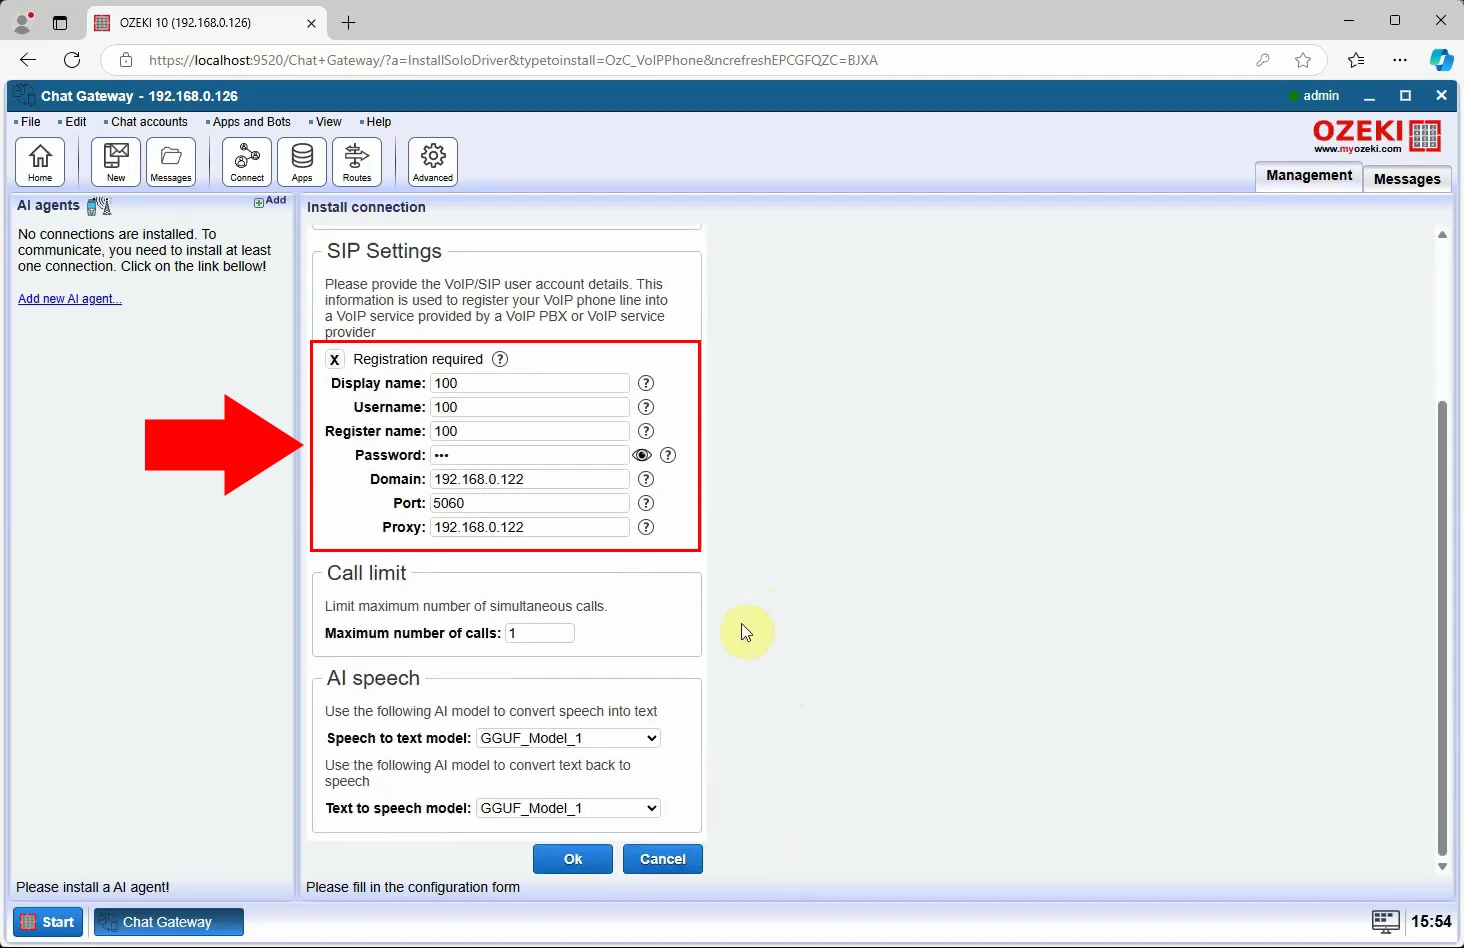
Provide the SIP Settings. You will find the group box under the General tab.
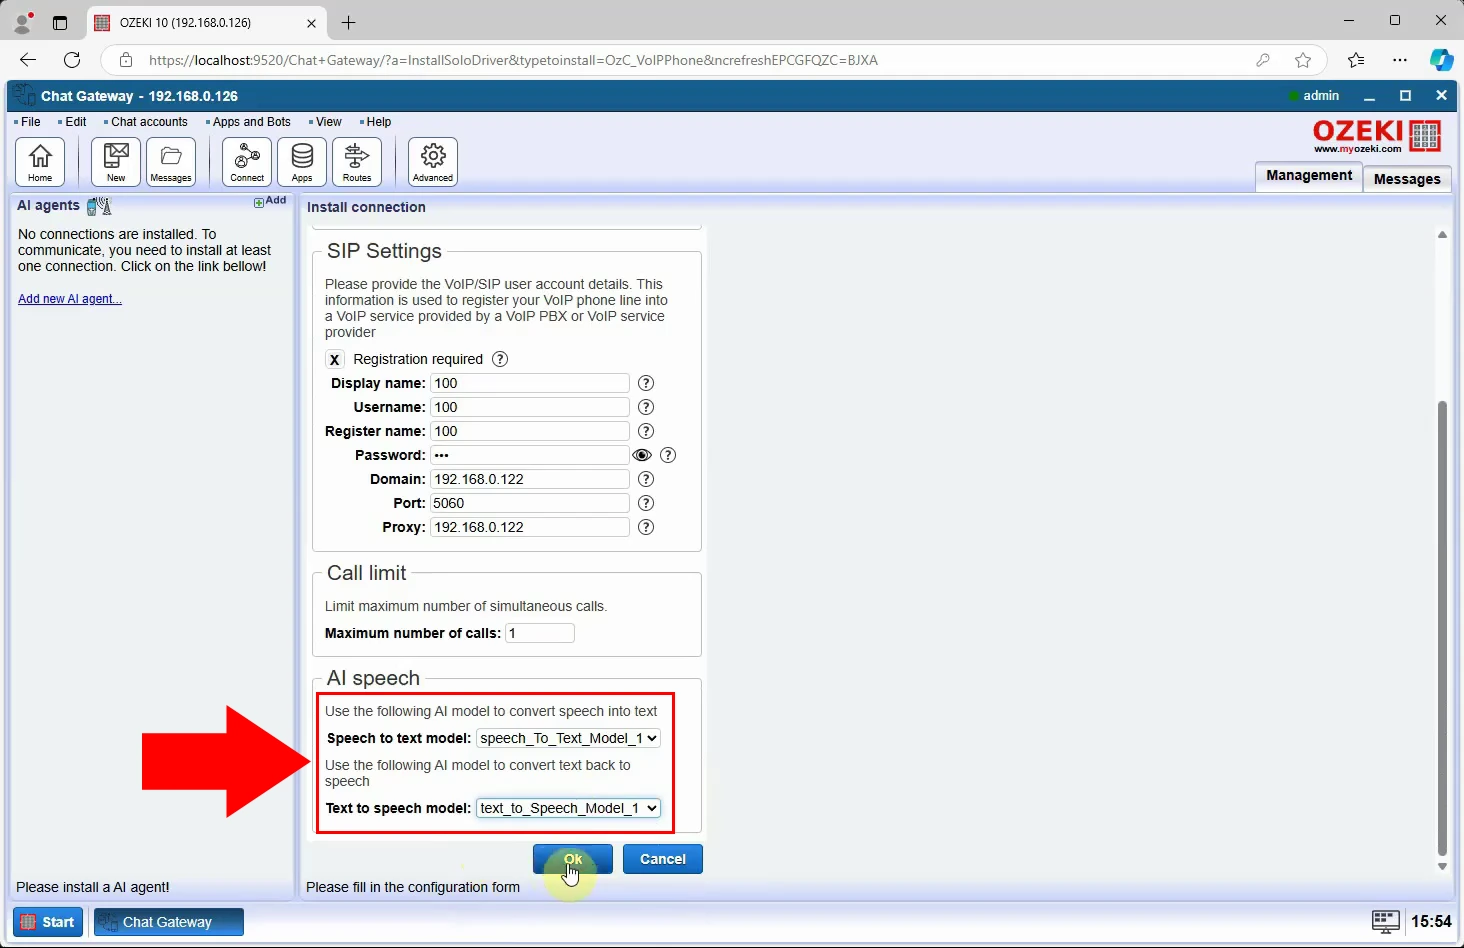
You also need to set your speech-to-text and text-to-speech AI Models. You can do that under the SIP Settings group box. Just use the models you've previously created with Ozeki AI Studio. Once you're done with the configuration, click the blue Ok button. This will redirect you to the log viewer.
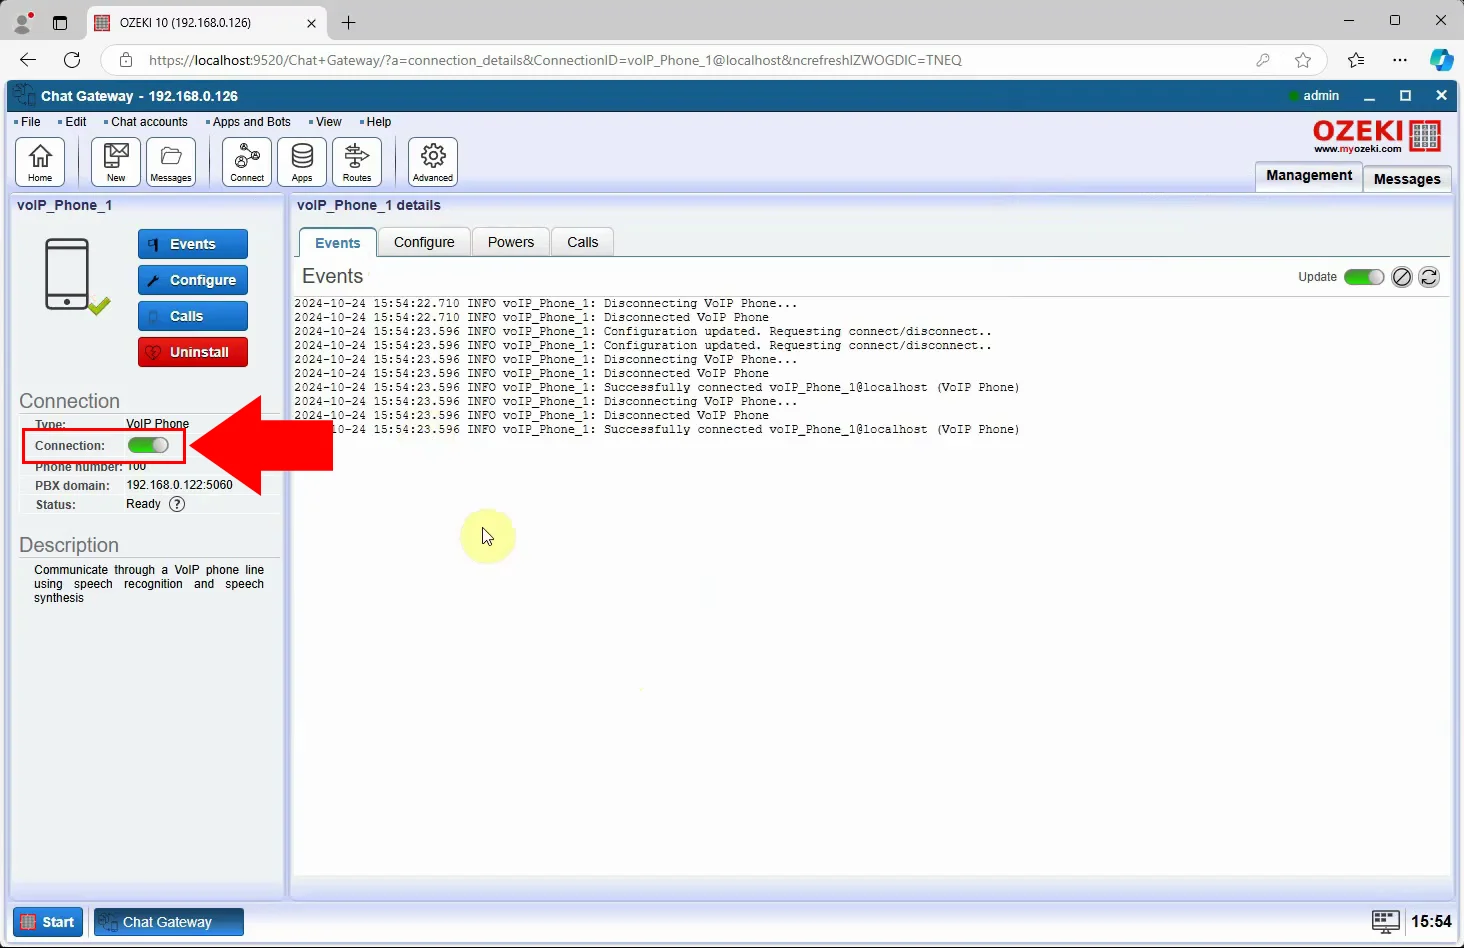
After providing the SIP settings and setting up the AI models, the next step is to connect to PBX. You can find that by pressing the toggle button on the left panel. It's located in the group box called Connection (Figure 24). Once you enabled the toggle, the event logs will be displayed.
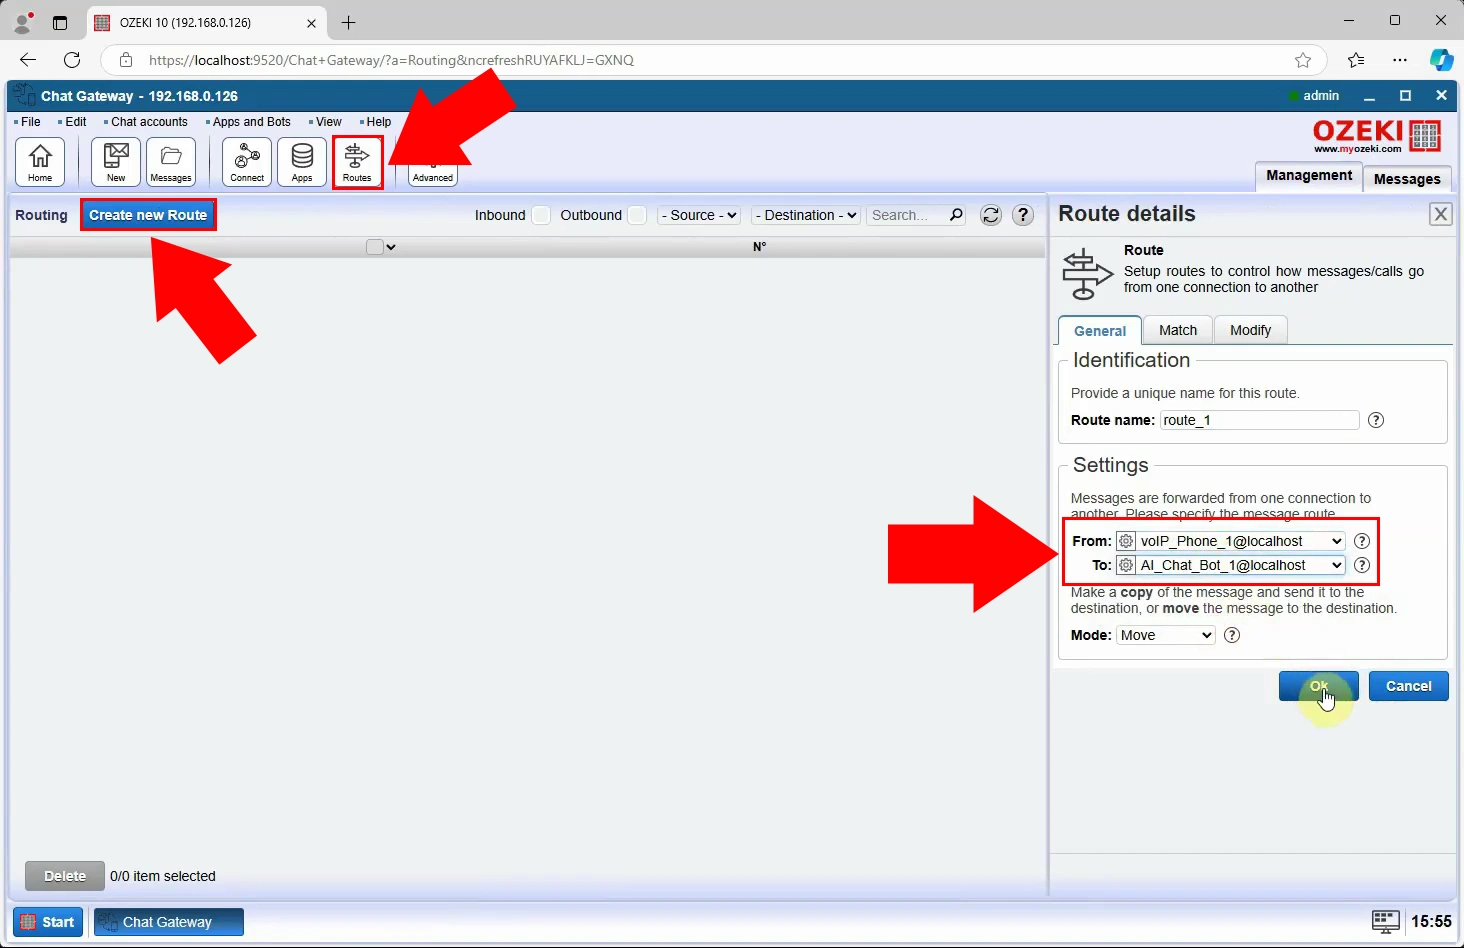
The very last step is to create a new incoming and an outgoing route. To create a new incoming route, select Routes on the toolbar. After that, click the Create new Route button under the toolbar. On the right panel, you can specify the message route. Select the appropriate options shown in Figure 25, then press Ok to create the new incoming route.
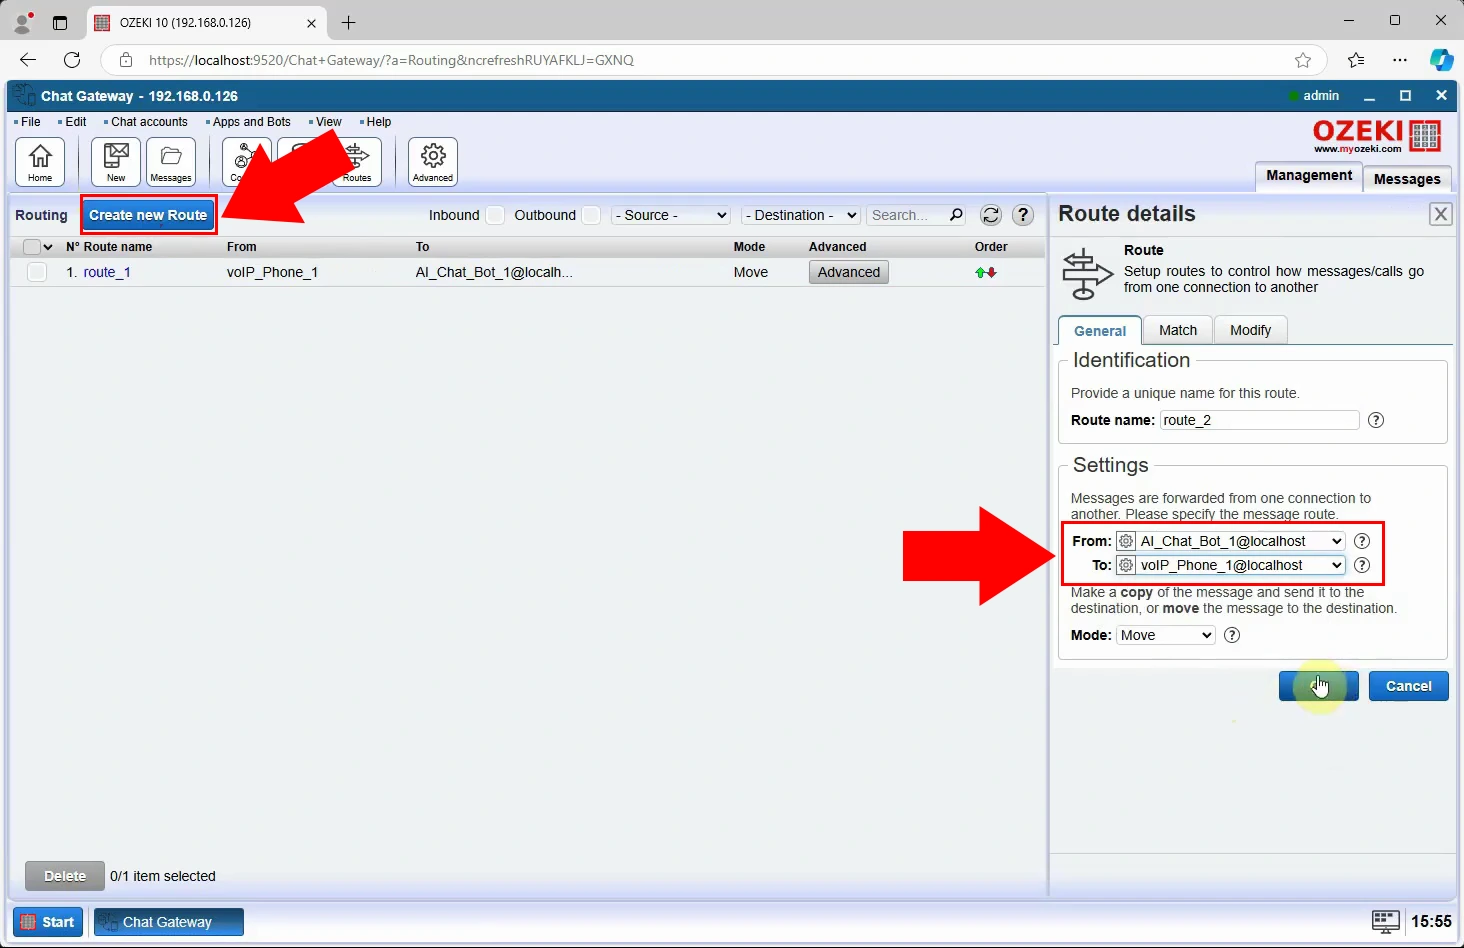
You can create a new outgoing route similar to the incoming route. Again, click the blue Create new Route button, fill the form under the Settings checkbox, and click Ok to create the outgoing route. With this, your VoIP is phone line is set up and ready to use!
Make a test phone call (Video tutorial)
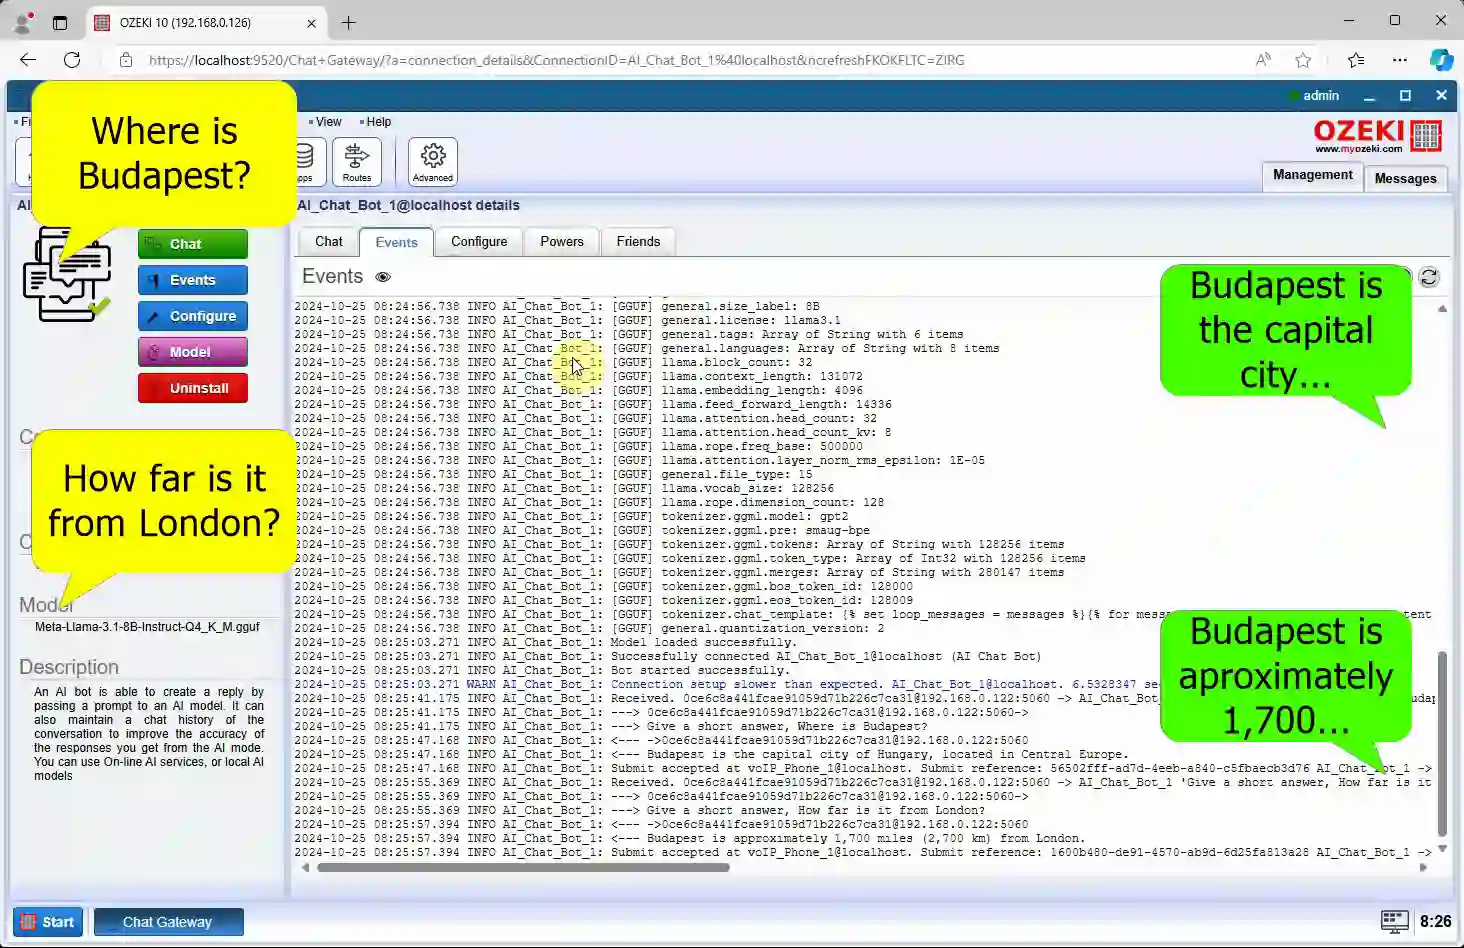
The video below shows how to make a test phone call with Ozeki Chat Gateway. It's is only 47 seconds long, and it shows you the whole process. The video begins with an incoming call, then shows the event log with questions being asked along with the responses of the AI Model.
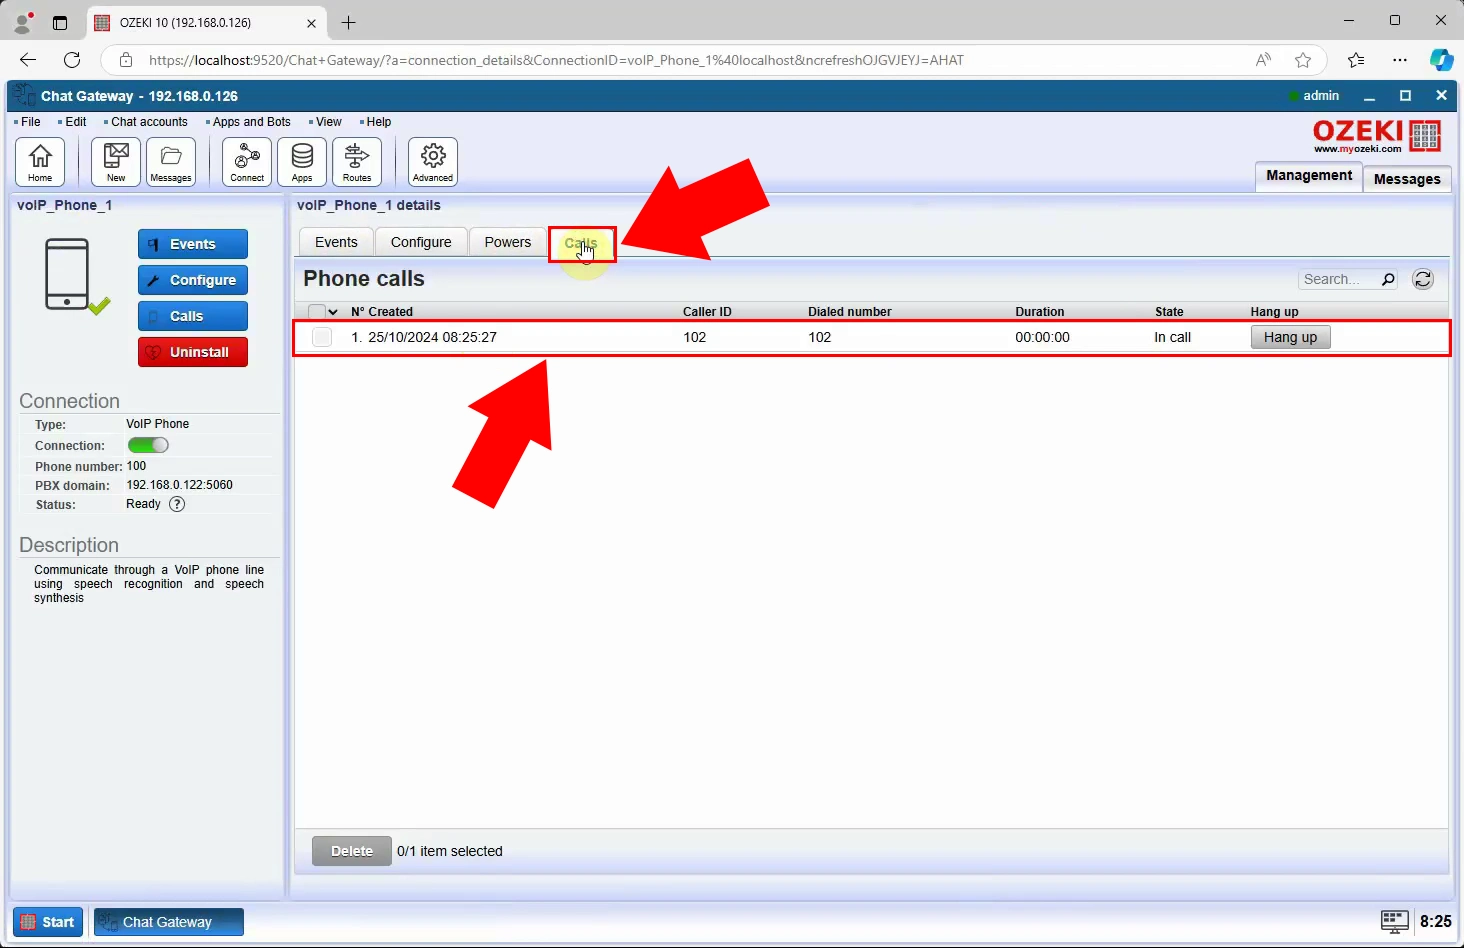
Navigate the Calls tab. You will find the incoming call there, as shown in Figure 27.
Now you can test your AI Model freely. To review event logs, click the Events tab. The log viewer will appear, and the logs will be displayed.
Final thoughts
This guide provided a comprehensive overview of setting up AI models to handle phone calls using Ozeki, taking you through each step from installation of the models to setup the VoIP phone line. By using Ozeki, you benefit from a highly compatible, user-friendly platform that simplifies complex tasks, allowing you to create a powerful AI-driven calling system with minimal effort. Ozeki’s reliable integration with AI models and easy-to-navigate interface make it an ideal choice for businesses looking to automate communication efficiently and scale quickly. If you wish to learn more about Ozeki AI, click the link. Ready to bring your phone system into the future? Hop in and start building with Ozeki today!
More information
- Setup asterisk PBX with 2 extensions
- How to answer phone calls with local AI
- A better text to speech (tts) AI model
- How to make phone calls with deepseek ai

