Ozeki AI Server Quick Start Guide
To start using Ozeki AI sever the best option is to go trough the steps presented in this guide. This guide gives you the download URL you can use to downoad the product, it shows you where you can download AI models from, and gives an insight on how to setup AI chat bots to be used from web browsers or mobile devices.
Quick steps
- Download Ozeki AI Server
- Install Ozeki AI Server
- Open the Graphical User Interface (GUI)
- Download an AI Model
- Setup the AI model in Ozeki
- Create an AI chatbot
- Connect your AI Chat Bot to the chat network
- Chat with your AI chat bot from a webbrowser
- Chat with your AI chat bot from mobile phones
Step 1 - Download Ozeki AI Server
To start you need to download Ozeki AI Server from the following URL:
The following video shows the download procedure.
To download Ozeki AI Server, you can use the download links on this page or you can click on the Download link in the top menu bar of this website (https://ozeki.chat) (Figure 1).
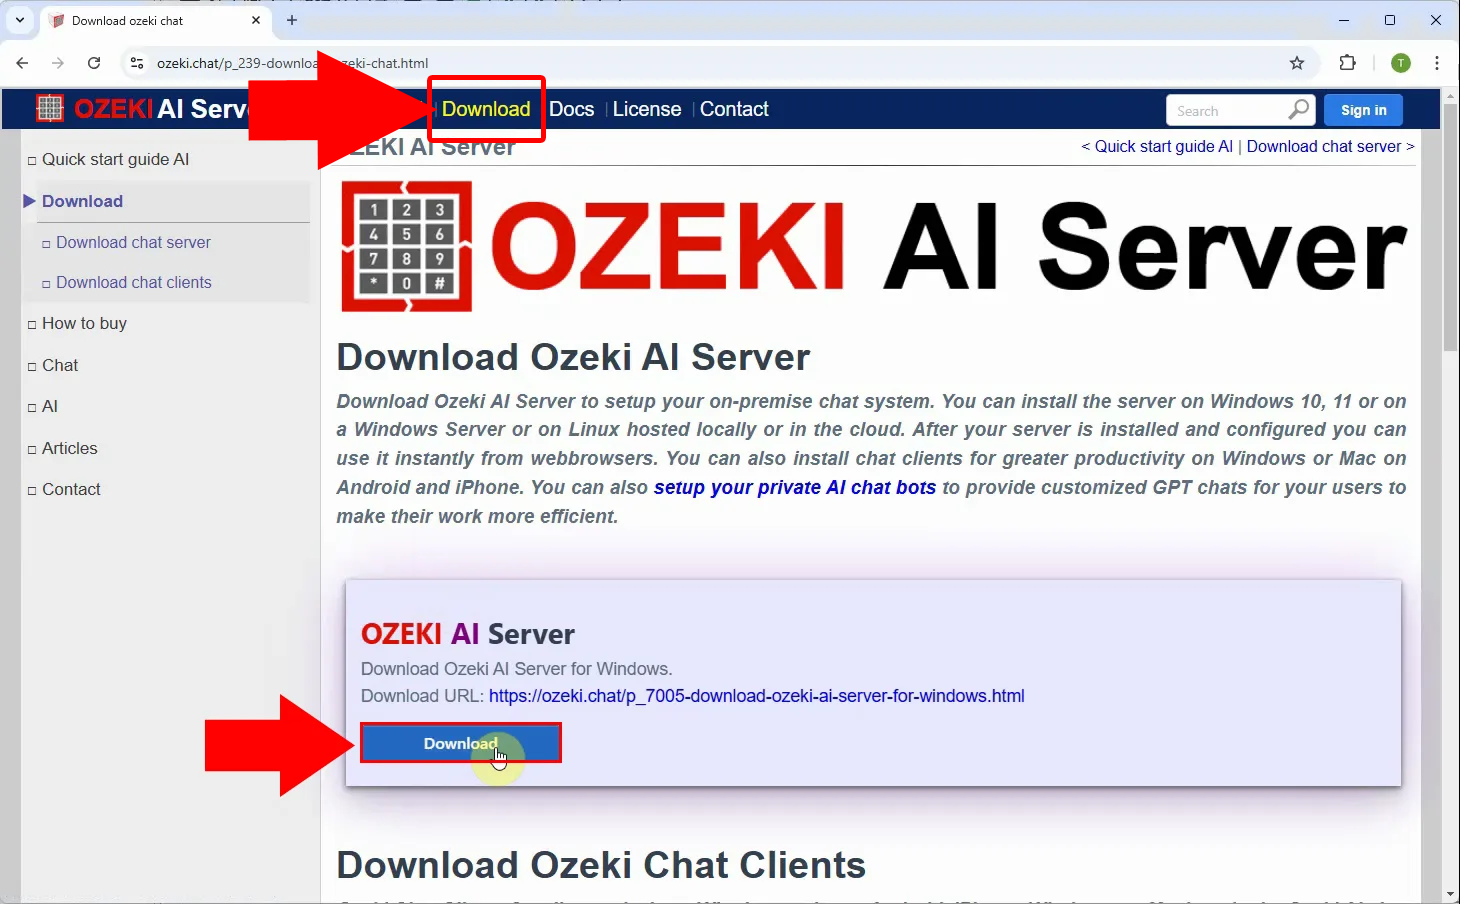
The download link will open the download page. On the download page, you need to select the Ozeki AI server product, and you should click on the blue Download button. Next you should select the latest version and click on the blue link starting with the text OzekiAIServer.
Step 2 - Install Ozeki AI Server
After Ozeki AI Server is downloaded, you will find the installation package in your Downloads folder. The following video takes you through the installation steps. In short the installation is similar to the Installation of a standard Windows application.
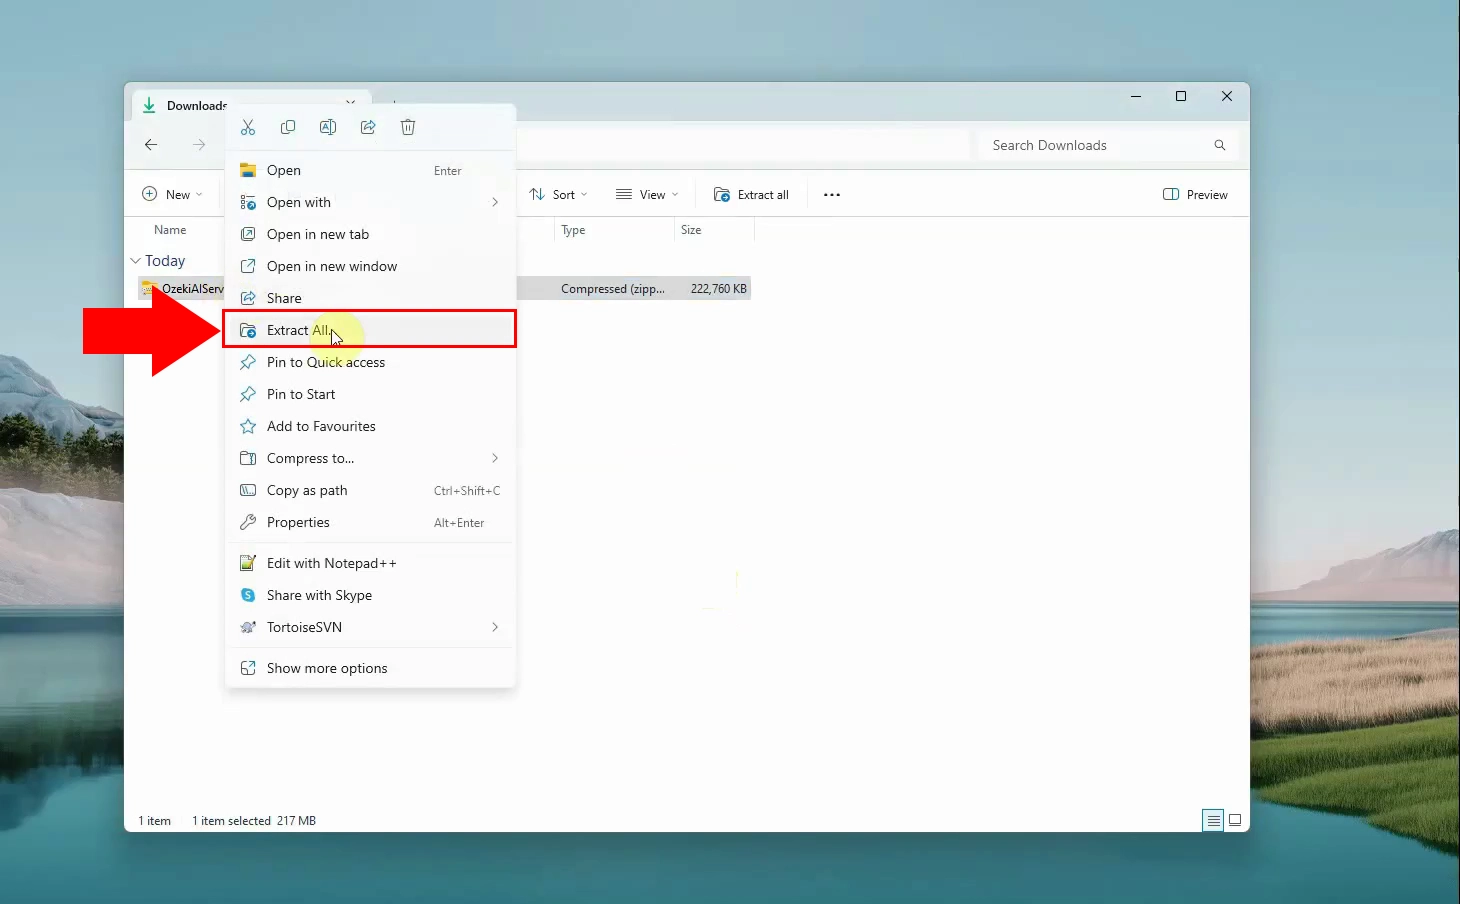
The installation starts by finding the downloaded Ozeki AI Server zip file in your Download folder. Next you need to extract this zip file using the "Extract All" context menu item in Windows explorer. (Figure 2)
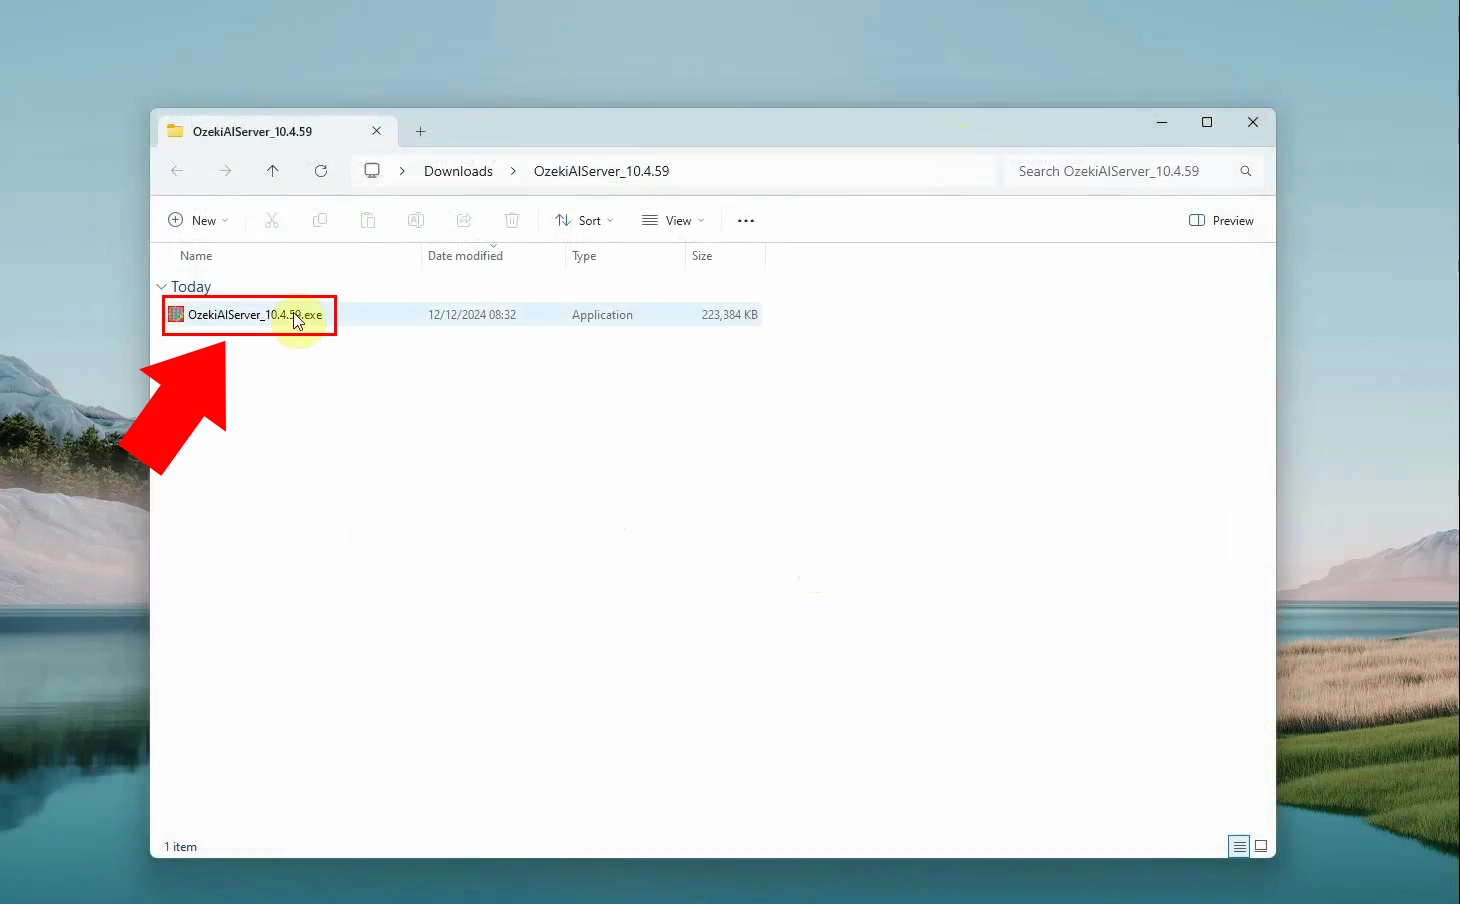
After extracting the zip file, you can run the OzekiAIServer.exe file to start the installation wizard (Figure 3). Note that the version number on your system will look different as Ozeki continuously improves the product.
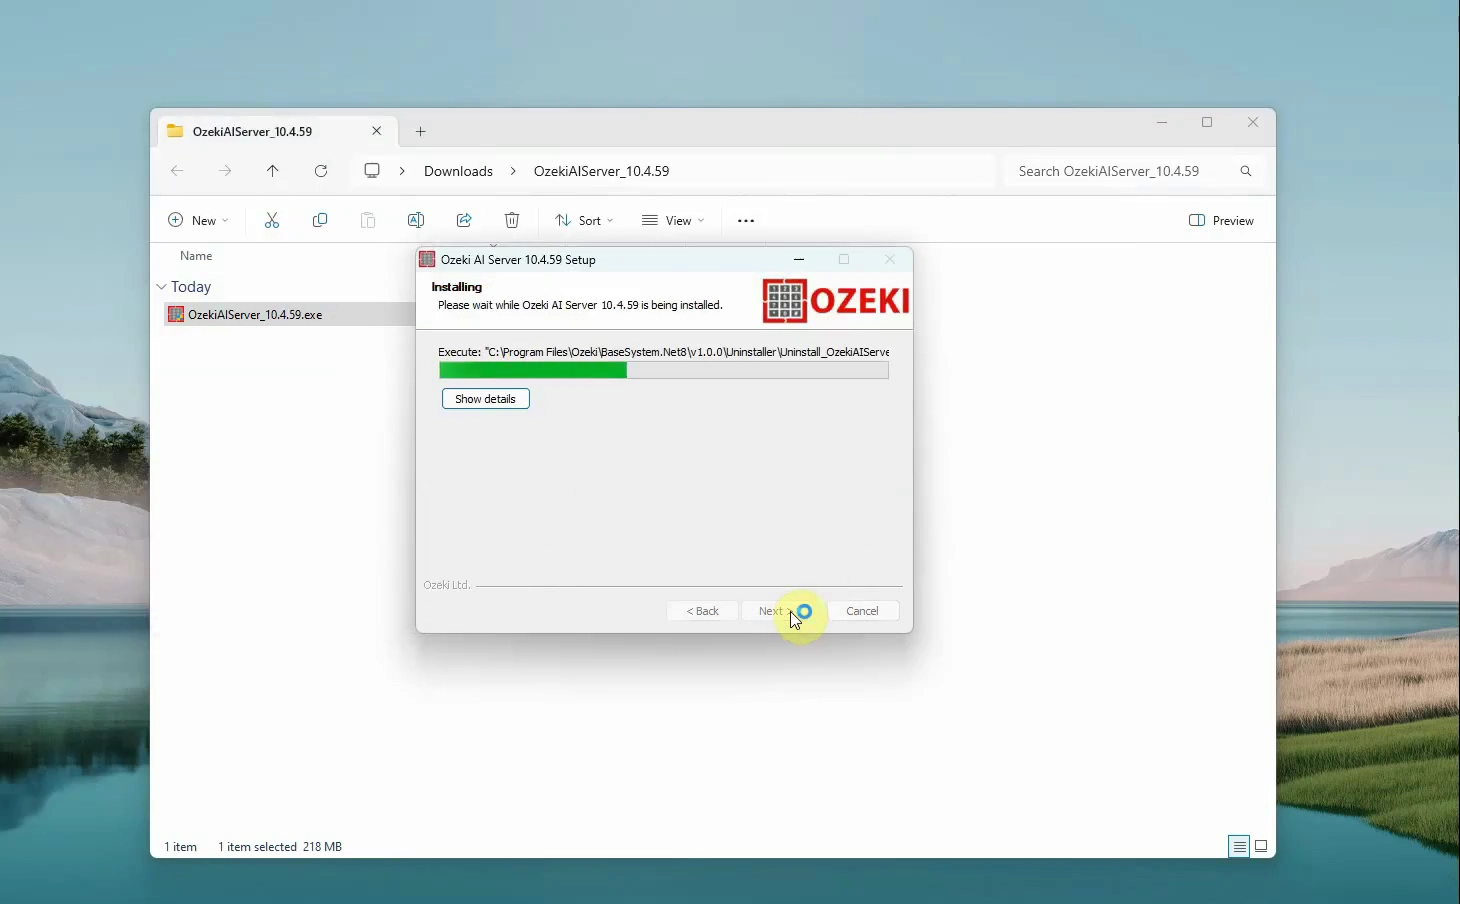
Once the installation is started you need to read and accept the license agreement then proceed with the standard installation steps. If you are unsure, it is a good practice to simply click Next on each form to complete the installation procedure (Figure 4).
Step 3 - Open the Graphical User Interface (GUI)
After the installation is complete, you can open the graphical user interface of Ozeki AI Server by typing the following URL into your browser:
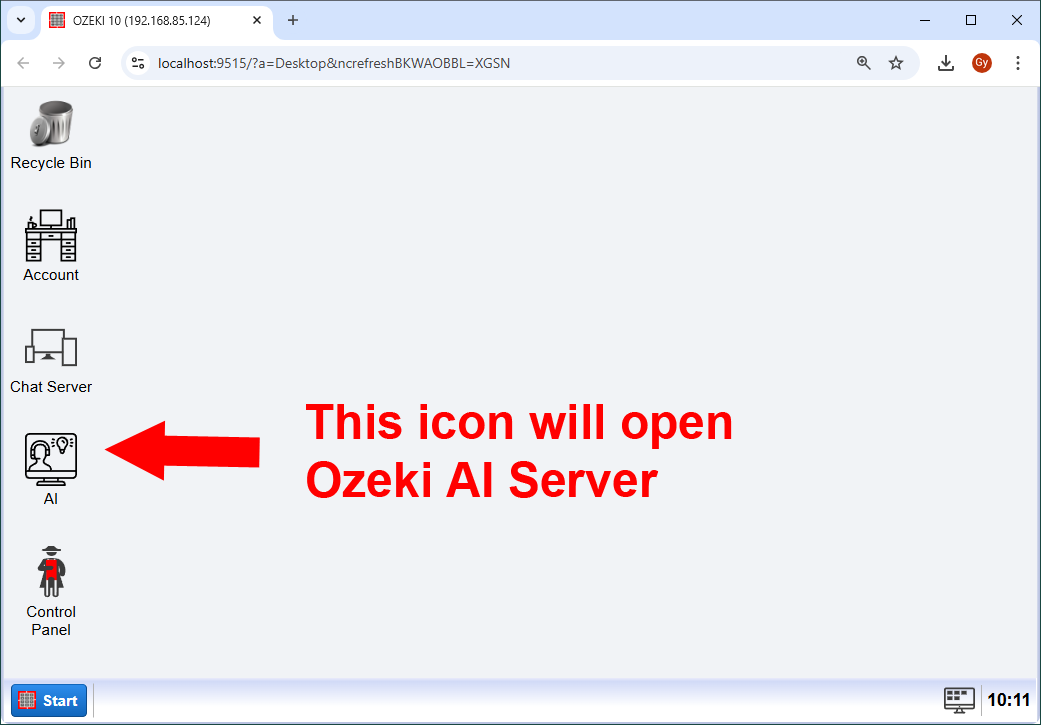
On the graphical user interface you need to click on the AI icon to open the AI app, that allows yout to setup AI models and AI chat bots (Figure 5).
Some common tasks we recommend after installation are:
- Change the admin password to allow remote access.
- If you own a license you should activate your license code
Step 4 - Download an AI Model
Once Ozeki AI Server is installed, the next step is to download an AI model. You can download AI models from the huggingface.co website, where over a million models are available. Check out the following video to see how you can download an AI model.
To start the model download procedure you need to navigate to Huggingface:
If you open Huggingface, you will notice that there are AI models in different format. You should select an AI model in the GGUF format. GGUF stands for GPT-Generated Unified Format. To find GGUF models, simply click the GGUF format filter on the Models page (Figure 6).
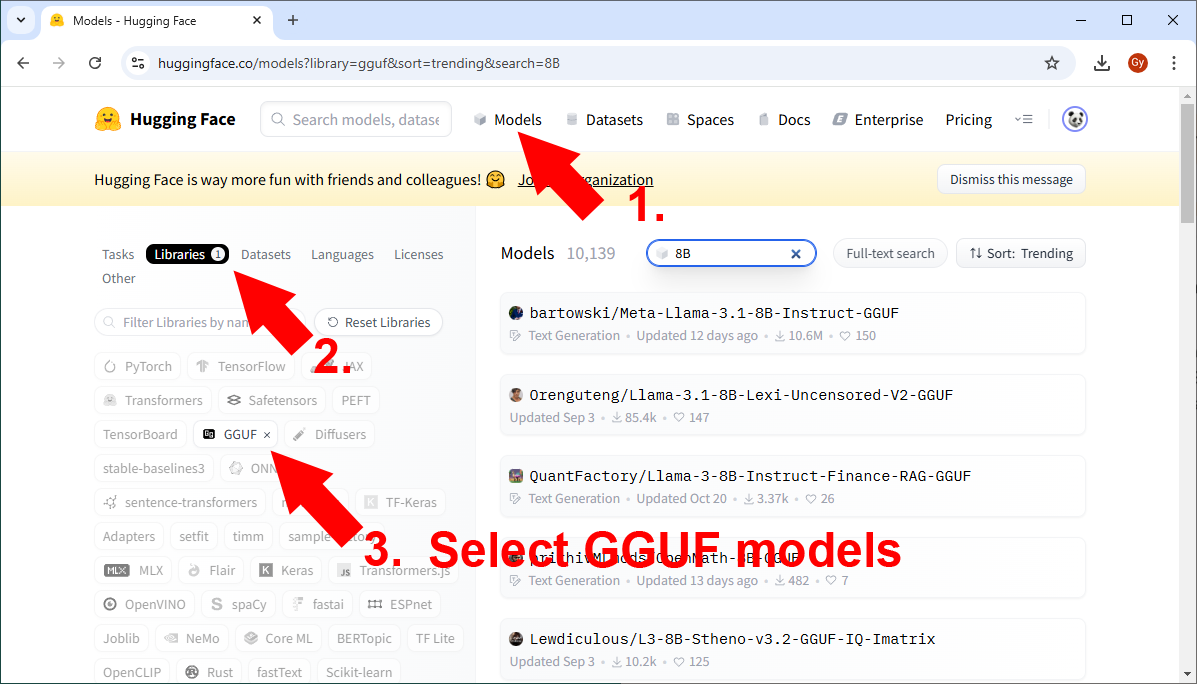
Once the GGUF model filter is set, you can search the model that best fits your requirements. If you are new to AI, it is best to start with LLama-3.1, which is a great Large Language Model (LLM). LLama has different versions. Each version is described by the model size. When you download LLama you need to pick a model size that will fit your AI hardware (your computer).
The most important parameter of your AI hardware is the amount of GPU memory it has. This parameter determines which model is optimal for you. The following table gives you an idea on which model to download.
| GPU | Model size | Download |
| No GPU, or GPU with less then 12GB VRAM | 1B | Llama-3.2-1B-Instruct-GGUF |
| 1 GPU with 12GB VRAM | 8B | Llama-3.1-8B-Instruct-GGUF |
| 2 GPUs with 2x24GB VRAM | 70B | Llama-3.1-Nemotron-70B-Instruct-HF-GGUF |
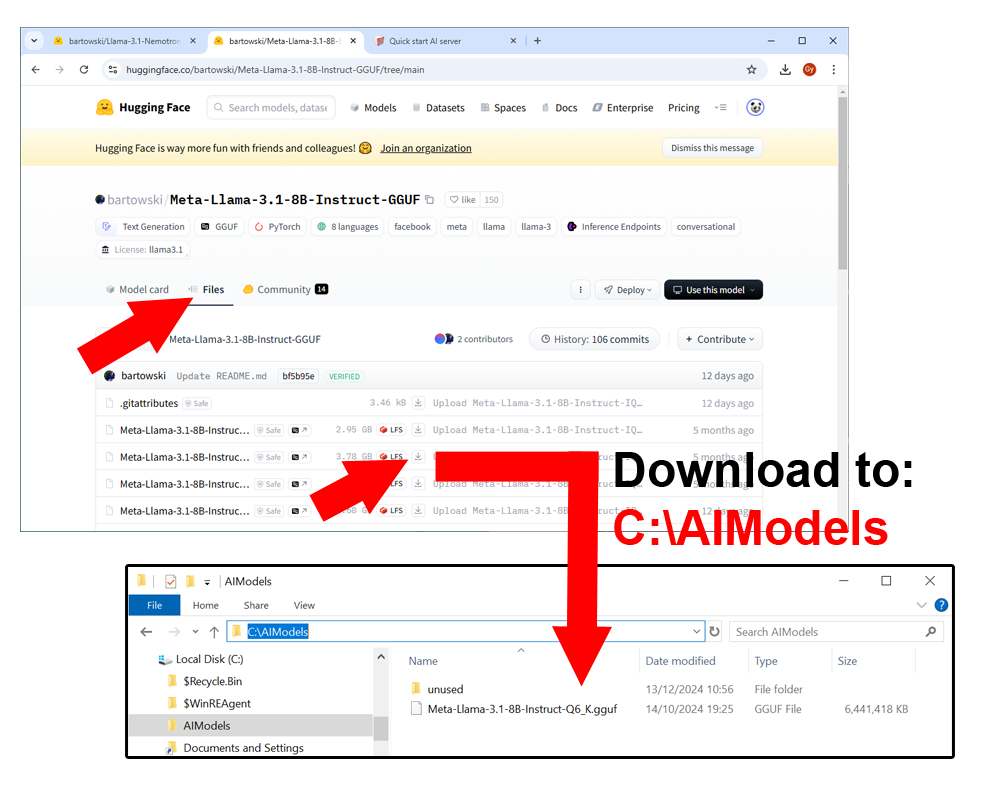
If you are unsure, start with the smallest model. Select the 1 billion (1B) model size. Smaller models are faster and have a better chance to fit into your computer's video memory (GPU VRAM). If you have a very powerful system with lots of GPU RAM, select a larger model. Once you have decided which models to use you should save the model file to C:\AIModels on your computer (Figure 7).
C:\AIModels
Save the downloaded model to your C:\AIModels directory.
To learn more about AI model selection and downloads, click on the following button:
Step 5 - Setup the AI model in Ozeki
Once the AI model is downloaded, you are ready to set it up in Ozeki AI Server. Check out the folowing 30 second video to see how a model can be configured in Ozeki AI server.
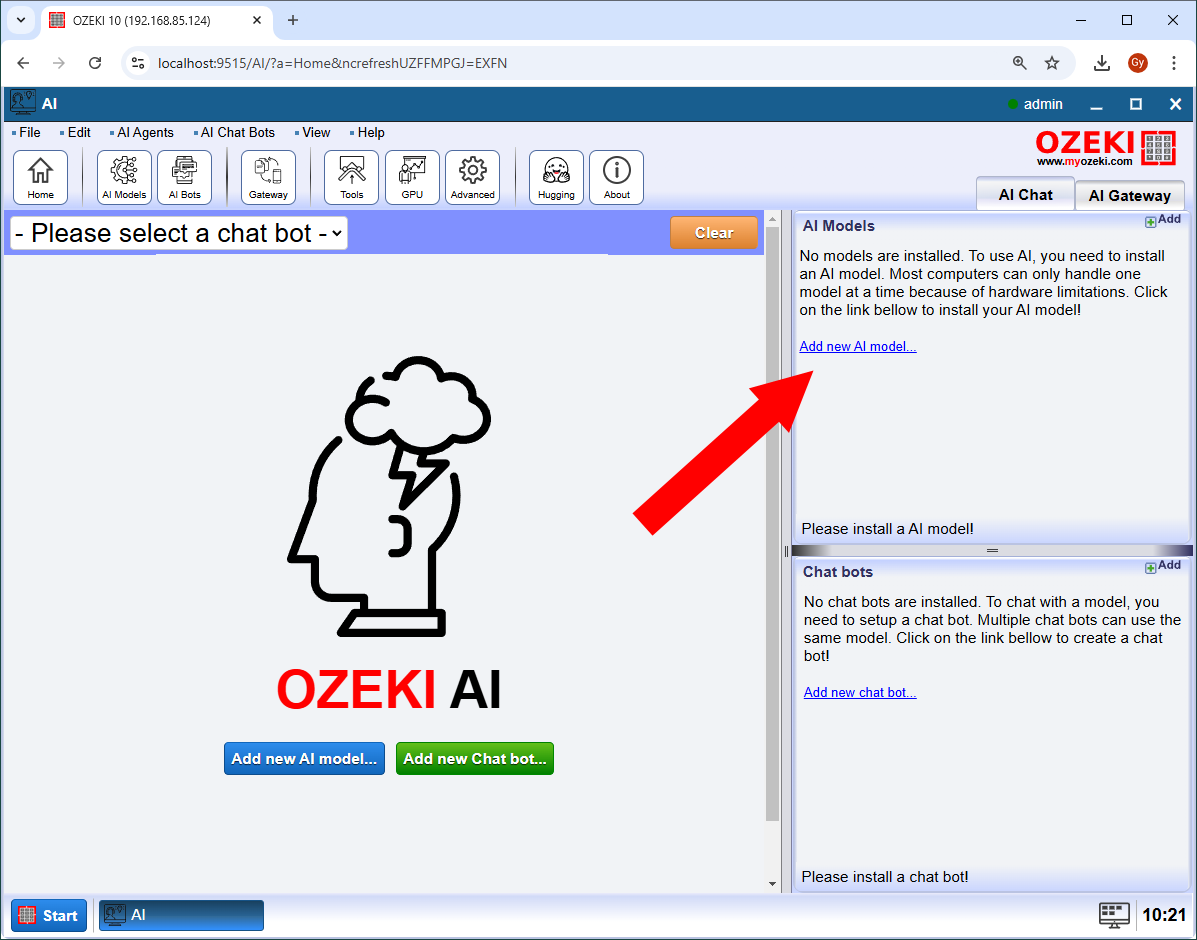
In short, you need to click on the "Add new AI model" link in the home page of the AI app (Figure 8) to start the installation.
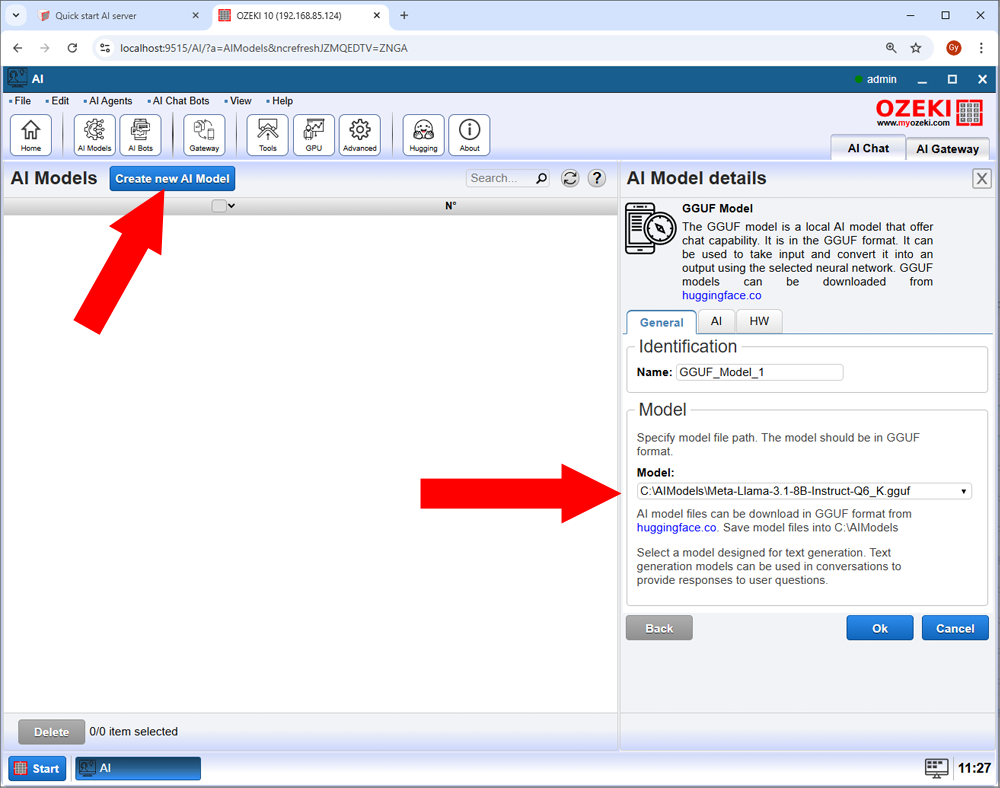
Then click on the blue "Create new AI Model" button in the top, and select the AI model from the combo box on the installation form. If you have saved your model into the C:\AIModels directory, your model will appear as a selectable option. If you have saved your model in a different location, you can enter the full path into the combo box (Figure 9).
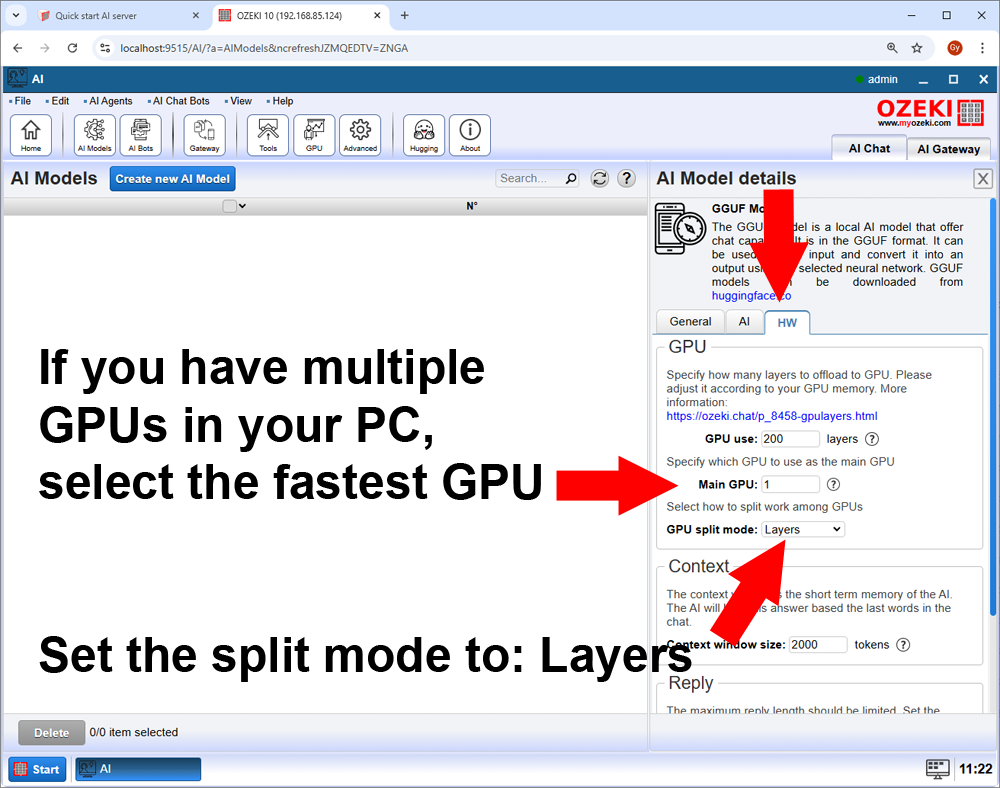
If you have a system with multiple GPUs, click on the HW tab, and set the main GPU option to the fastest GPU and select Layers for the GPU split mode.
Step 6 - Create an AI chatbot
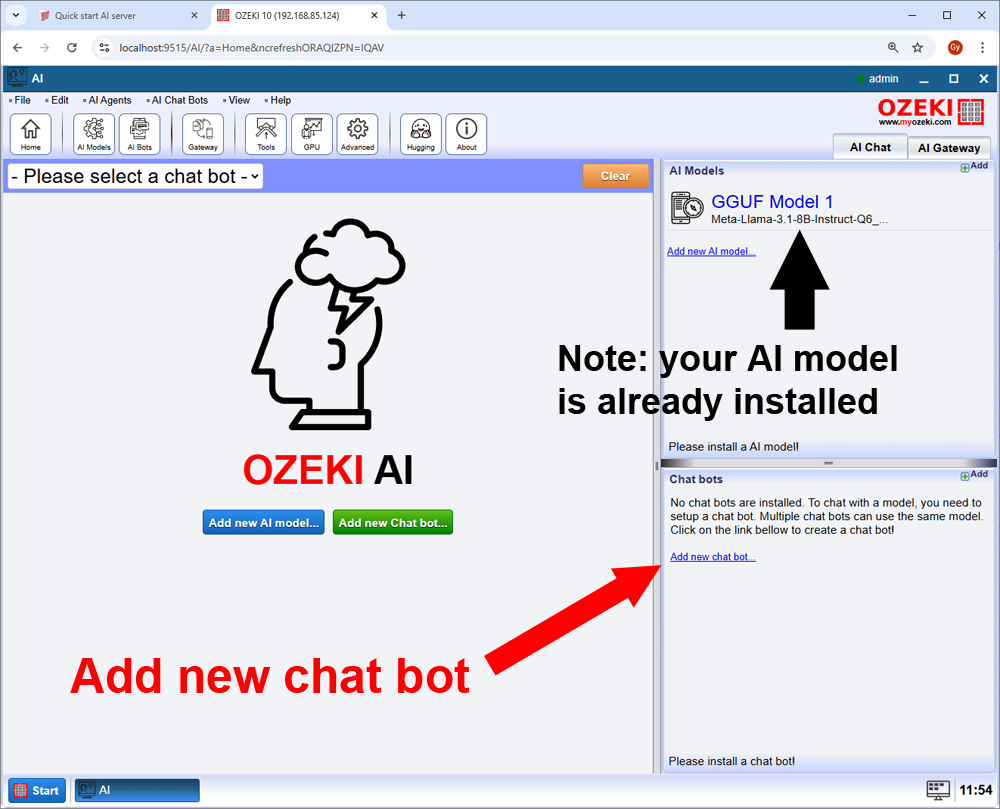
Once your model is setup and ready, all you need to do to use it is to create an AI chatbot. This step is very easy. As the following video demonstrates, you simply need to click on Add now chat bot and select the model you have already installed.
Chat bots are used to manage chat sessions, and they are the tool to provid initial prompts and instructions to the AI model. They can also be used to customize user prompts before they are executed by the model. Multiple chat bots can be installed with different instructions to use the AI model. It is a common practice to have one chatbot for sales, one for technical support and one for marketing configured with differenct system pompts. To install a chatbot click on the "Add new chat bot" link in the home page or on the "AI bots" button in the toolbar.
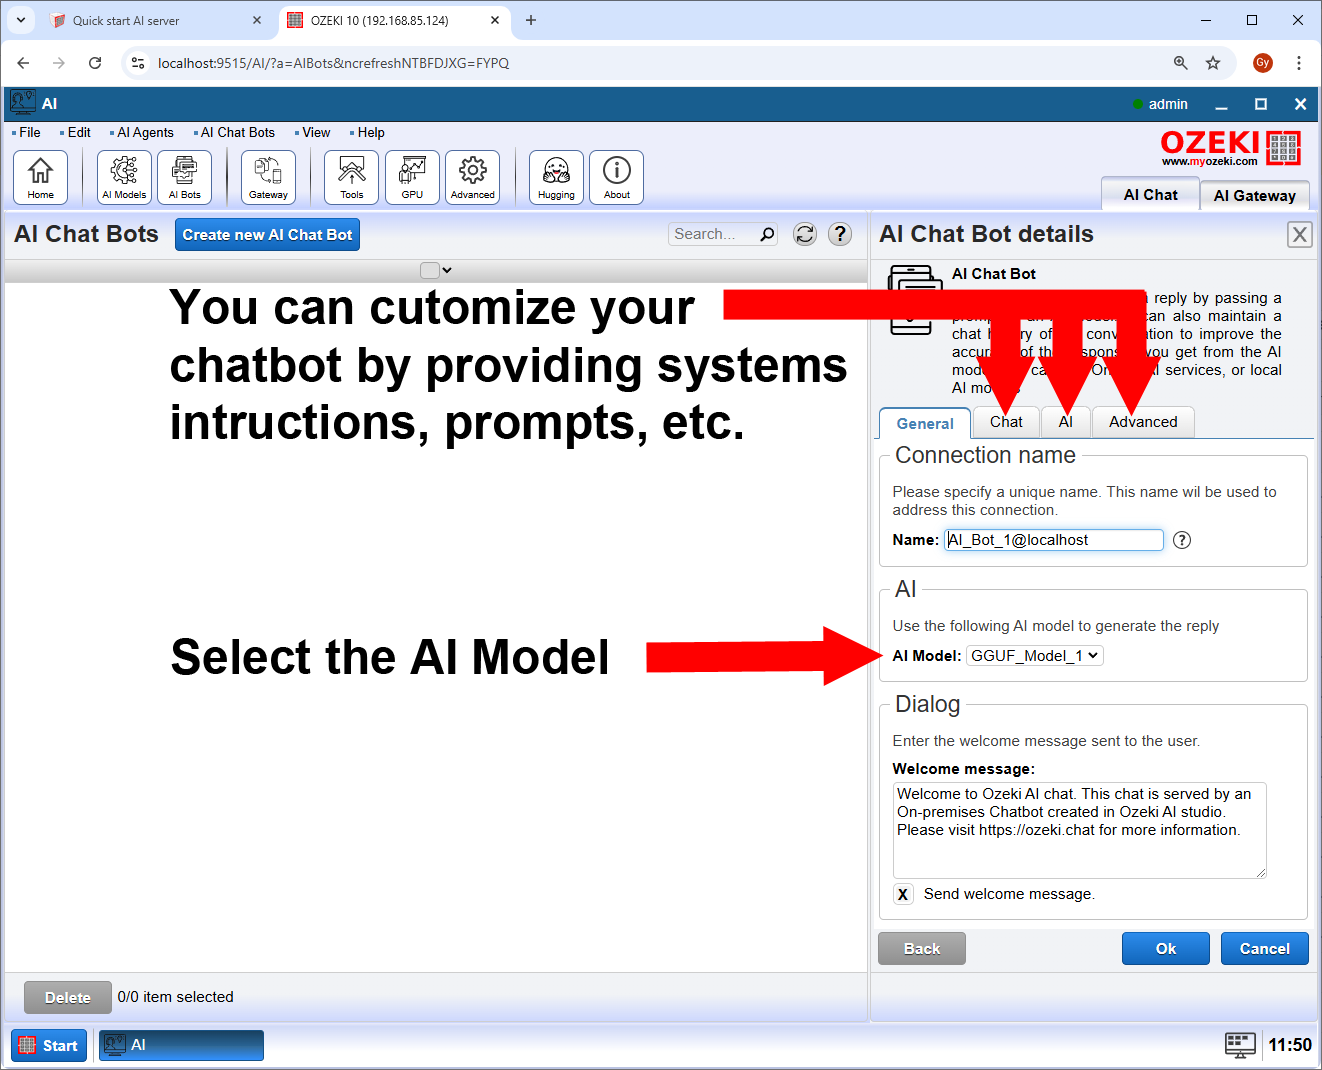
During the chat bot installation procedure you can use the Chat/AI/Advanced tabs to setup system prompts and behavior patterns for the AI.
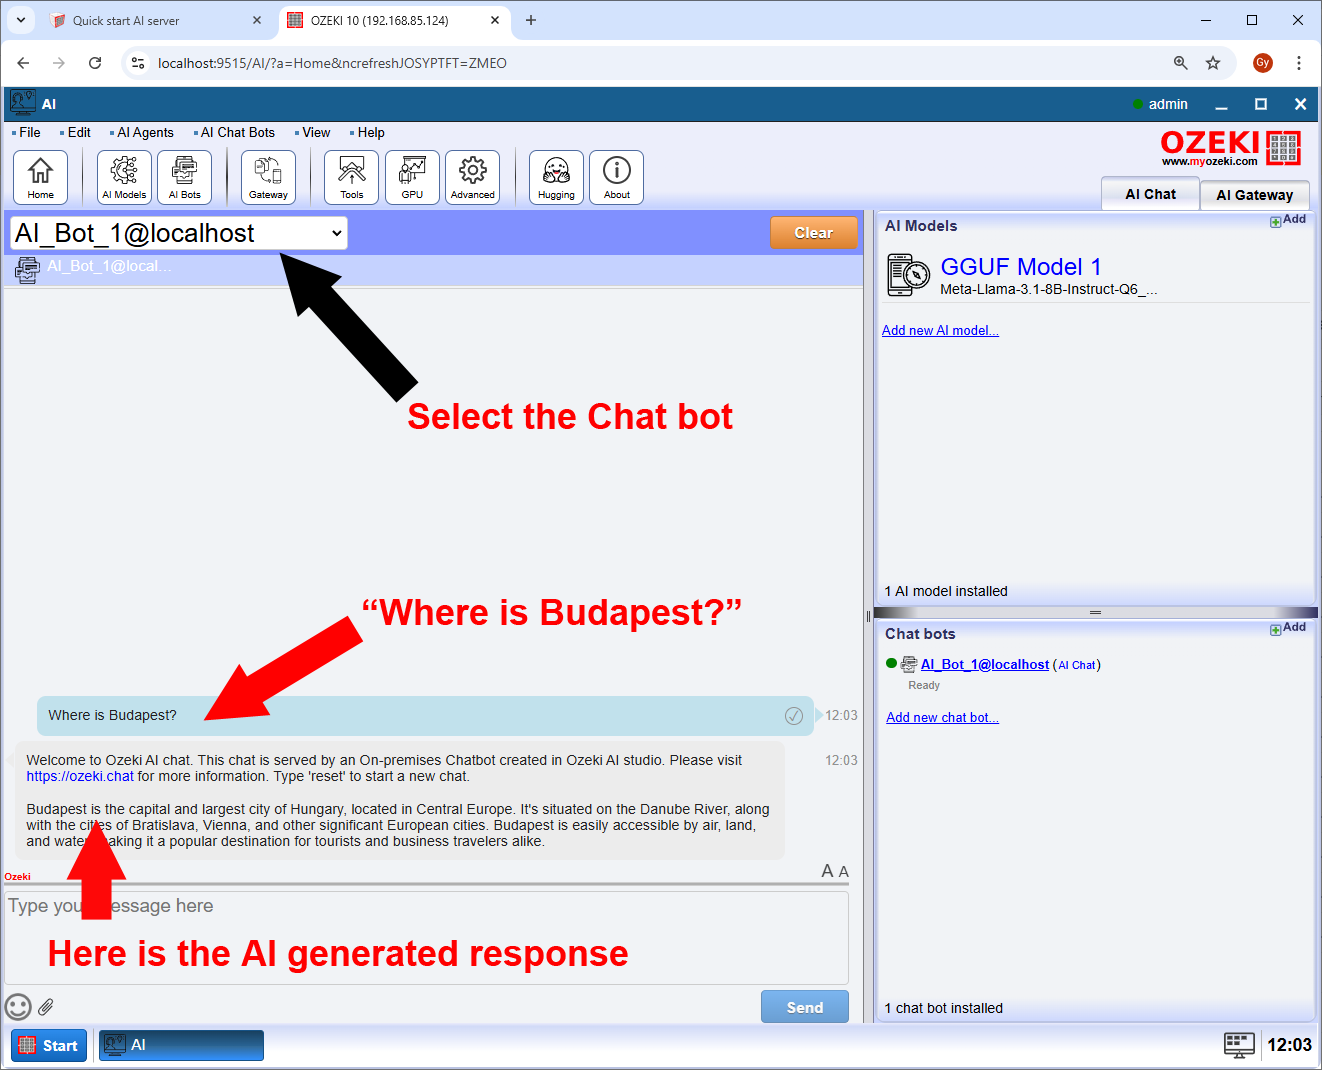
After your AI chat bot is setup and ready to use, you can start to chat with it. Our first question should be: "Where is Budapest?". Give the AI a few seconds, and you will see the response (Figure 13).
Step 7 - Connect your AI Chat Bot to the chat network
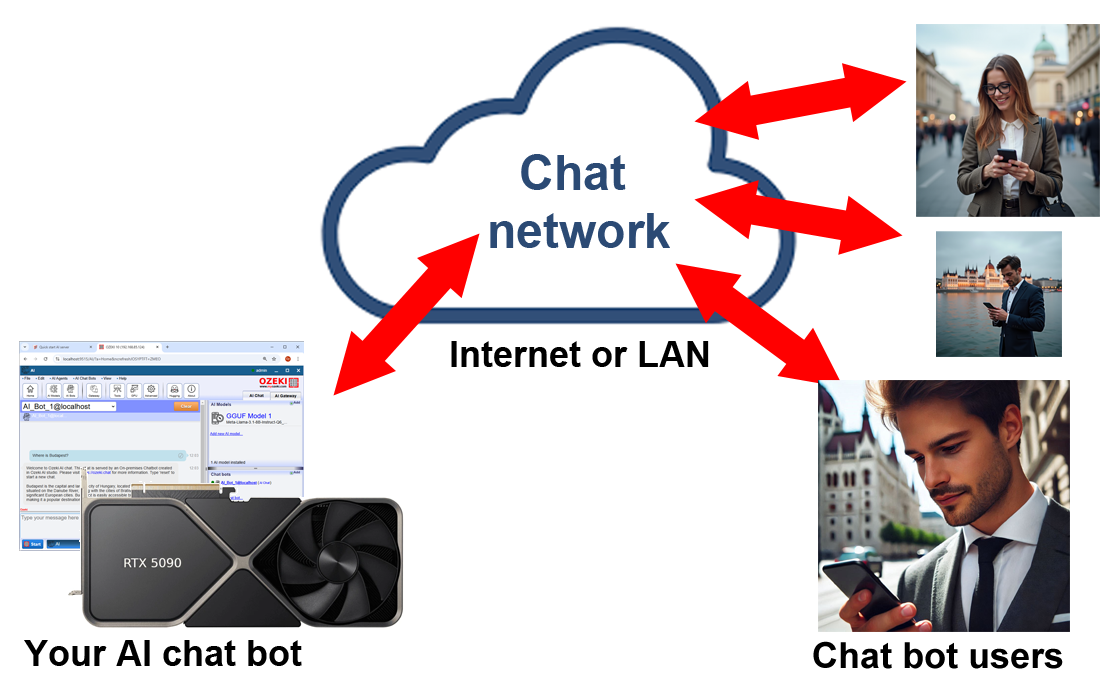
When your AI Chat Bot is ready to use, you can connect it to the chat network to make it easy for your users to access it from their laptops and mobile devices. You can use the myozeki.com chat network or you can setup your own private chat network.
In the next part you can find out how you can connect your chatbot to the myozeki.com chat network. The steps you need to take are:
- Create a chat account for your chatbot at myozeki.com: myaibot@gmail.com
- Configure the myaibot@gmail.com chat account in your AI server
- Create a chat account for yourself at myozeki.com: john@gmail.com
- Login to myozeki.com with your account (login as john@gmail.com)
- Add the chatbot (myaibot@gmail.com) to your contact list
- Send a message to your chat bot
Step 7.1 - Create a chat account for my chat bot at myozeki.com
To create a chat account for your chat bot, you need to open the myozeki.com registration page at the following URL:
https://myozeki.com/index.php?owpn=page_authentication_registration
This will bring up the myozeki.com registration form. You can register an account here for your chatbot. You can do this by entering an e-mail address and a phone number and a password. It is a good practice to create a dedicated e-mail address for your chatbot (e.g you can create a free email account at gmail.com). Regarding the phone number, you can provide any number you like.
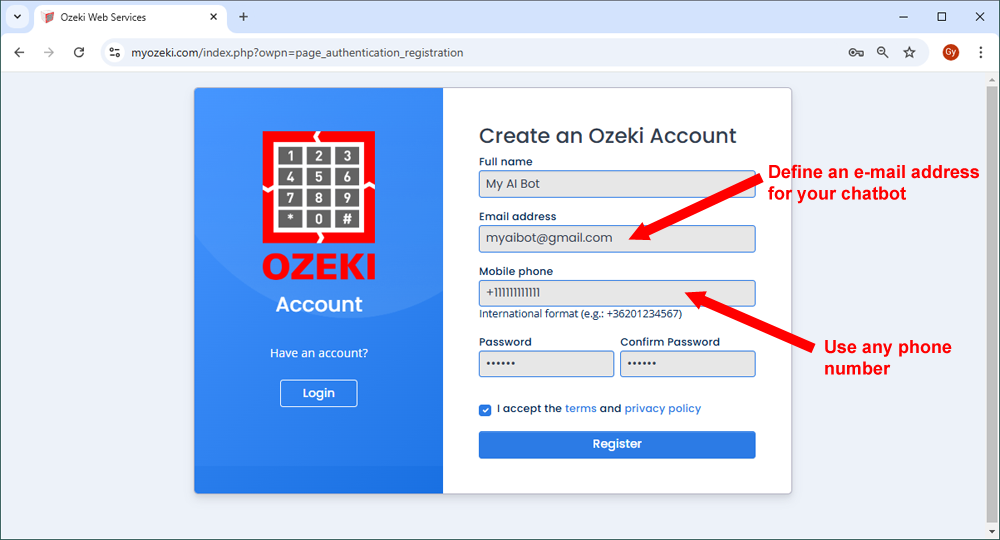
In our example we have used the myaibot@gmail.com e-mail address to create a myozeki.com chat account for our AI chatbot. Take a look at the following video to see the registration procedure.
Step 7.2 - Configure the chat account in your AI server
When your chat account is ready, you can configure it in your AI sever. The configuration is straightforward: You need to open the configuration form of the AI chat bot, then you need to select the "Chat" tab and enable the "Login to chat network" option. On this form you can enter the chat acount e-mail address as the login name and the chat account password (see the video).
Step 8 - Chat with your AI chat bot from a webbrowser
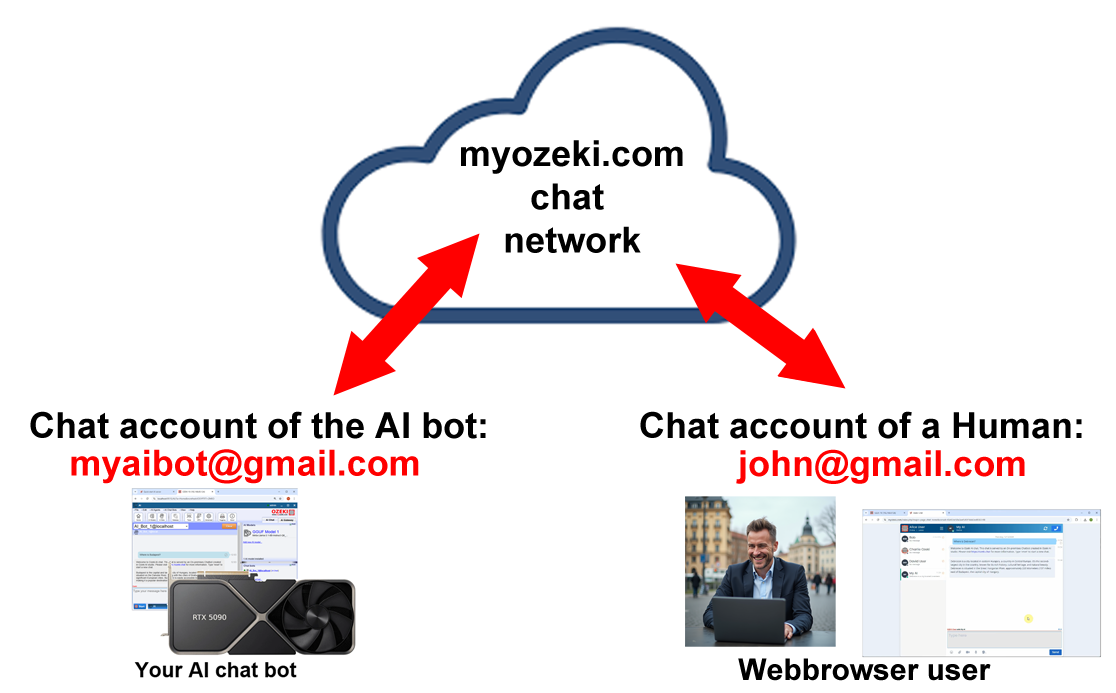
If your AI chat bot is connected to the myozeki.com chat network, you and your friends can chat with the chatbot from anywhere in the world. To chat, register a chat account at myozeki.com, login and add the chat bot to your contact list (Figure 16.)
Login to myozeki.com as john@gmail.com
If you have not already done so, you need to create a myozeki.com account with the e-mail address of john@gmail.com. (Of course you should use your own e-mail instead of john@gmail.com)
Add your chatbot as a Friend
After you have loggin in, you need to add your AI chat bot to your contact list. This can be done by clicking on the hamburger menu, and selecting the "Add friend" menu item.
Step 9 - Chat with your AI chat bot from your Mobile
If you are a mobile user as most of us are, you can setup the Ozeki Chat App on your mobile, and use it to access your chat bot from anywhere in the world. (The advantage to the Ozeki App is that it can display notifications about new messages, this way you can get notifications from AI servies about important events.)

To install the Ozeki App you can use the Google Play Store or the Apple App Store or you can download it directly from our website by scaning the following QR code.
OZEKI Chat Clients
Android
You can download the Android Chat client for your Android mobile, by scanning the following QR code or by clicking on the Download Ozeki for Android link. This client can be installed directly from Google Play store.
Download 
Get notifications and work more
efficiently by downloading the app:
Download Ozeki for Android


iPhone
You can download the iPhone client for your Apple device, by scanning the following QR code or by clicking on the Download Ozeki for iPhone link. This client can be installed directly from Apple App store as well.
Download 
Get notifications and work more
efficiently by downloading the app:
Download Ozeki for IPhone

If the app store is not available on your device (e.g. you use a Huawei mobile), you can download the Ozeki mobile client directly from ozeki.chat. The following video shows how to download the Ozeki Mobile client from ozeki.chat.
Login to myozeki.com and chat with your AI bot
Once the Ozeki Chat App is installed, you can simply open it, select myozeki.com as your workspace and login with your e-mail address and password (e.g. john@gmail.com)

Final thoughts
If you have followed the above steps and you have your AI chat bot setup and ready to be used from webbrowsers and mobile devices, you will enjoy the privacy and efficiency this local AI solution offers. Over time you will likeley add more chat bots to your systems, that are tailored for specific use cases and your will benefit from improved productivity in your organization.


