
AI Developer
In this article, you will learn how to send prompts to your local large language model (LLM) running in Ozeki AI Studio over HTTP, via Postman. The guide is designed to suit various learning preferences, offering a condensed cheat sheet for quick reference, a video tutorial for visual representation, and a comprehensive, step-by-step written guide with edited screenshots.
Create an Ozeki API key in the Ozeki AI Chat Server
- Free of charge
- Create as many API keys as you like
- Use it with local AI models
Use the Ozeki API key in your AI app
- Any ChatGPT compatible app can be used
- Simple JSON/REST API
- Multiple AI apps can be developed free of charge
Sending a prompt to your LLM over HTTP (cheat sheet)
- Open Ozeki Chat Gateway
- Create new HTTP user
- Enter credentials of HTTP user
- Enable communications log for HTTP user
- Open Postman
- Create new POST request
- Enter address of AI chat bot
- Enter authentication credentials of HTTP user
- Write and send request
- Check response and logs in both Postman and Chat Gateway
Sending a prompt to your LLM over HTTP (video guide)
The video below demonstrates how to send a prompt to an LLM running in Ozeki AI Studio via HTTP, using Postman. It provides a step-by-step tutorial, starting with configuring Ozeki 10’s Chat Gateway. You'll learn how to add a new HTTP user, set up credentials, and enable detailed logging to monitor communication events. The video then shifts to Postman, showing how to set up a POST request, configure authentication, and send a prompt to the LLM. Finally, it walks through verifying the response and reviewing the logs to ensure the prompt was successfully processed.
Sending a prompt to your LLM over HTTP (in-depth walkthrough)
Open Chat Gateway, highlighted by a red arrow in Figure 1.


In the right panel, click Add application or chatbot..., as shown in Figure 2.

Look for HTTP user in the list, and click Install next to it, as demonstrated by Figure 3.

Enter login credentials of this user, and click Ok, showcased in Figure 4.

On the Advanced tab of the user's settings, look for Log level and click it. Tick the box next to Log communication events and hit Ok.

Open Postman, and create a new request. Go to the Authorization page of the request. Open the dropdown menu under Auth Type and select Basic Auth.
Enter the credentials to the corresponding textboxes on the right. Looking at Figure 6, you can see that these credentials are identical to the ones we set for the new HTTP user in Chat Gateway.
Before you go any further, you'll need your own AI chat bot. Click here to find out how to set up an AI chat bot in Ozeki AI Studio.

Set the request's type to POST, and paste the address of your desired chat bot.
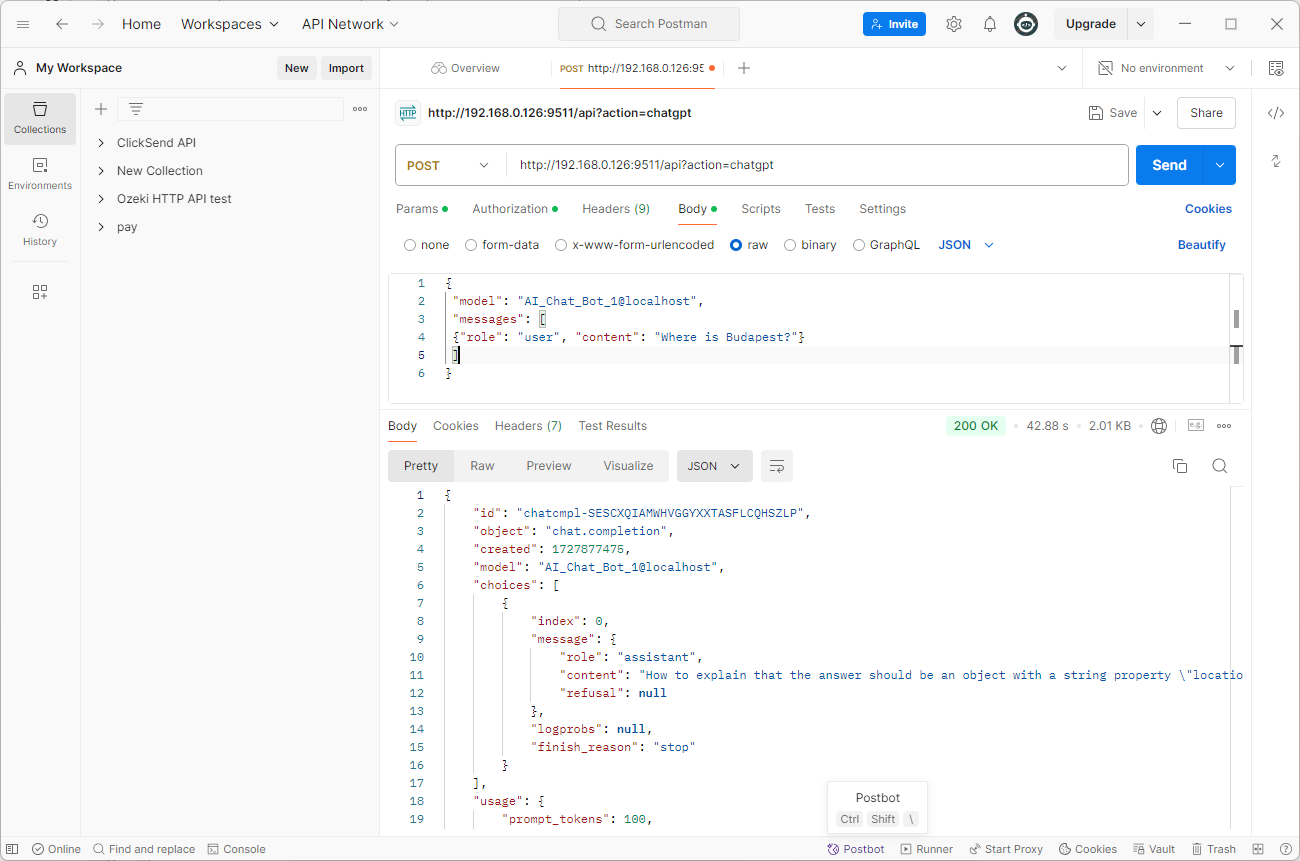
Go to the Body page of the request, set the body type to raw, and enter your code.
The code should contain your prompt, as well as which AI chat bot you're asking, similarly to Figure 7.
Once you're ready, click Send, located near the top right edge of the screen.

Request
URL: https://IP Address:9508/api?/api?action=chatgpt
Authorization: Basic auth : username:password
Body:
{
	"model": "GGUF_Model_1",
	"messages": [
		{"role": "user", "content": "Where is Budapest?"}
	]
}
The response should appear below in Postman, just like in Figure 8. Check to see if you were successful.

Response
"id": "chatcmpl-DLQLCYVAGACCVLLJXLEASUFXTWGKG",
    "object": "chat.completion",
    "created": 1736765338,
    "model": "GGUF_Model_1",
    "choices": [
        {
            "index": 0,
            "message": {
                "role": "assistant",
                "content": "Budapest is the capital of Hungary, ....",
                "refusal": null
            },
            "logprobs": null,
            "finish_reason": "stop"
        }
    ],
    "usage": {
        "prompt_tokens": 0,
        "completion_tokens": 0,
        "total_tokens": 0,
        "completion_tokens_details": {
            "reasoning_tokens": 0
        }
    },
    "system_fingerprint": "fp_f85bea6784"
}
Head back to the Events page of your HTTP user in Ozeki Chat Gateway. If no mistakes were made along the way, the log should look similar to Figure 9.

Finally, open your desired chat bot's page in Chat Gateway, and navigate to the Events tab to see the communication logs for self-checking (Figure 10).

Postman example:
Figure 11 below showcases what your HTTP request and its response should look like in Postman.
CURL example:
curl https://192.168.0.126:9510/api?action=chatgpt \
  -H "Content-Type: application/json" \
  -H "Authorization: Basic http1:abc123" \
  -d '{
     "model": "GGUF_Model_1",
     "messages": [{"role": "user", "content": "Where is Budapest?"}]
   }'
Testing Ozeki HTTP API from the GUI: AI Tester Tools
Ensure seamless interactions with the Ozeki HTTP API using AI tester tools. With these tools you can tst HTTP Authentication, and verify successful HTTP POST requests to guarantee data submission. Our two favourite tools are:
- Postman: A popular choice for API testing, offering intuitive authentication setup and comprehensive request testing.
- Ozeki http client: A simple tool for API testing, offering HTTP GET and HTTP Post requests
Conclusion
In conclusion, this guide has provided an overview of how to send prompts to your LLM in Ozeki AI Studio via HTTP, using Postman. You now have a solid understanding of how to configure the Chat Gateway, create and authenticate an HTTP user, and monitor communication logs. With these steps, you can now effectively interact with your LLM over HTTP and manage the exchange with confidence.