How to answer E-mails with AI
Unlock the Power of your personal AI-Powered Email Bot with Ozeki AI Studio. In this article you can learn how to create a cutting-edge email bot using Hugging Face models or using the on-line ChatGPT service. You will also learn how to deploy it seamlessly by configuring Ozeki Chat Gateway with detailed instructions on setting up your email account and connecting it to the AI-powered bot. This step-by-step guide will walk you through the entire process of building an intelligent email assistant that can improve the e-mail communication of your business.
Key advantages
- The whole systems runs on your own Windows computer: No internet connection is needed
- You can feed the AI your own konwledge base: Generate accurate, insightful, usefula and appropriate responses based on data and knowledge you already have
- Your private information stays private: As no online services are involved, you don't have to worry about passing sensitive information in e-mails to 3rd parties
- Cost efficient: With your own low cost GPU (or general purpose CPU) you can generate responses free of charge.
- Scalable: Multiple computers can be put setup if needed
- Full control: Log files, custom confiuration options give you total control over your system
How does it work
The solution works the following way: The Ozeki e-mail client checks your inbox periodically. If it sees a new e-mail it downloads a copy. After the e-mail is downloaded, it ask the AI if it is relevant for answer. If the answer is 'yes', it asks the AI to generate a reply e-mail.
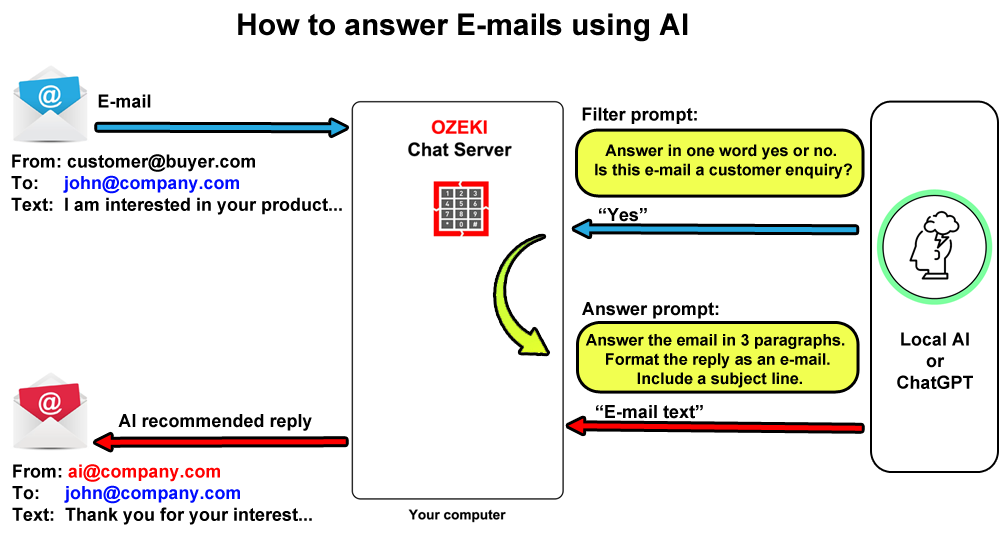
The reply e-mail can be sent to directly to the sender and/or to the recipient (you). If you send the AI generated response to your e-mail address only, it will allow you to review the AI response and use it to reply the e-mail manually.
The AI engine can be configured to use your local knowledge-base to generate a response. For example it can download the datasheet of the user who sent the e-mail from your CRM, or it can base it's reply based on a FAQ you put together.
What will you see in your Inbox?
When the user John (john@company.com) opens his inbox, he will see two incoming e-mails instead of one: The original e-mail sent by customer@buyer.com, and a suggested reply sent by ai@company.com.
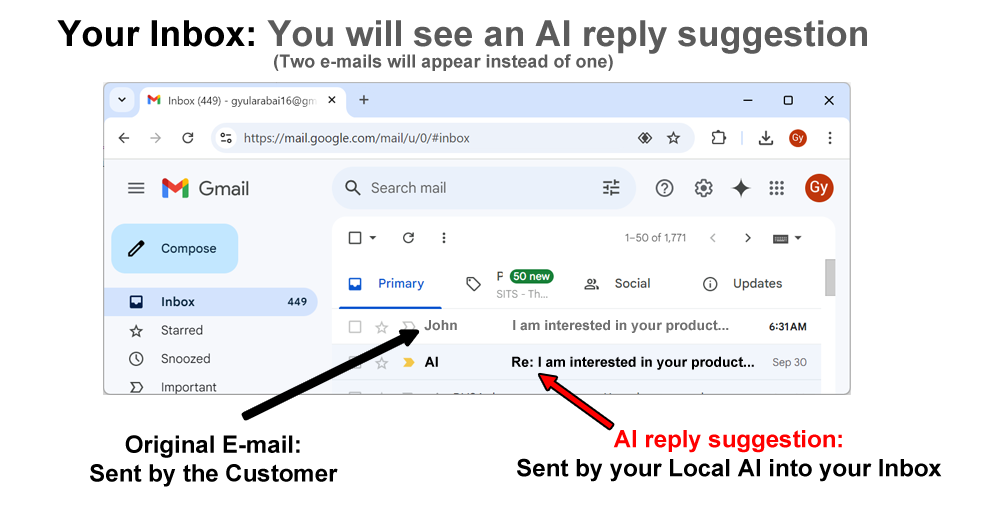
John can decide if he wants to use the AI recommended reply or not in his response to Customer.
How do the AI e-mail replies go to my Inbox?
To understand the solution, we must simplify how the system works. To understand it, you need to take a look at Figure 3. On this figure you will see, that that the idea is simple: Ozeki AI will download a copy of the incoming e-mail and will upload a reply suggestion.

The AI system performs these steps: Download, Reply, Upload.
Which AI models should I use?
To answer e-mails you have two options, you can use the On-line Chat GPT LLM using an API key, or you can use a local LLM you have downloaded as a GGUF file from Hunggingface.
Note that if you use a local LLM, you should consider the following:
- 1. Choose a model that has the word 'Instruct' in the model file name. Instruct means that the model was training with instructions, so it will understand your intent better. For example the model: Meta-Llama-3.1-8B-Instruct-Q4_K_M.gguf is a good choice. Notice the word 'Instruct' in the mobdel file name.
- 2. Choose a model with 7B parameters at least. The higher the parameter count, the better when you want to generate accurate responses.
- 3. Choose a model with Q4 quantitazation at least. The higher this number is, the better the e-mail answer will be.
- 4. Train your model on your knowledge base! An out of the box AI will be as smart as a high school graduate. You must teach it local knowledge relevant to your company, to get great e-mail responses. You cannot expect the model to return good responses without training.
- 5. Include customer specific knowledge in the response. Connect your AI chatbot to your CRM or other data source that can provide customer specific details. The reply e-mail will be better if the AI model can include customer specific details.
Which email protocols are supported?
The e-mail to AI functionality is made possible by Ozeki Chat Gateway. The chat Gateway takes messages form one connection and forwards them to another. In our case it takes messages from an E-mail connection and forwards them to AI.

The Ozeki Chat Gateway app is part of Ozeki AI Chat Server. When you download the Ozeki AI Chat Server Installation package, it will automatically be installed.
The Ozeki Chat Gateway supports the following E-mail protocols. All local e-mail systems allow you to use these options.
- POP3
- POP3S (Secure)
- IMAP
- IMAPS (Secure)
- SMTP
- SMTP over TLS (Secure)
- SMTP over SSL (Secure)
Does it support my local E-mail system?
The short answer is: Yes.
The Ozeki AI solution is a local on premises system. It can access your e-mail messages on the e-mail servers in your LAN. It can communicate with your e-mail servers using one of the protocols above.
Does it support GMail?
The short answer is: Yes.
Google's Gmail allows you to access the inbox through Secure IMAP and you can send e-mails through the Google SMTP server using your Google Account. Check out the following document on how to answer E-mails sent to Gmail using AI.
https://ozeki.chatg/p_8483-how-to-answer-gmail-e-mails-using-ai.htmlPrerequisites
To setup your on-premises E-mail AI solution, you need to install Ozeki Chat Server on a Windows PC. We also recommend you to buy a GPU for higher performance (you can use a general CPU, but it the system will be slower). It is also good if you have plenty of RAM in your PC. Check out the Ozeki AI studio hardware requirements for more information.
How to setup the solution (Quick steps)
- Download an AI model Huggingface.co
- Open Ozeki AI studio and setup the downloaded model
- Create an AI E-mail Bot
- Open Ozeki Chat gateway
- Setup your e-mail account
- Connect the e-mail account to the AI E-mail Bot
- Send a test E-mail and see the AI response
Step 1. - Download an AI model Huggingface.co
To start, navigate to the Hugging Face website by visiting huggingface.co. Once there, click on the Models tab at the top of the page. To narrow down your search, use the filters available and select the option for Libraries. Then, filter again for models with the GGUF format.
After finding a model you're interested in, download the corresponding .GGUF file to your computer. Once the download is complete, place the model file in the directory C:\AIModels on your system.
Step 2. - Open Ozeki AI studio and setup the model
Open OZEKI 10 on your system. Once the program is running, navigate to AI Studio. Inside the studio, locate and click the AI Models button.
Next, click the Create new AI Model button to start the process of adding a model. From the available options, select GGUF as the model type. Finally, choose your desired model from the dropdown list provided.
Step 3. - Create an AI E-mail Bot
In AI Studio, click on the Chat bots button to access the chatbot settings. From there, proceed by clicking the Create new Chat bot button.
Next, choose AI Email from the available options. Afterward, select the desired model you want the chatbot to use. Once everything is set, activate the chatbot to complete the process.
Step 4. - Open Ozeki Chat gateway
To continue, close AI Studio and then open Chat Gateway.
Step 5. - Setup your e-mail account
In Chat Gateway, click on Add new account... to start setting up an email connection. From the list, select the desired email client, which in this case is an IMAP client.
Next, enter the IMAP server's host address, along with your username and password. Switch to the SMTP tab, where you'll need to enter the SMTP server host. Then, input the default sender name and email address. After completing these details, click Ok and connect the client.
Step 6. - Connect the e-mail account to the AI E-mail Bot
In the Incoming (upper) panel, click on Add new route... to begin setting up the routing. Define the sender and recipient connections as required, then click Ok to confirm.
Next, click the Home button to return to the main screen. In the Outgoing (bottom) panel, click Add new route... once again, and set the sender and recipient connections for outgoing messages. After that, click Ok and return to the home screen by pressing the Home button.
Step 7. - Send a test E-mail and see the AI response
Open your preferred email interface and compose a test email to send to your Email chatbot. Once sent, return to Ozeki Chat Gateway, open your email bot, and navigate to the Events tab.
In this tab, verify that the bot has received, read, comprehended, and replied to the test email, which is recognized as a customer inquiry in the video. Finally, go back to your email interface and confirm that the bot's reply has been successfully received.
Conclusion
In conclusion, setting up and managing AI models, chatbots, and email integrations using Ozeki’s tools is a straightforward process with the right steps. From navigating Hugging Face to download GGUF models, to creating new AI models and chatbots in OZEKI 10, each task builds a functional AI system tailored to your needs. Once the necessary configurations for chat gateways, email clients, and routing are completed, you can effectively manage incoming and outgoing communications.
Finally, by testing the system with a real-world scenario, such as an email inquiry, you ensure that the chatbot is properly integrated and responding accurately. With these steps complete, your AI and email infrastructure is ready to streamline your tasks.
More information
- How to create chat bots with AI
- How to analyze websites with AI
- How to answer e-mails with AI
- How to reply to SMS messags with AI
- How to run AI queries using SQL