How to send chat messages from an SQL database
Welcome to our comprehensive guide on sending chat messages from an SQL database using the Ozeki Chat Gateway. This resource is designed to walk you through each step of the process, from setting up your Ozeki Chat account to integrating your SQL database and configuring message routes. Whether you're new to the system or seeking to streamline your message management, this guide provides the essential instructions and troubleshooting tips to ensure a seamless experience. Follow along to enhance your communication capabilities with efficient database-driven messaging solutions.
What is an SQL database?
An SQL database is a relational database management system that uses Structured Query Language (SQL) to manage and manipulate data organized into tables. It ensures data integrity and enforces relationships between tables through primary and foreign keys. SQL databases support complex queries and transactions, making them suitable for handling large volumes of data efficiently.
How to send chat messages from an SQL database (Quick steps)
To send chat messages from an SQL database
- Access Ozeki Chat Gateway
- Add a new Chat Account
- Provide account details
- Verify the connection
- Add New Application or Chatbot
- Install MySQL connection
- Configure connection details
- Add new route
- Insert message into database
- Check if the message was sent correctly
- Open the MyOzeki Chat website
- Verify successful message delivery
- Reply to the message
- Check chat history
Send chat messages from an SQL database (Video tutorial)
In this video tutorial, we’ll walk you through the process of sending chat messages directly from an SQL database using Ozeki Chat Gateway. Our step-by-step guide is designed to be clear, making integration easy even if you're new to the process. You'll learn how to connect your SQL database with the Ozeki Chat Gateway, configure the necessary settings, and ensure efficient message delivery. By the end of this tutorial, you will have an understanding of how to leverage SQL database for chat messaging with Ozeki Chat Gateway.
Step 1 - Access Ozeki Chat Gateway
Start by accessing your Ozeki Chat Gateway account. If you don’t have an account yet, download the Ozeki Chat Gateway from thethe https://ozeki.chat/. Install the application and create an Ozeki account. Once you’ve logged in with your credentials, you’ll be directed to the home screen of the Ozeki Chat Gateway. From there, go to the main interface and select the option to add a new chat account.
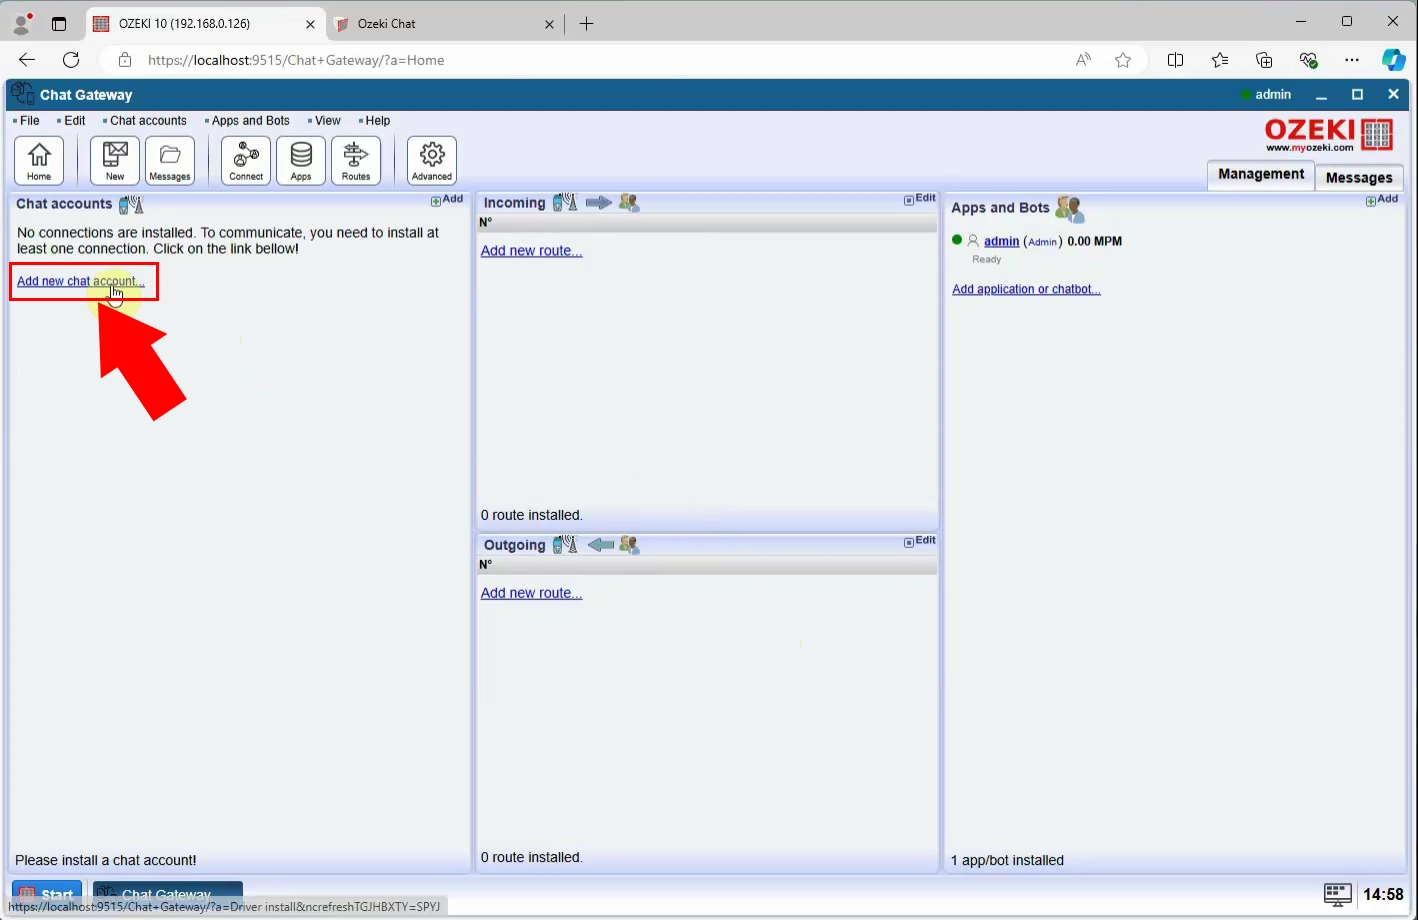
Step 2 - Add a New Chat Account
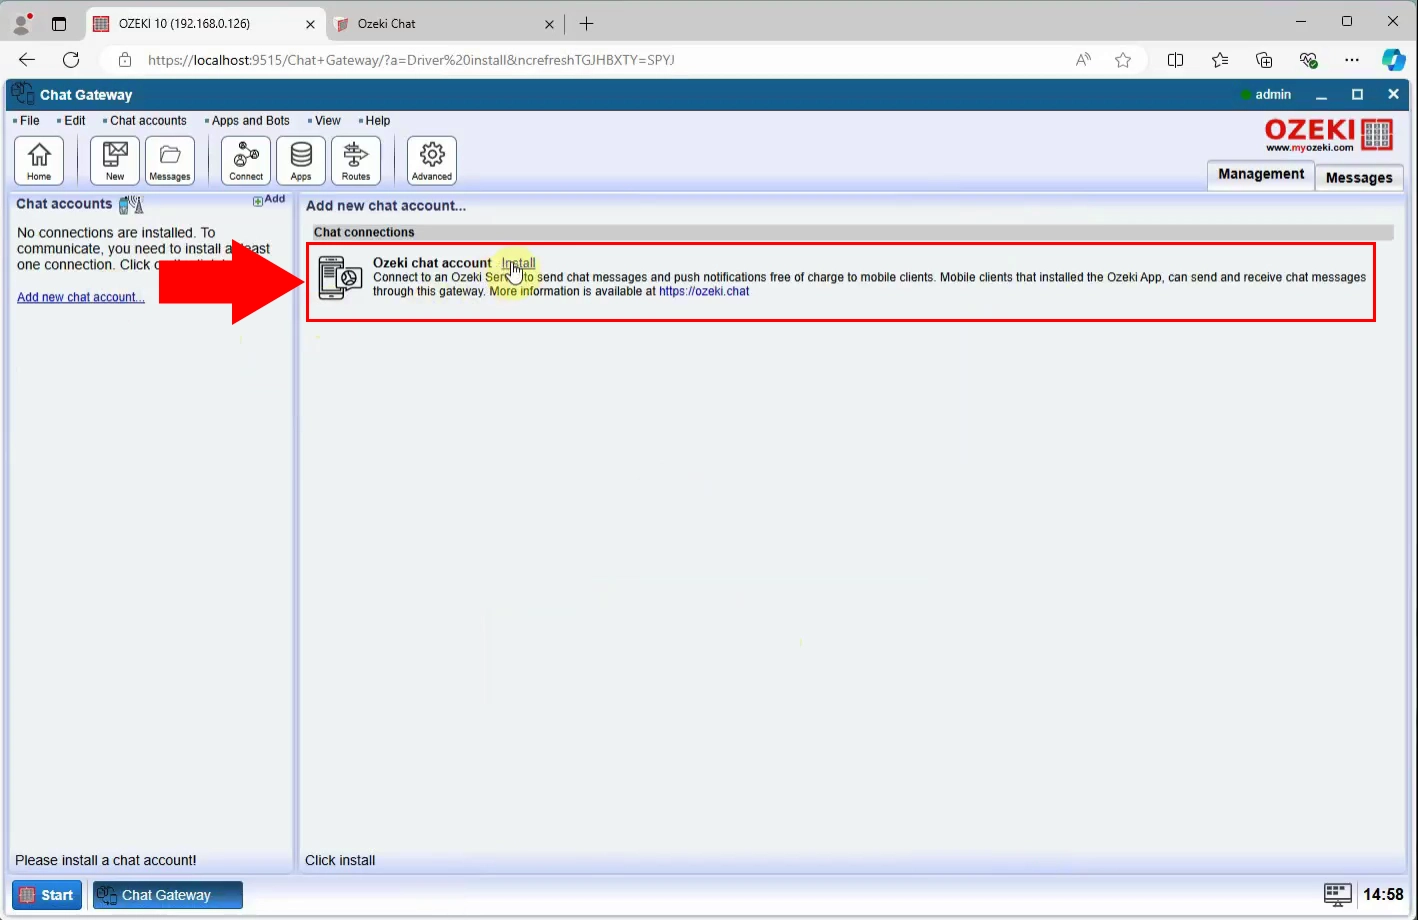
Install the Ozeki Chat Account from the connections panel. This will connect you to the Ozeki server, allowing you to send chat messages and push notifications to mobile clients at no cost. Mobile clients with the Ozeki App installed can use this gateway to send and receive chat messages. Click the installation link to begin the setup process.
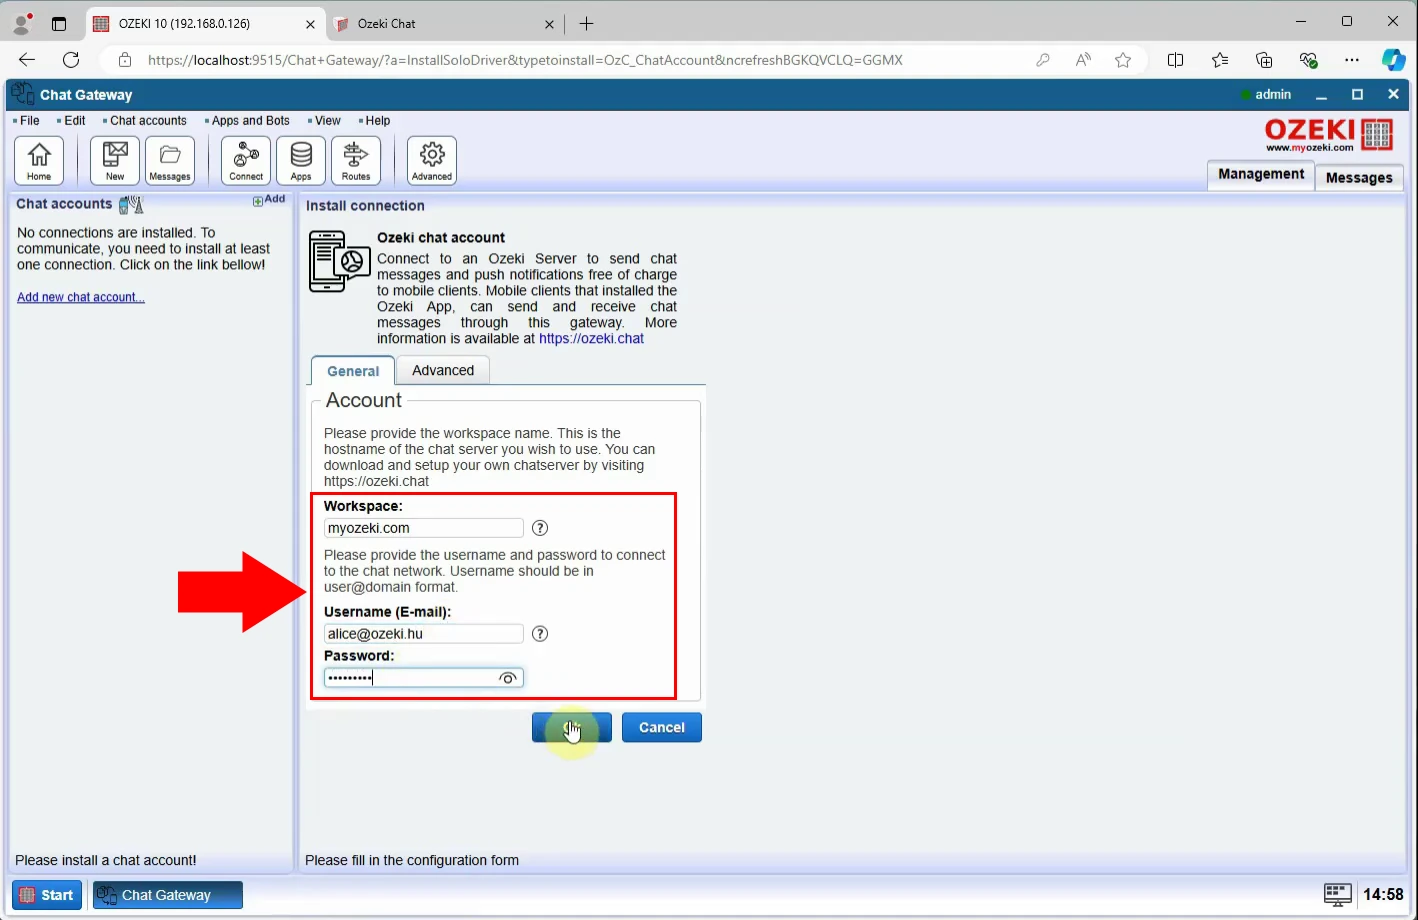
Next, enter the workspace name, which will serve as the hostname for the chat server you want to use. After specifying the workspace name, provide a username and password to connect to the chat network. The username should follow the format user@domain to ensure a unique identity within the network, allowing you to send and receive messages without conflicts. Click "Ok" to save these settings.
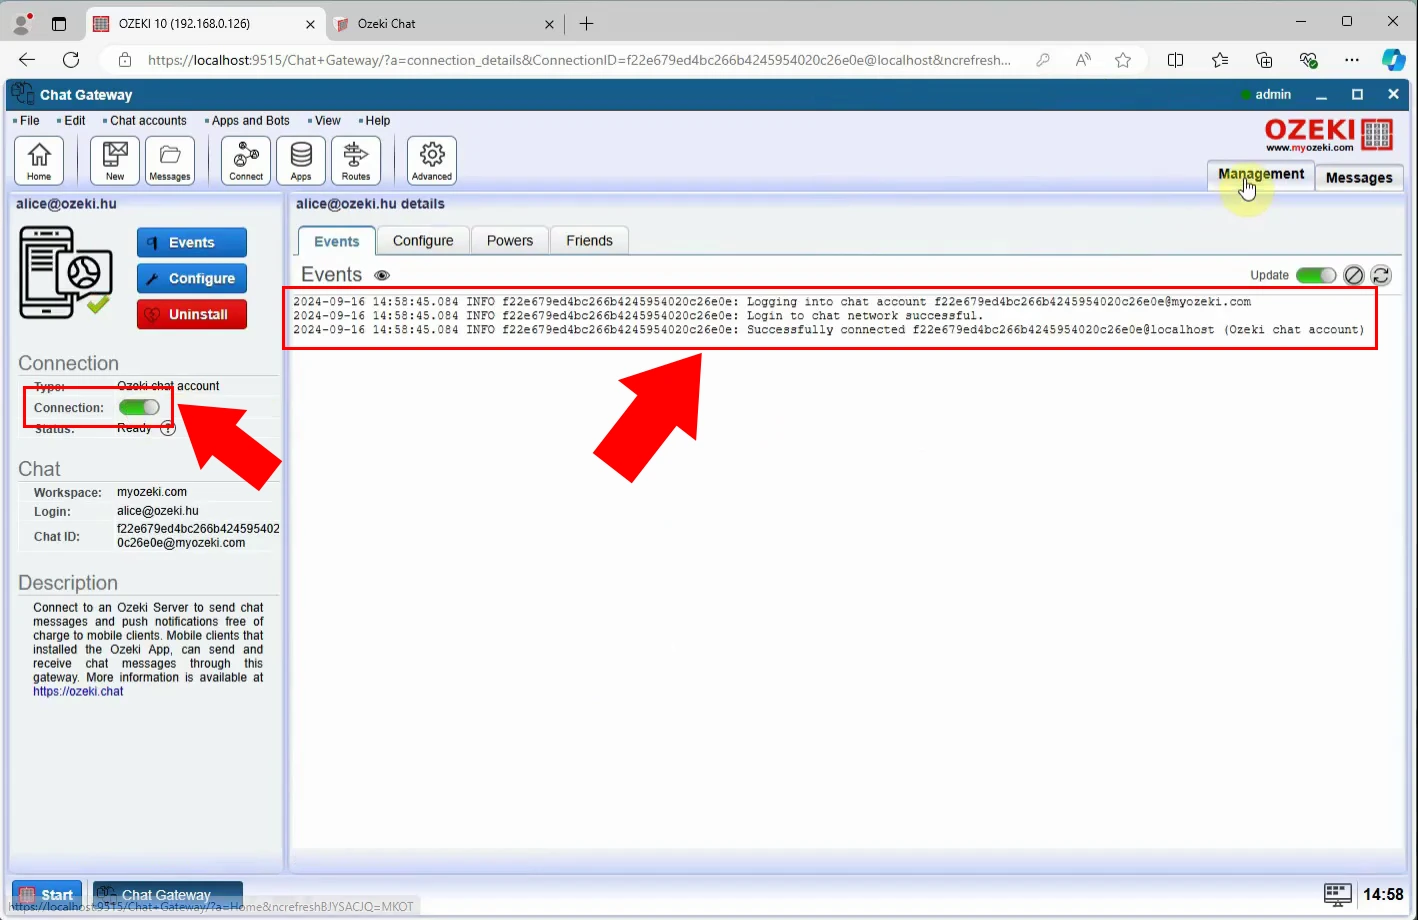
After entering and confirming these details, the system will verify the connection. Upon successful authentication, it will link your Ozeki Chat Gateway to the specified chat network. To enable communication between your Ozeki Chat Gateway and mobile clients, set the slider button to green. A notification about the successful connection will appear in the events tab.
Step 3 - Install MySQL Connection
Now, head back to the main interface of the Ozeki Chat Gateway and navigate to the "Add new application or chatbot" panel. Here, you'll have the option to integrate new applications or chatbots with your Ozeki Chat Gateway.
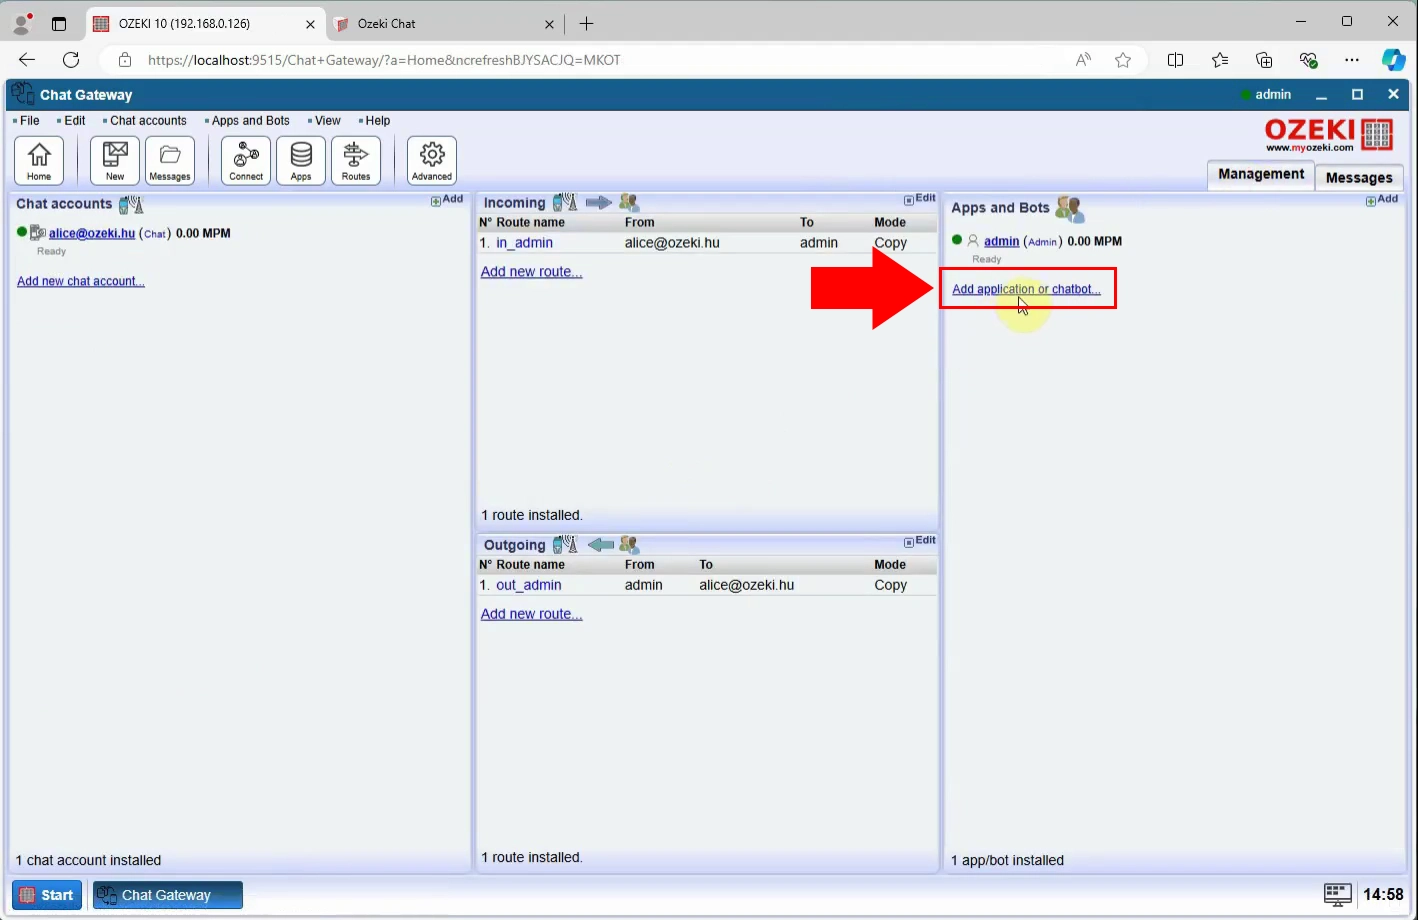
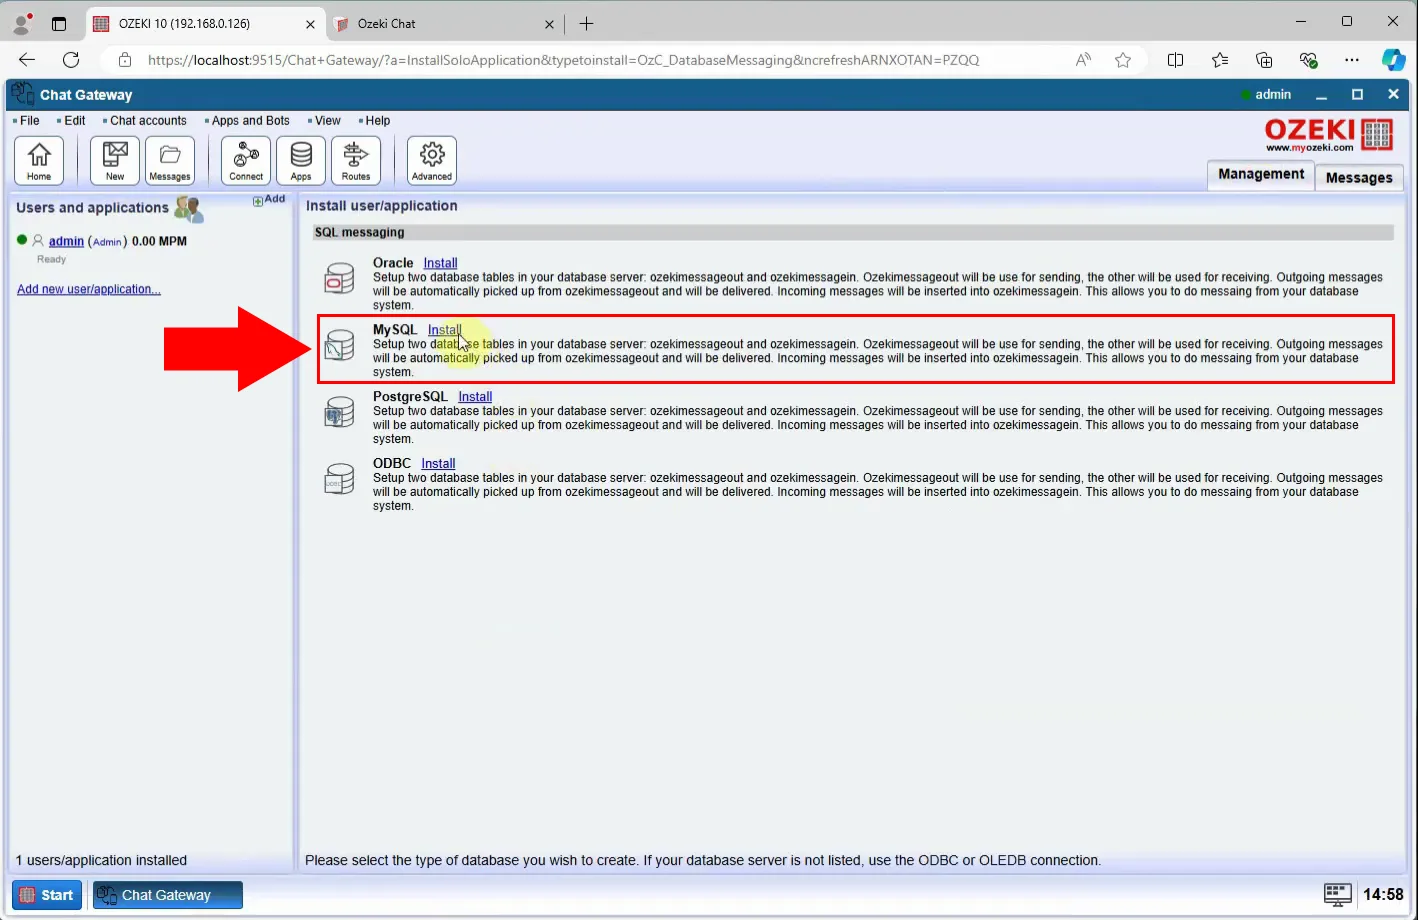
Install the MySQL connection from the connections panel. This will enable your Ozeki Chat Gateway to connect to a MySQL database, allowing you to manage and interact with your database directly from the gateway. MySQL is two database tables in your server ozekimessageout and ozekimessagein. Ozekimessageout is used for sending, the ozekimessagein is used for receiving. Outgoing messages will be automatically picked up from ozekimessageout and will be delivered. Incoming messages will be instered into ozekimessaegin. This allows you to do messaging from your database.
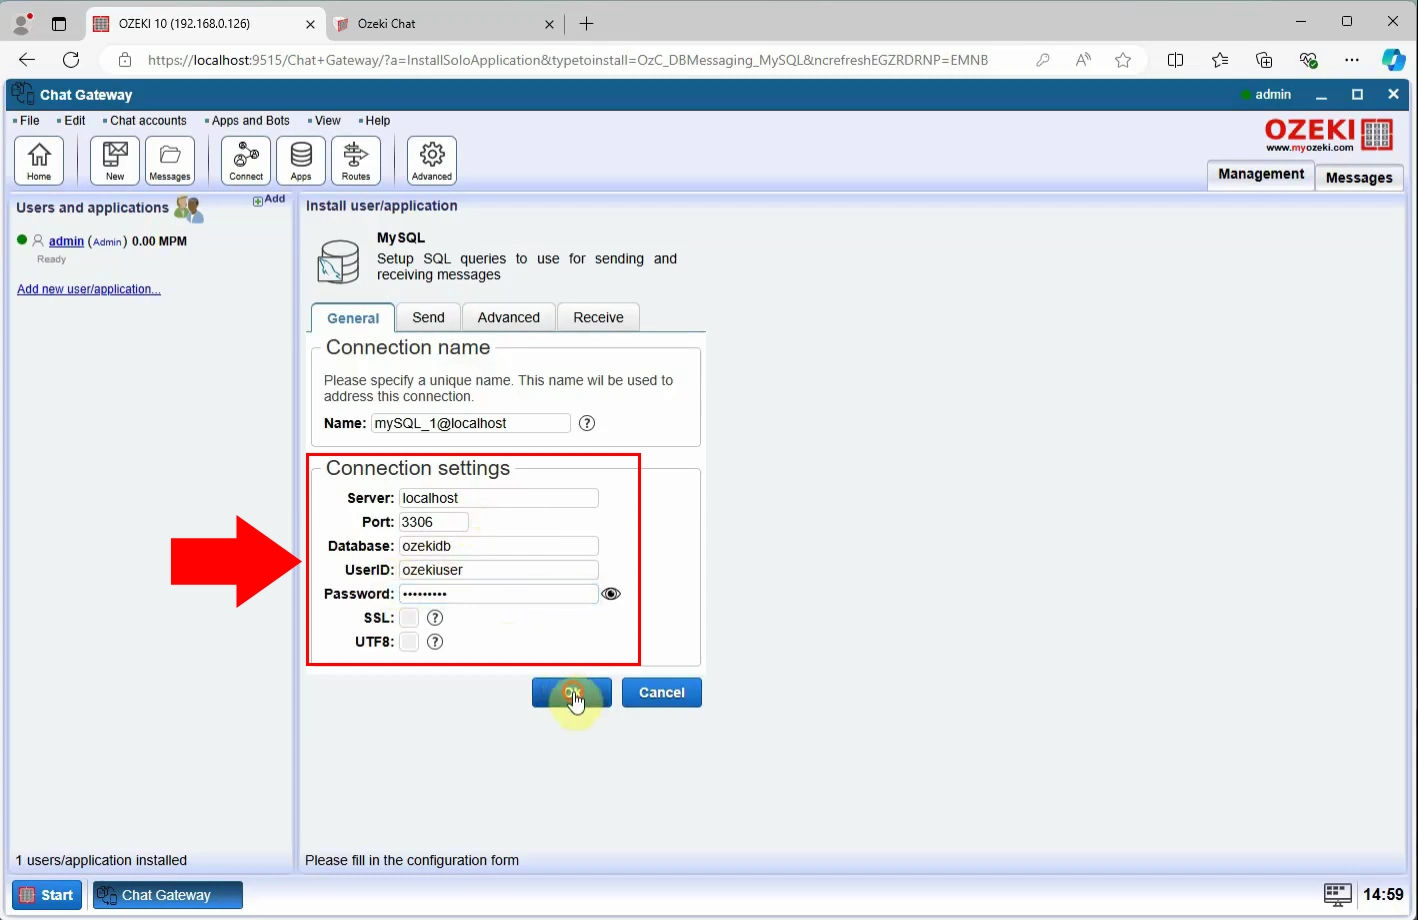
In this subsequent phase of the process, you have to enter connection details and configure the connection. Specify a uniqe connection name that will be used to address the connection. Then, input the connection details, including the server name, port number, database name, and username. Also, set a unique password for the connection. Once all the details are entered, click the "Ok" button to save the settings.
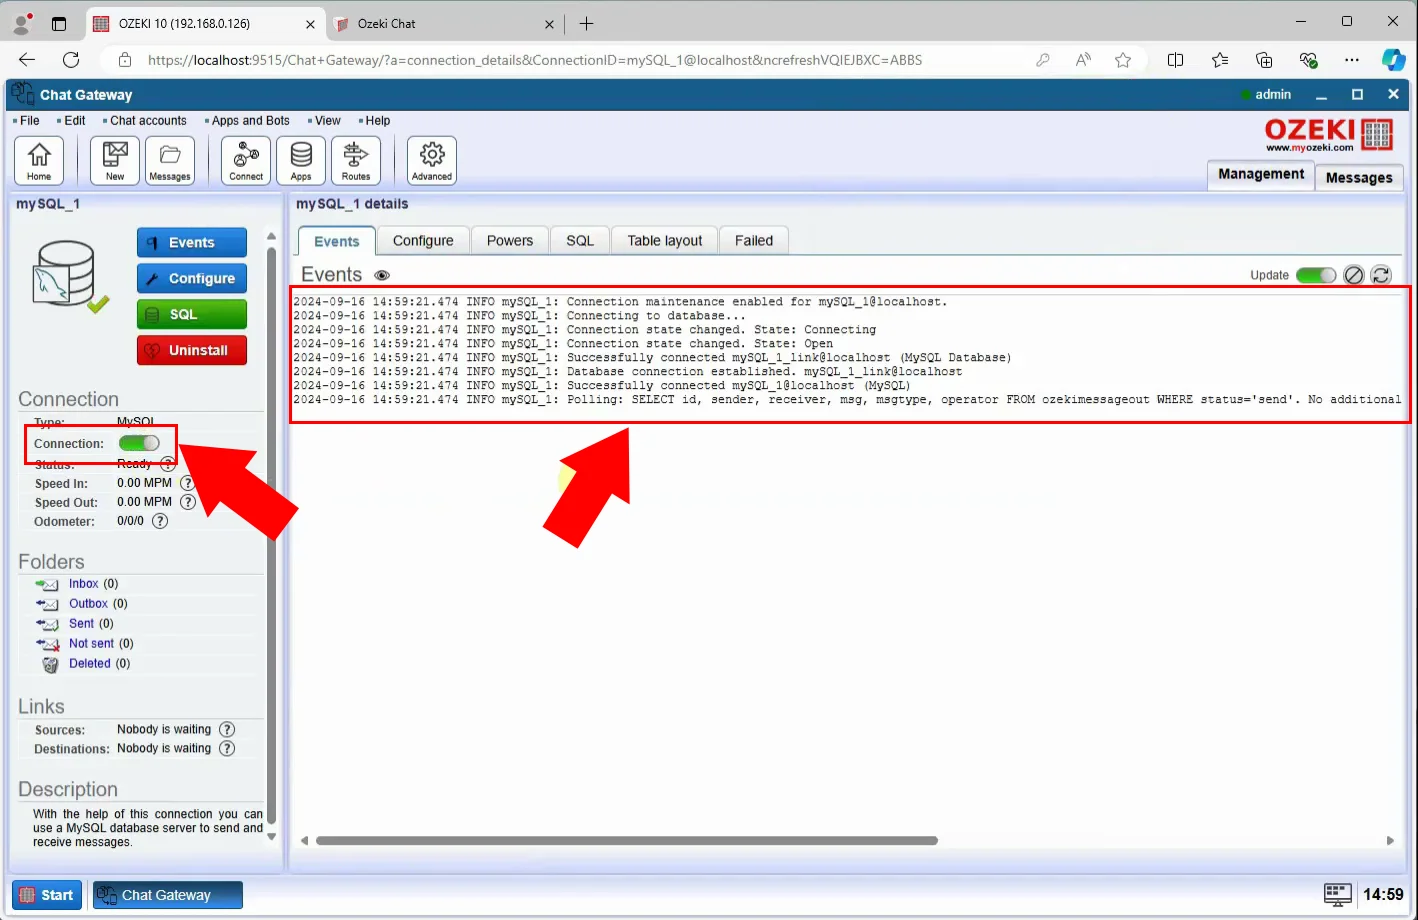
After providing and confirming these details, the system will verify the connection. Upon successful authentication, it will link your Ozeki Chat Gateway to the specified chat network. To enable communication between your Ozeki Chat Gateway and mobile clients, set the slider button to green. A notification confirming the successful connection will appear in the events tab.
Navigate to the main interface of the gateway, then choose the "Add new route..." option. This route will define how incoming messages are handled and directed within your system.
Step 4 - Add message routes
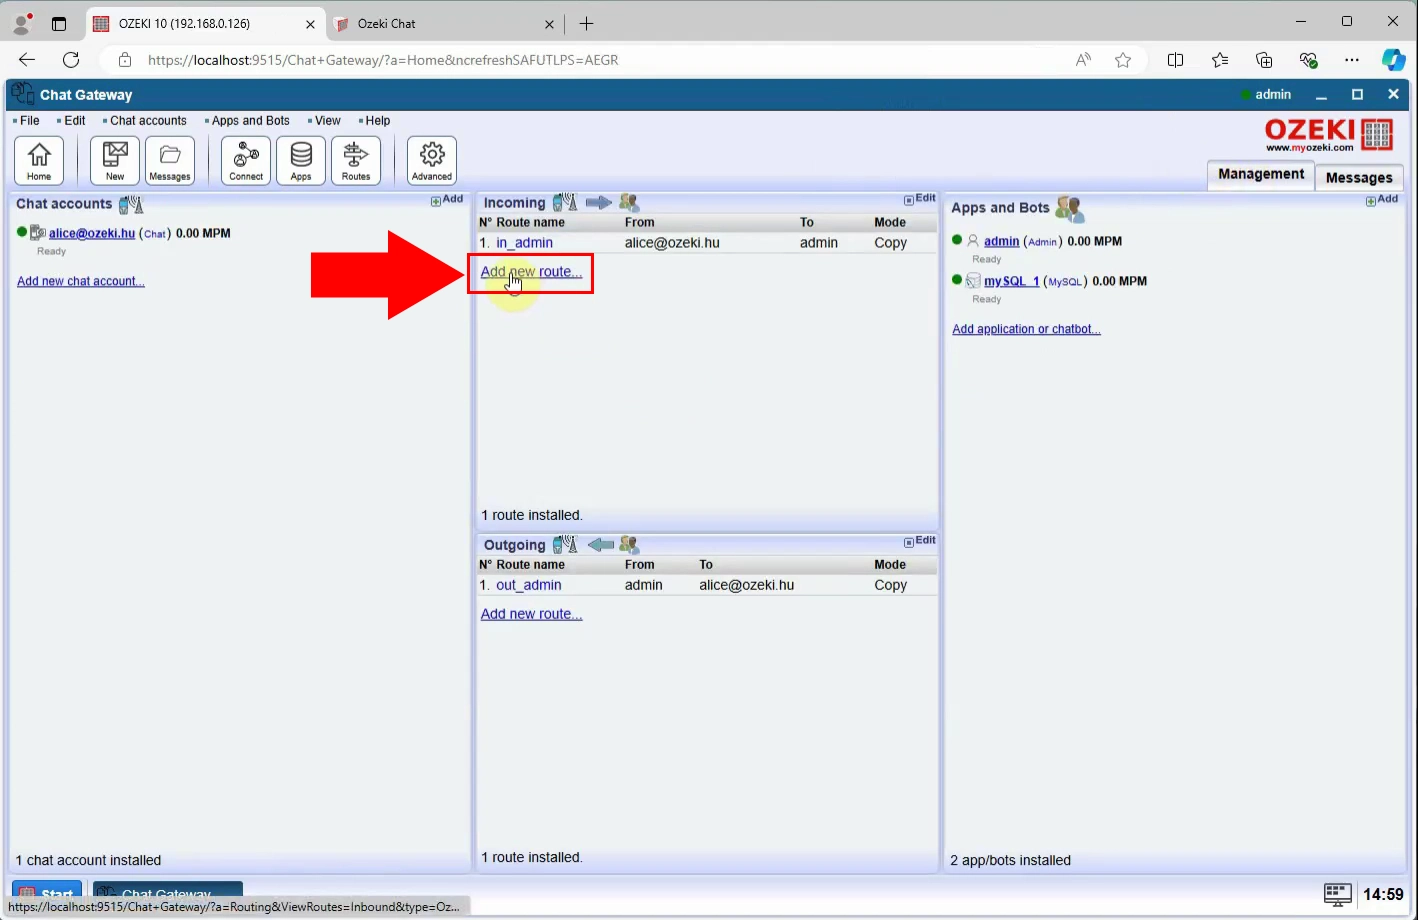
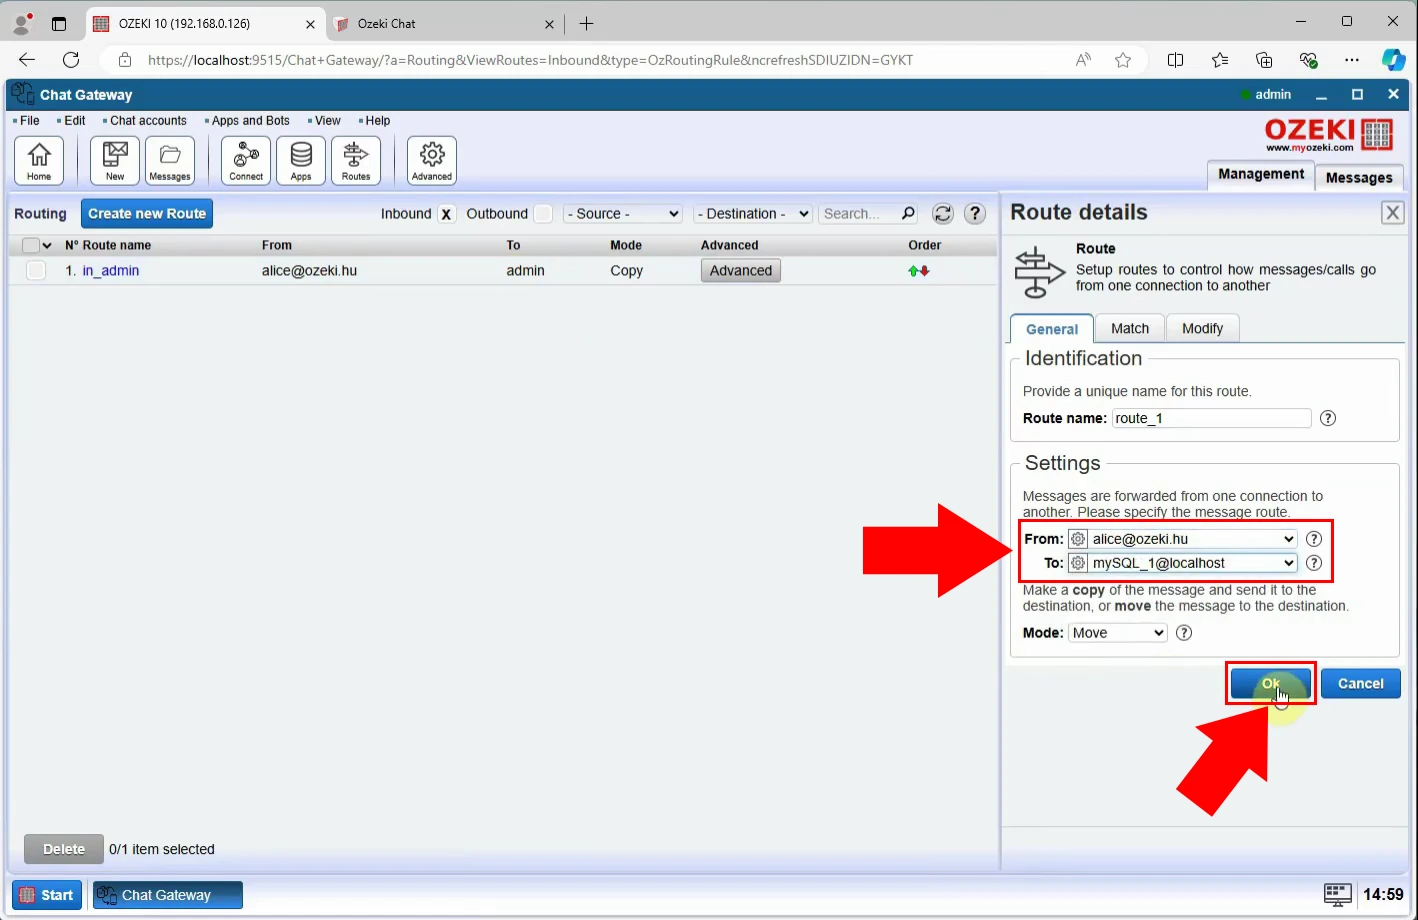
Now, you have to configure incoming route. Setup route to control how messages and calls go from one connection to another. Provide a unique name for this route, then do the other essential settings. Specify a message route by entering the sender and receiver adresses. Save these route settings with the "Ok" button.
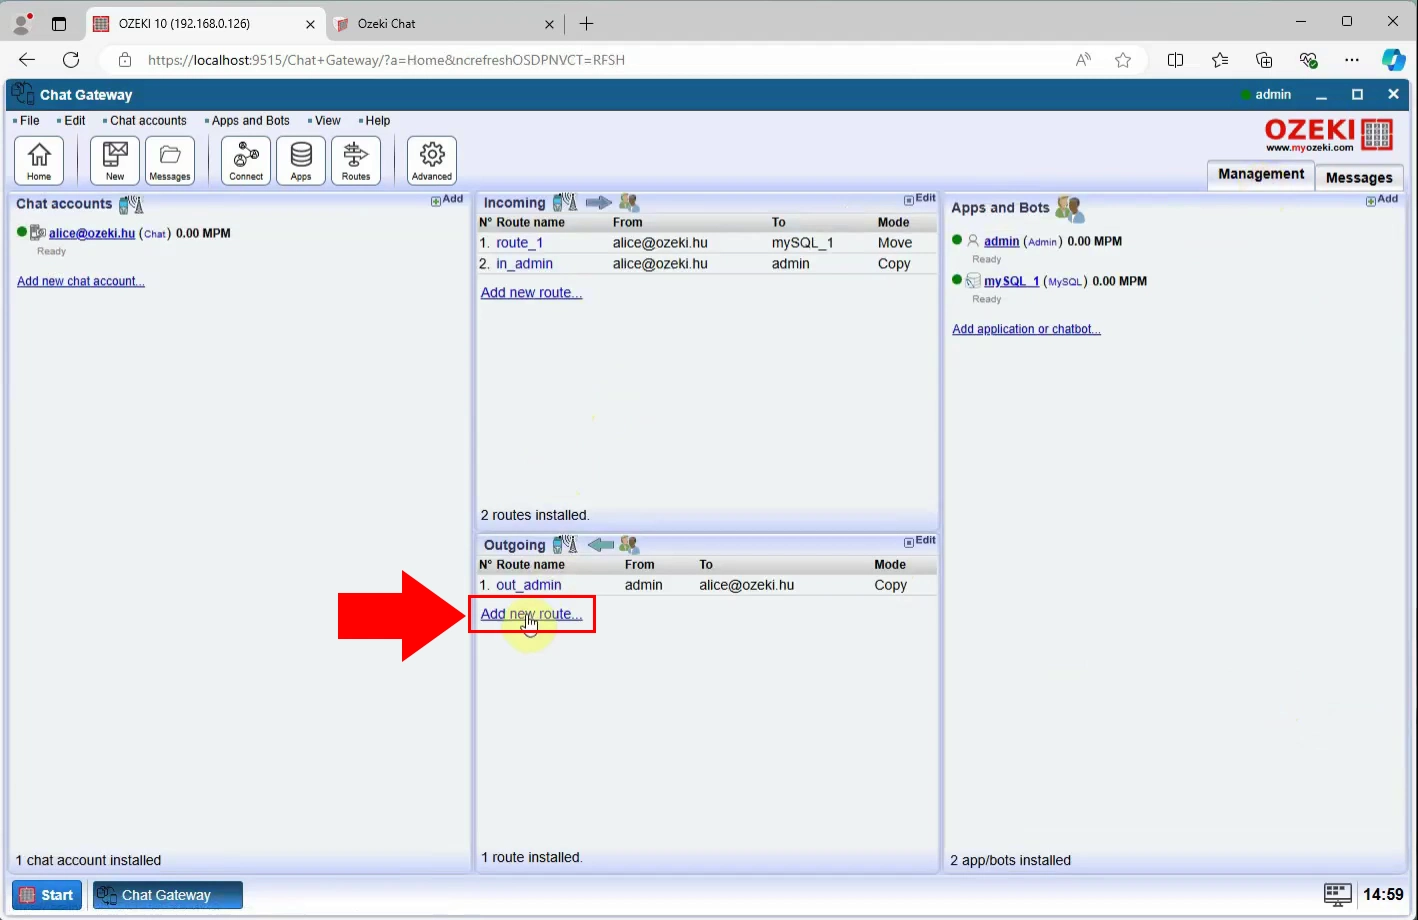
Add new outgoing route by clicking on the "Add new route" option. This configuration will determine how outgoing messages are handled and directed to their intended recipients. Ensure you provide all required information, including routing criteria and destination settings, to complete the setup.
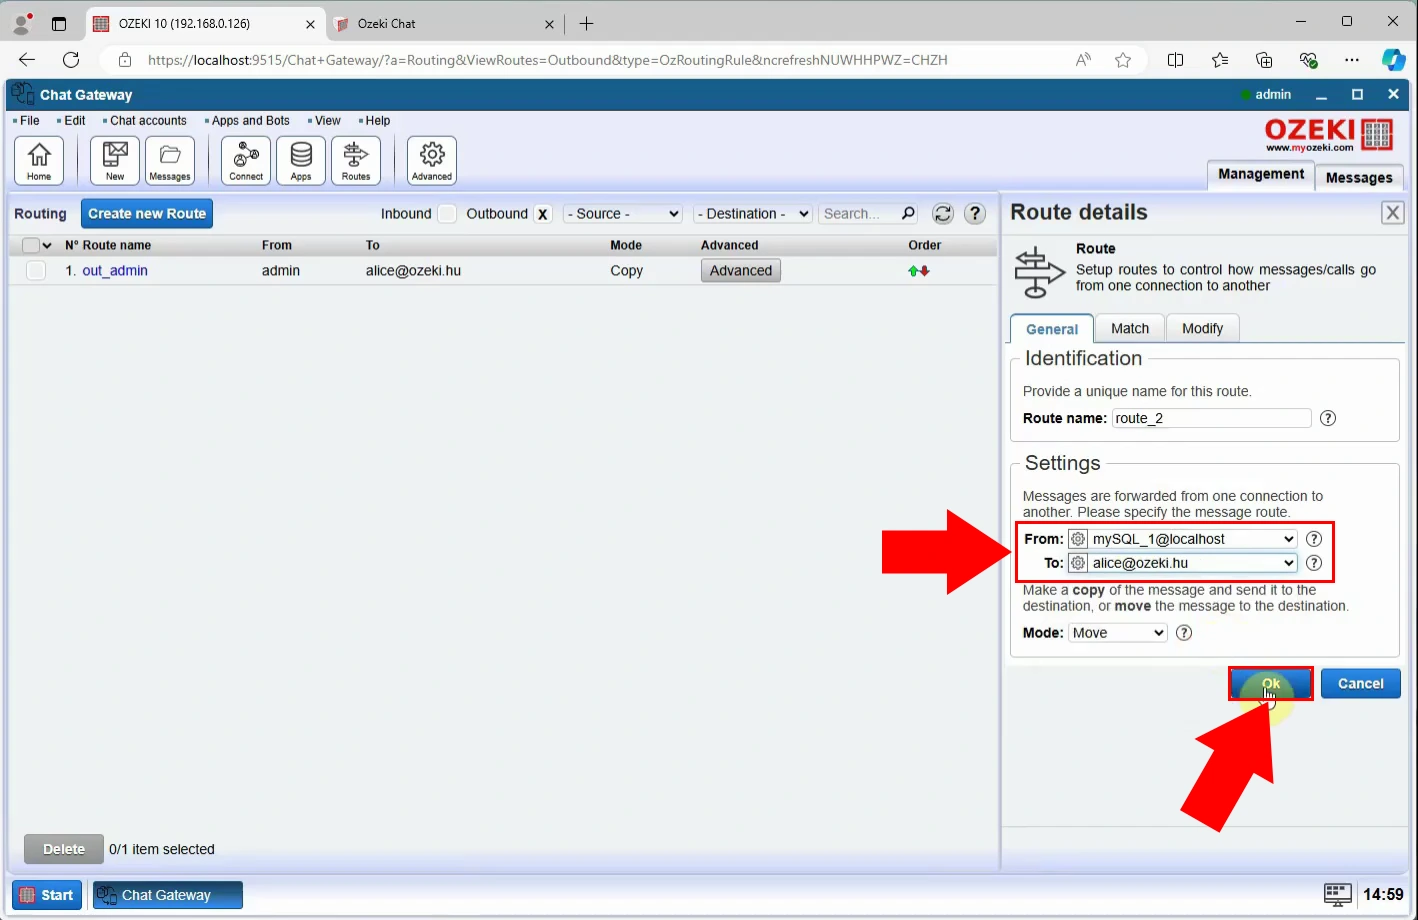
Configure the outgoing route to manage how messages and calls are directed from one connection to another. Start by assigning a unique name to this route, then complete the other necessary settings. Define the message route by specifying the sender and receiver addresses. Once all settings are configured, click the "Ok" button to save the route.
Step 5 - Insert Message into Database
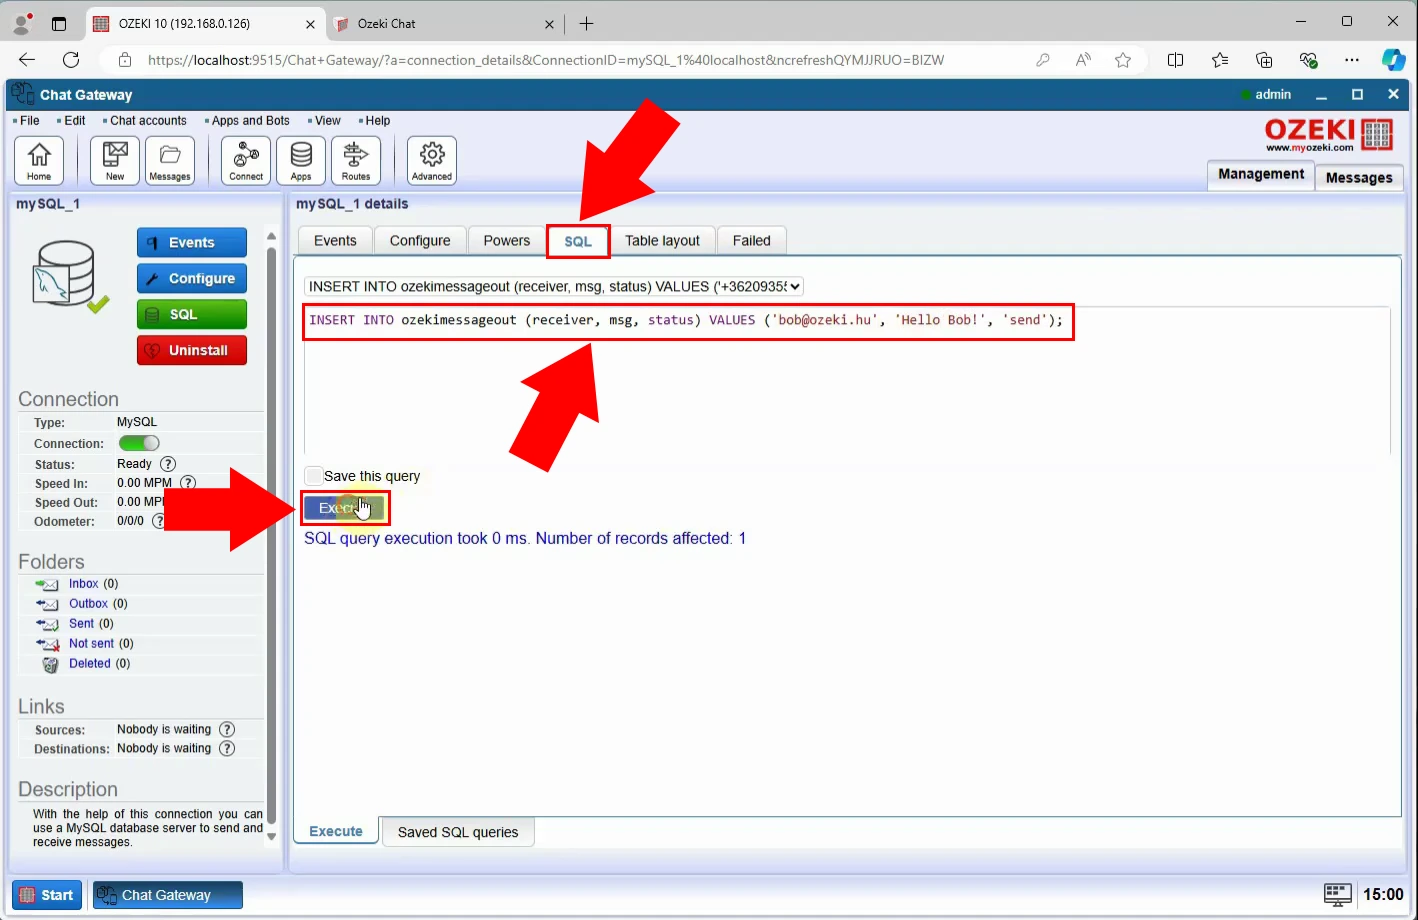
Open mySQL application from the Apps and Bots panel. Select the SQL tab, where you need to set INSERT INTO ozekimessageout query. Update the query with the appropriate receiver and test values. Once you have made the necessary changes, click the "Execute" button to run the query.
Step 6 - Send Chat Message
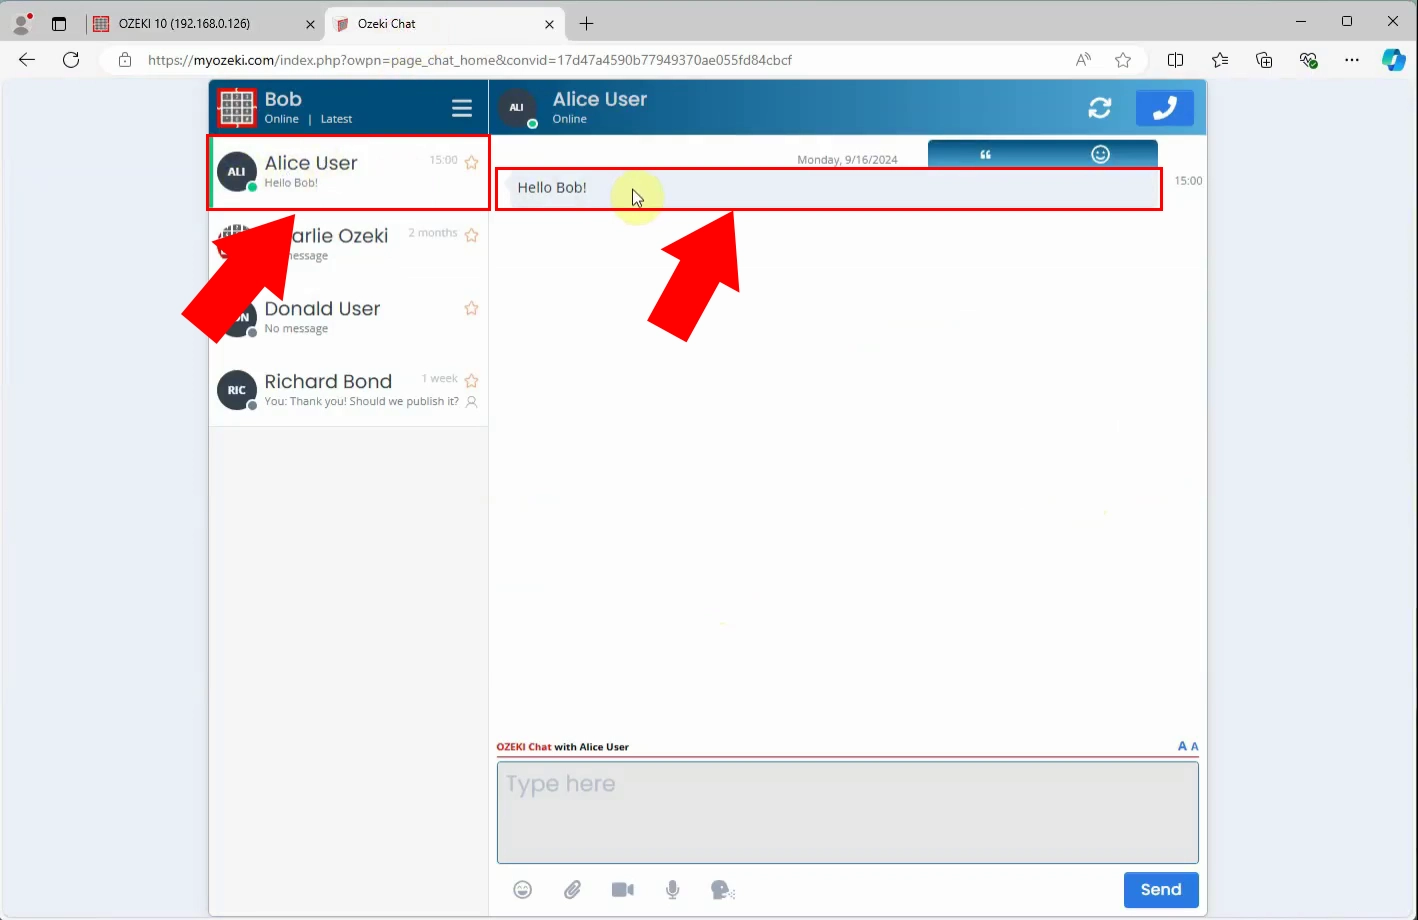
Load the events tab to verify if the messge was sent correctly. Once the message has been sent, open the MyOzeki Chat website in your browser. Log into your MyOzeki account and go to the chats page. If the message was delivered successfully, you will see the chat message with the recipient. To view the complete conversation, click on the chat icon, and the entire chat history with that person will be displayed.
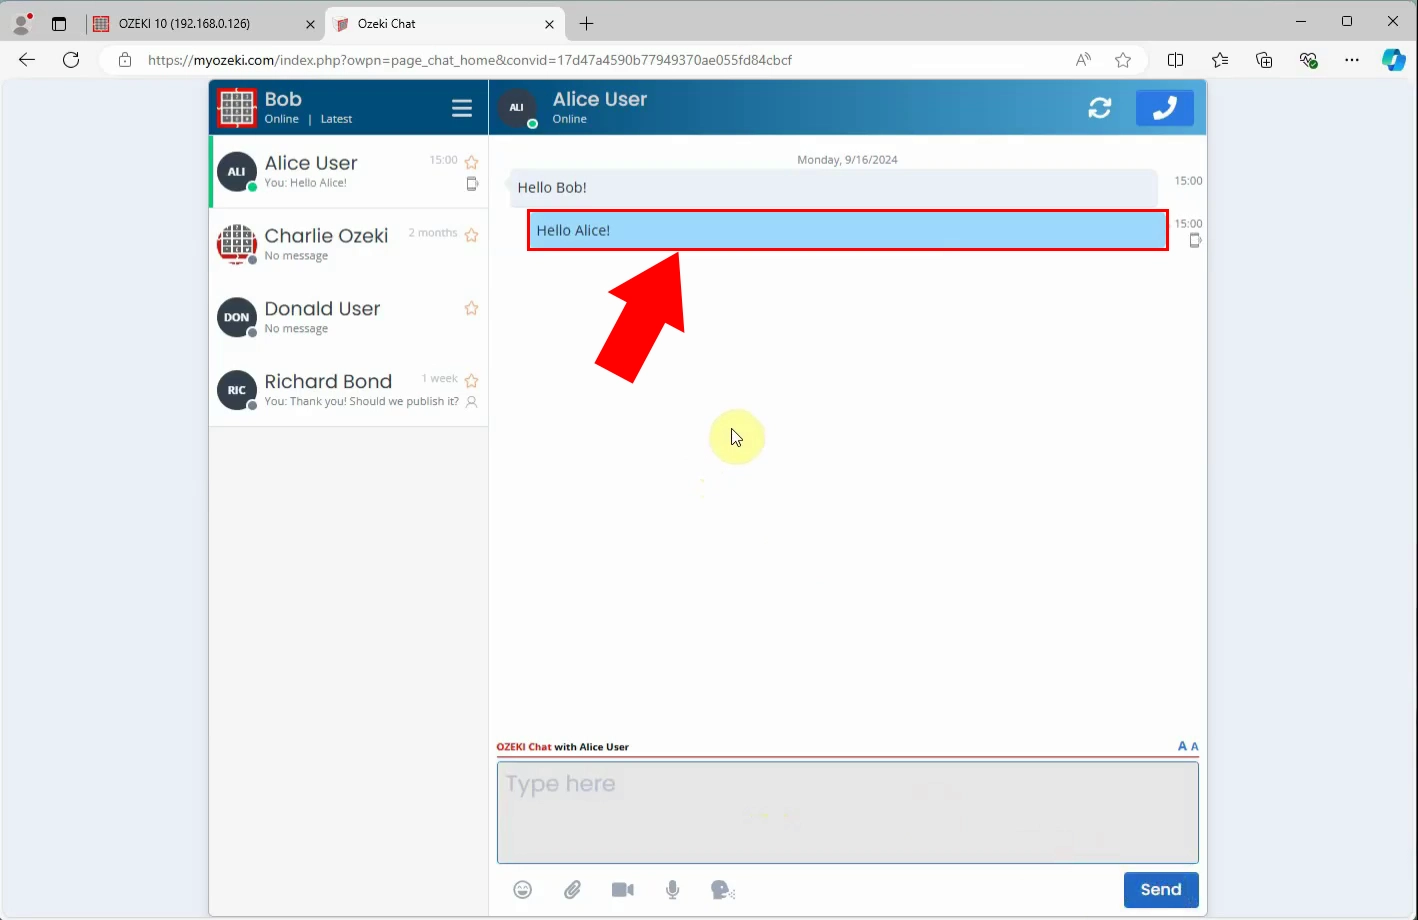
As the recipient, you can reply to the message using the MyOzeki Chat interface, continuing the conversation directly in the chat window. Simply type your response in the input box and press Send to deliver your message instantly. The chat interface is designed for real-time communication, enabling smooth and uninterrupted exchanges between users.
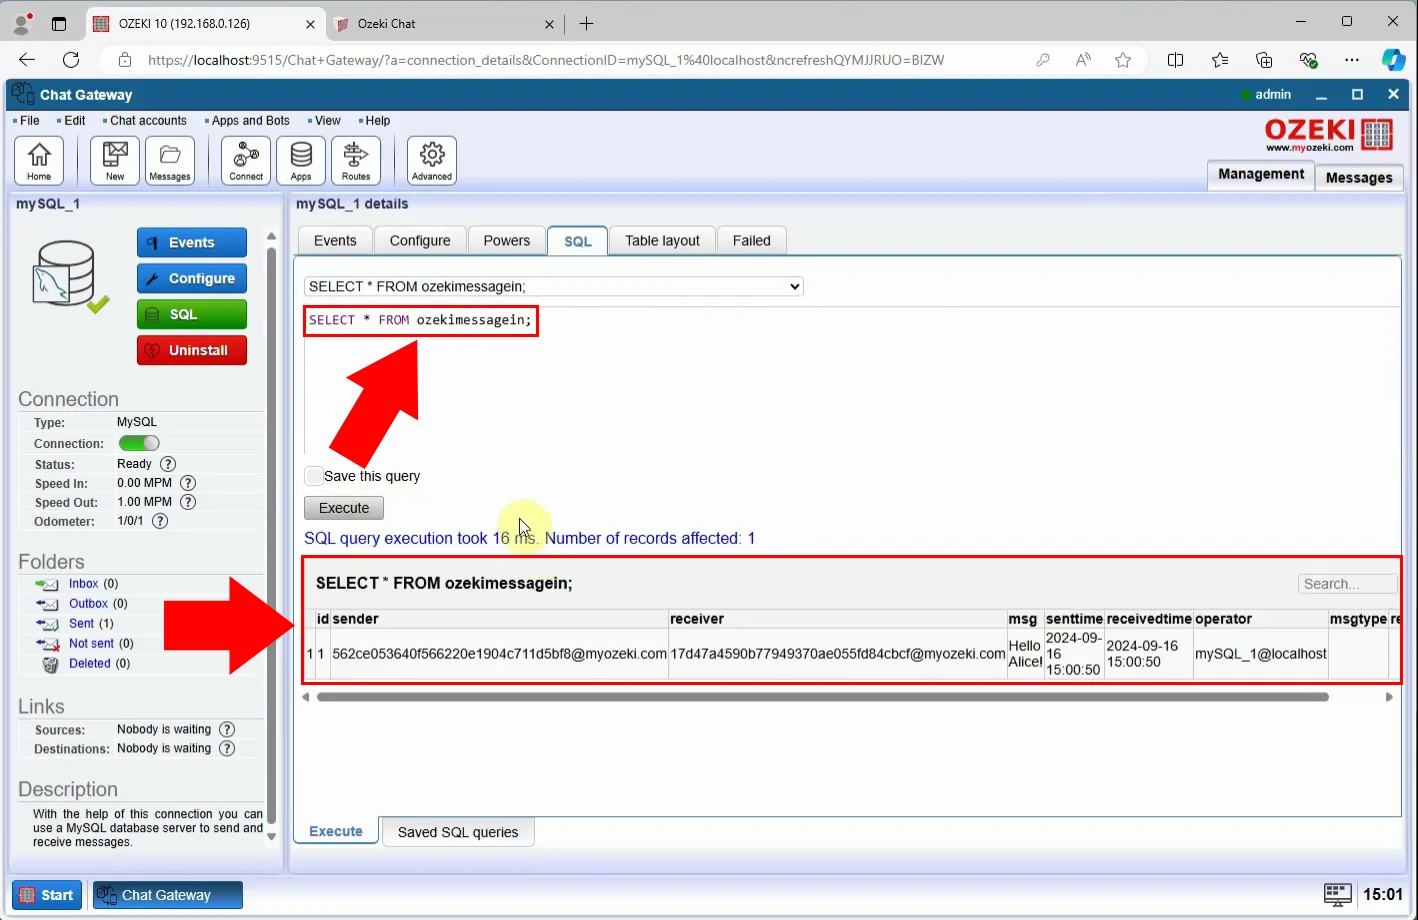
Open Ozeki Chat Gateway and insert the SELECT from ozekimessagin query, and click on the "Execute" button to run it. This will retrieve the chat messages from the database, allowing you to view and verify the details of the inserted messages.
Summary
Integrating your SQL database with the Ozeki Chat Gateway offers an efficient way to manage and send chat messages directly from your database. By following the steps outlined in this guide, you can successfully set up the connection, configure routing for incoming and outgoing messages, and verify that messages are delivered as intended. This setup ensures smooth and reliable communication, leveraging the power of Ozeki Chat Gateway to handle messaging operations with ease.
FAQs
What are the prerequisites for sending chat messages from an SQL database using Ozeki Chat Gateway?
To start sending chat messages from an SQL database, you need an Ozeki Chat Gateway account and a MySQL database. Ensure you have installed the Ozeki Chat Gateway software, configured a new chat account, and established a connection to your MySQL database.
How can I troubleshoot if messages are not being delivered?
Ensure that your database connection is correctly configured and that the routes for incoming and outgoing messages are properly set up. Check for any errors in the connection or routing configurations and consult the events tab for diagnostic information.
Can I send messages from multiple SQL databases?
Yes, you can configure multiple SQL database connections in Ozeki Chat Gateway by setting up separate MySQL connections and routing rules for each database.
What is the purpose of the ozekimessageout and ozekimessagein tables?
The ozekimessageout table is used for storing outgoing messages to be sent, while the ozekimessagein table is used for storing incoming messages that are received by the system.
Can I automate message sending from the SQL database?
Yes, by using scheduled SQL queries or triggers, you can automate the process of inserting messages into the ozekimessageout table, which will be picked up and sent by Ozeki Chat Gateway.
More information
- How to send a chat message from the chat gateway GUI
- How to send chat messages from an SQL database
- How to send chat messages from Txt files
- How to send chat messages using HTTP requests
- VB
- C sharp
- PHP

