How to setup a DDNS client - Example 3 (DuckDNS)
Discover how to easily set up your DDNS client using DuckDNS with our comprehensive guide. Learn how to associate your domain with DuckDNS, execute automated updates, and ensure your DNS records remain up-to-date with your changing IP address. Follow our quick steps for configuration and gain a deep understanding of DDNS setup with DuckDNS. Access the tutorial now for hassle-free management of your dynamic DNS needs.
What is DuckDNS?
DuckDNS is a free dynamic DNS service hosted on AWS (Amazon Web Services) that allows users to associate a domain name with their changing IP address.
How to setup a DDNS client - Example 3 (DuckDNS) (Quick Steps)
To setup a DDNS client
- Visit the website of Duck DNS
- Sign in with your Google account
- Connect your domain to Duck DNS
- Install linux cron
- Copy the provided cron command and paste it into the Terminal
- Create a directory to store your .sh script file
- Insert the necessary update command into the .sh file
- Set the permissions on the .sh file to allow execution as a script
- Open the Crontab file and insert the command
- Execute the .sh script to test
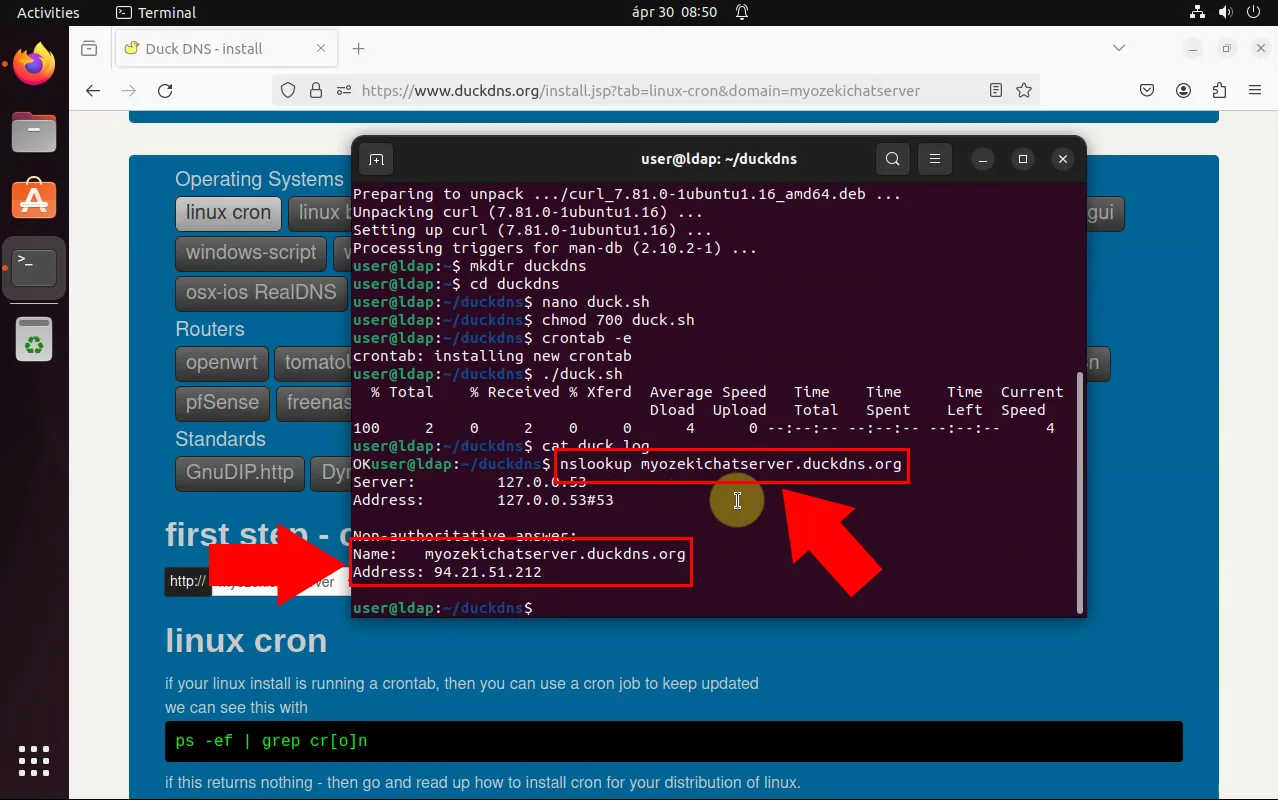
- Verify the result
DDNS client setup video (Video tutorial)
In this following video tutorial, we will provide you a coprehensive guide about how to setup a DDNS client, especially by using DuckDNS which is a free dynamic DNS hosted on AWS. The video contains all the neccessary steps you need to take, so you can complete this task with ease. By the end of the tutorial, you will have a wide knowledge about how to configure a DDNS client using DuckDNS.
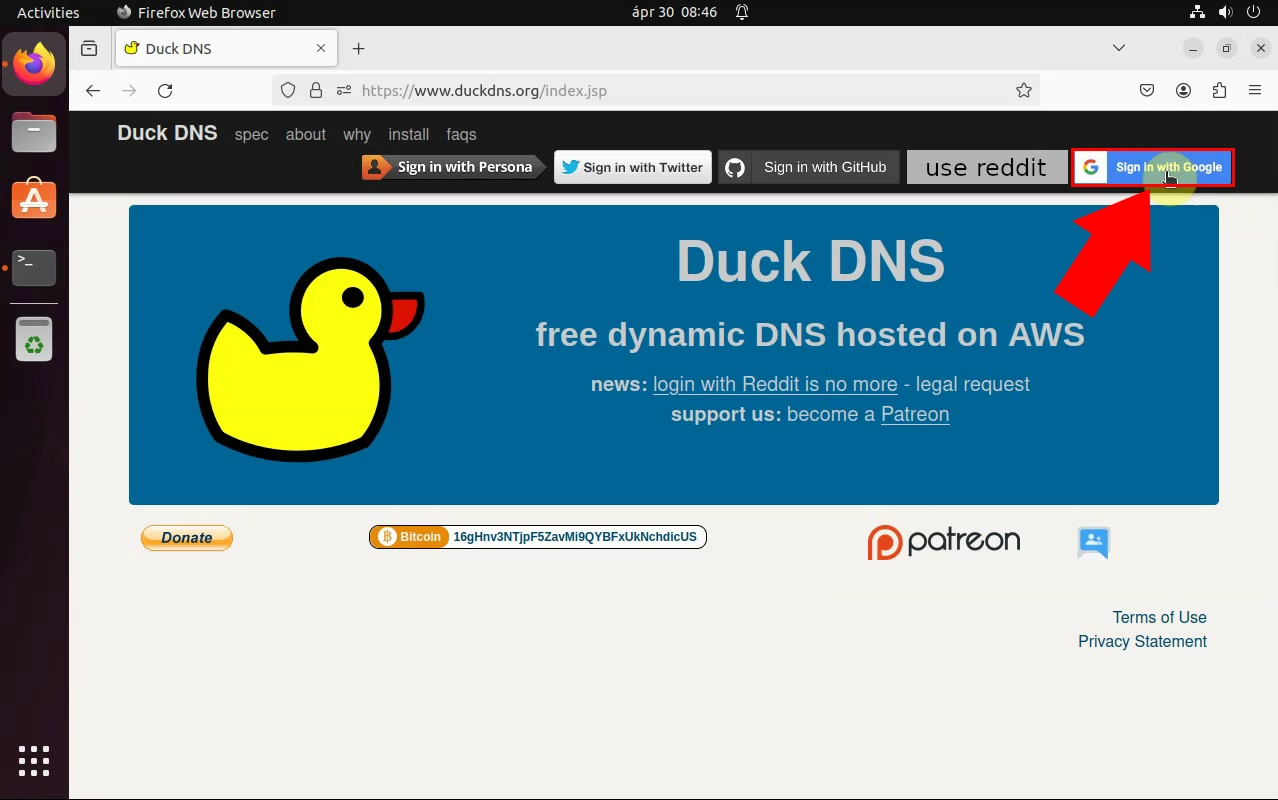
As a first step, load the https://www.duckdns.org/ website on your computer's browser. As soon as you have loaded it, sign into DuckDNS with your Google account login credentials. Find the "Sign in with Google" option in the page, then create a free account. The Google login provides you to set up these information automatically within a click.
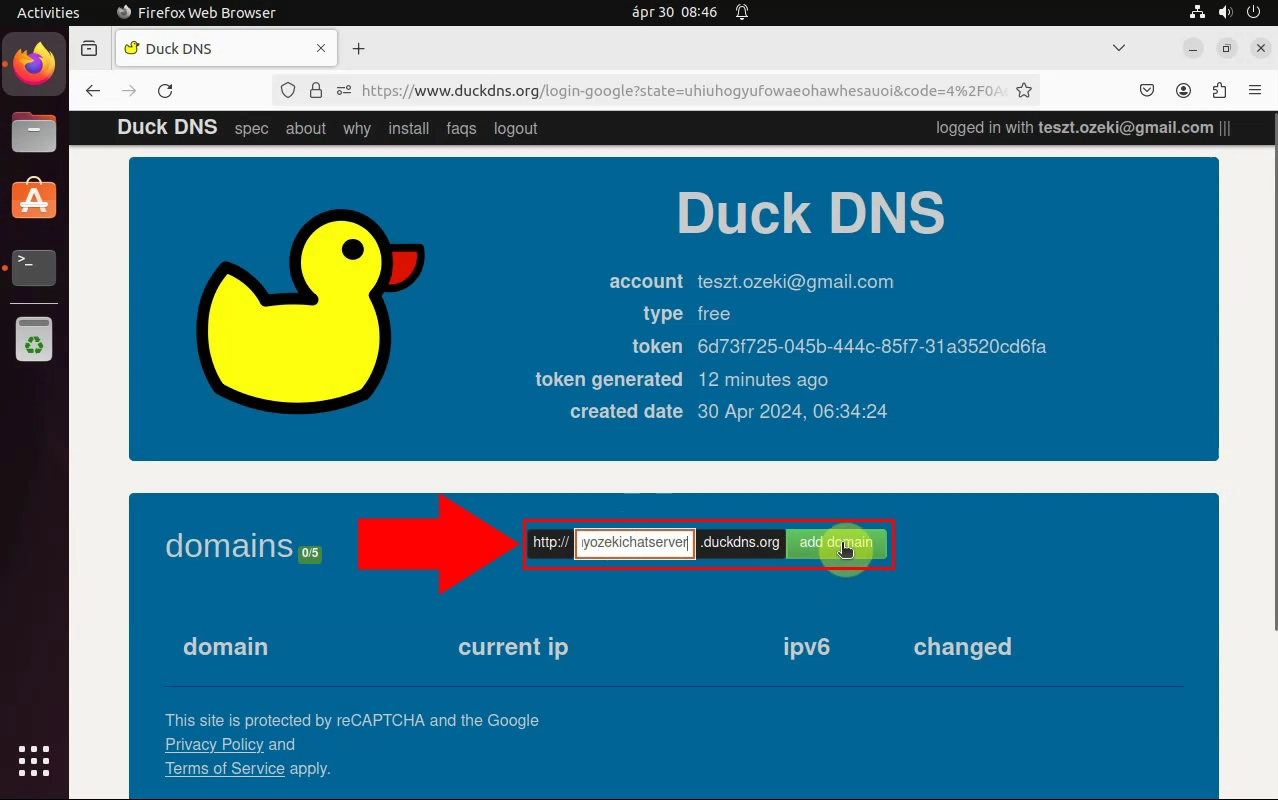
As your login credentials have been shown at the DuckDNS site, you have to connect your domain to DuckDNS. Enter your websie's domain into the certain box, then click on the "add domain" to initiate the connection. In case if your domain has been connected successfully, you will receive a notification about the successful connection.
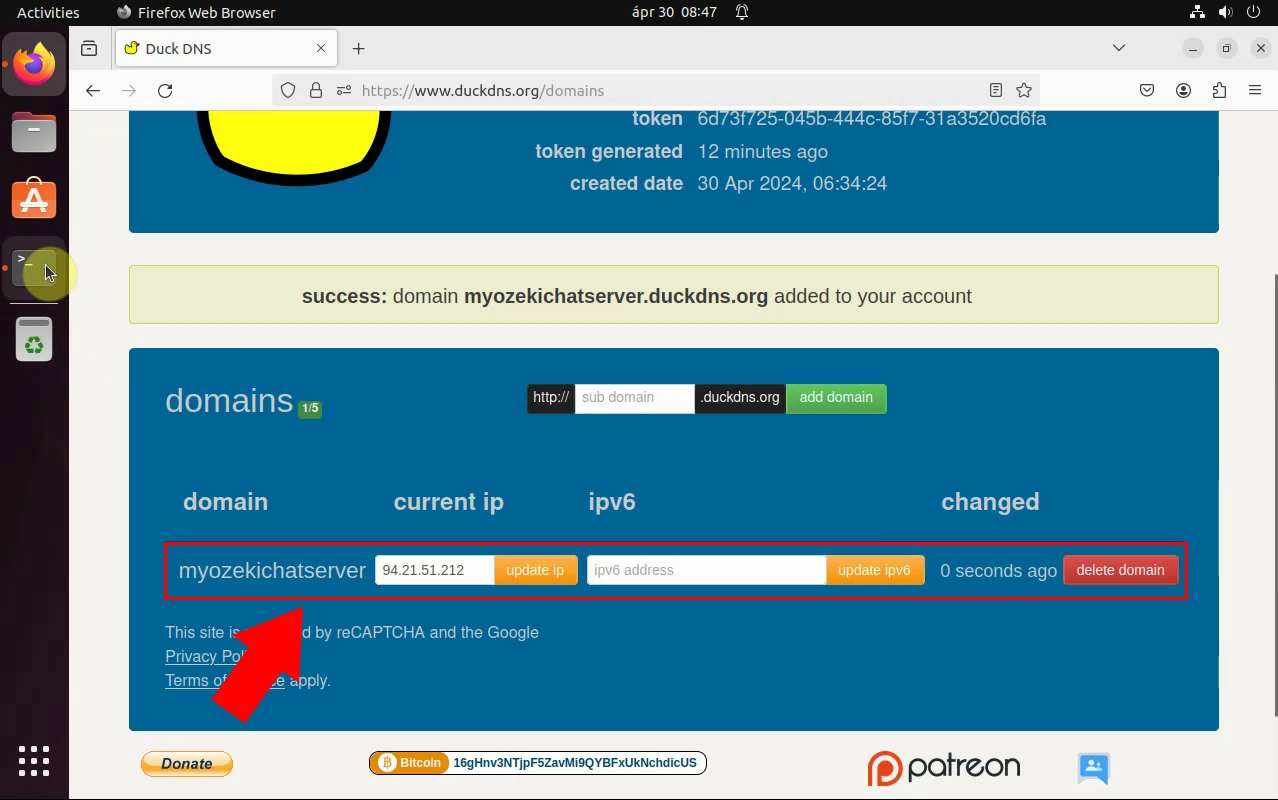
Now, as your domain is connected to your Duck account, you will see it's name listed on the domains board. You can see the ip address, or add ipv6. You can upadte them, or delete them when it's needed. It ensures that you have a full control over your domain configuration.
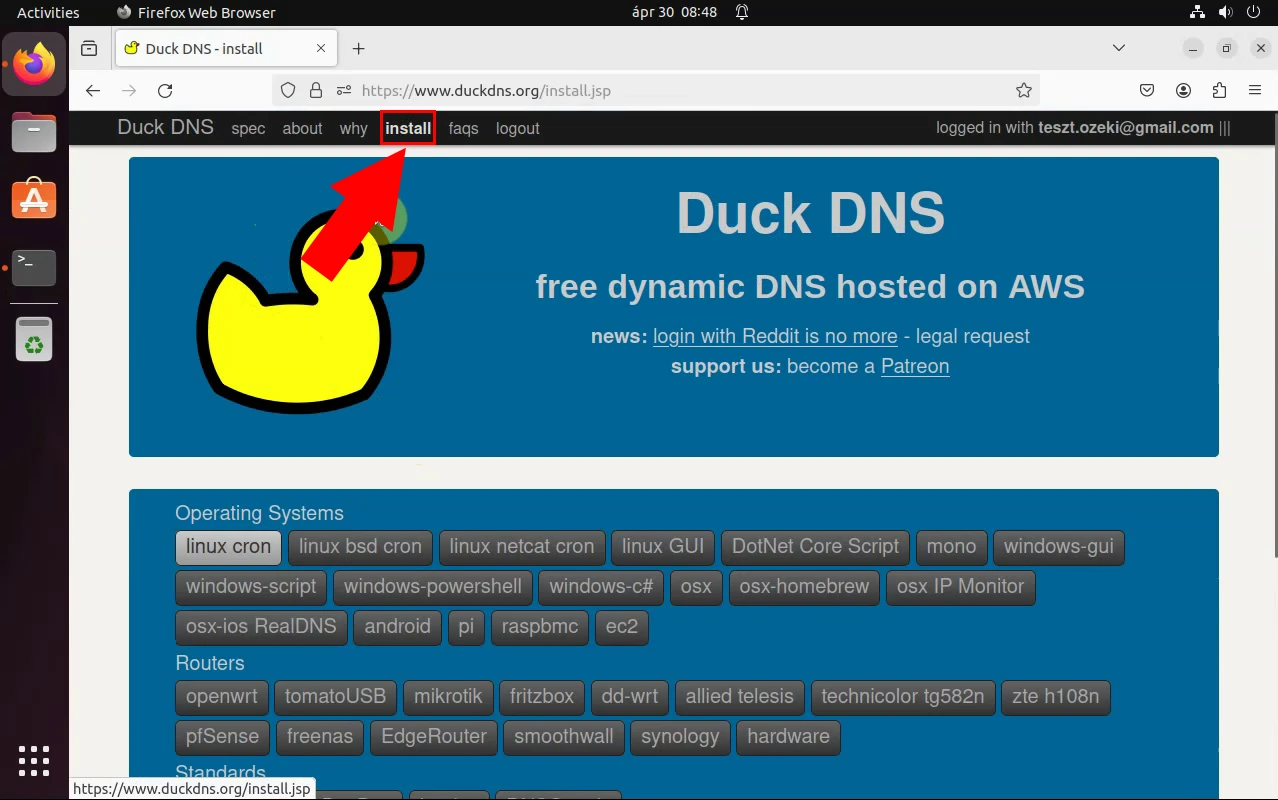
In this subsequent phase of the process, you have to find the "Install" option. Head to the top of the page, then choose the "Install" option from the gives ones. By clicking on it, a papge will appear from which you can choose from different operating systems accouding to your needs.
From the Operating System selection page, choose the "linux cron" option. After that choose a domain name. Choosing the operating system, in this case, "Linux cron," is necessary because it determines the instructions and commands you'll use to set up the DDNS client. As for choosing a domain name, it's essential because DDNS (Dynamic DNS) involves associating a domain name with your dynamically changing IP address. The domain name acts as a consistent address for accessing your network or services, even if your IP address changes.
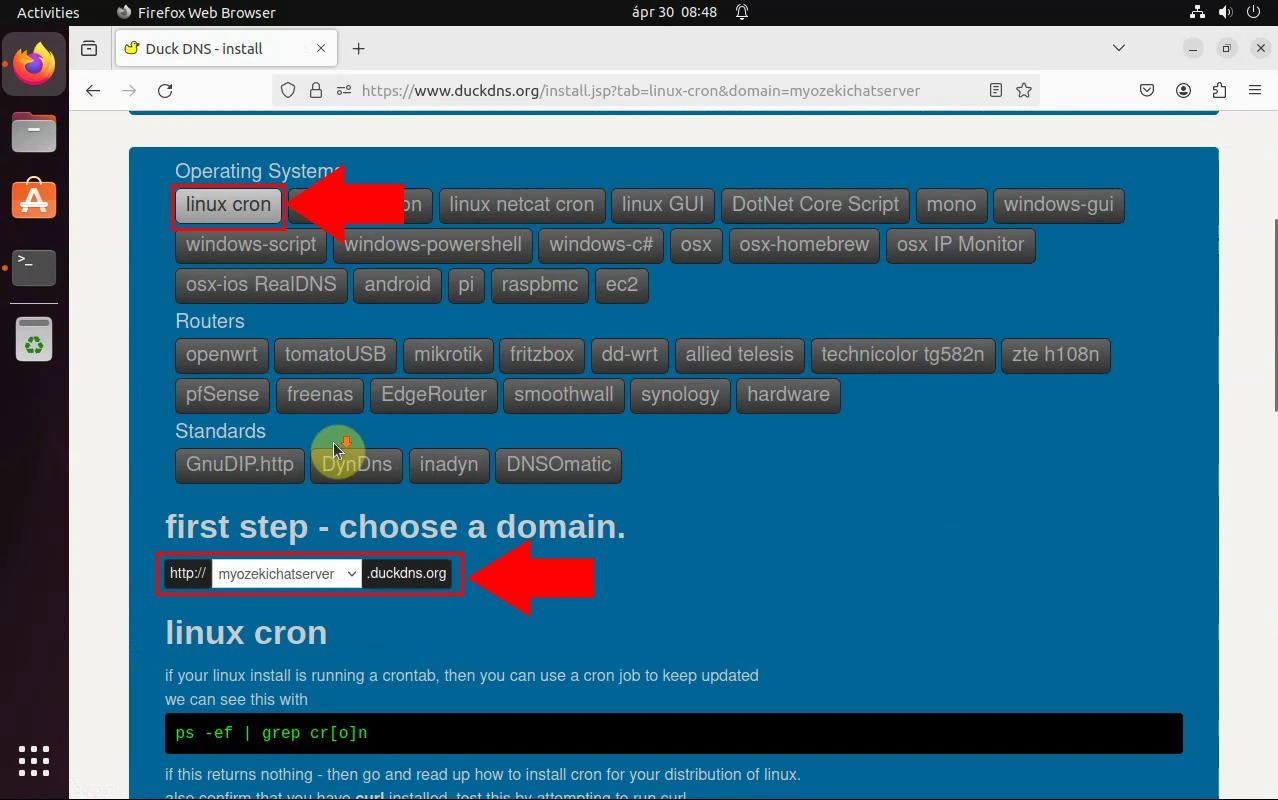
Selected the previous information, you will see your linux cron. If your linux install is running a crontab, you can use a cron job to keep updated. Copy the given cron, then start the Terminal. Paste the cron, then login user. In the context of setting up a DDNS (Dynamic DNS) client, Cron is used to automate the process of updating your DNS records with the current IP address provided by your internet service provider. Curl is typically used to send HTTP requests to the DDNS service provider's server, informing it of any changes to your IP address. This allows the DDNS service to update your domain's DNS records accordingly. Copy and paste the "curl" that you have installed into the Terminal. Paste the "sudo snap install curl", then wait for reading package lists.
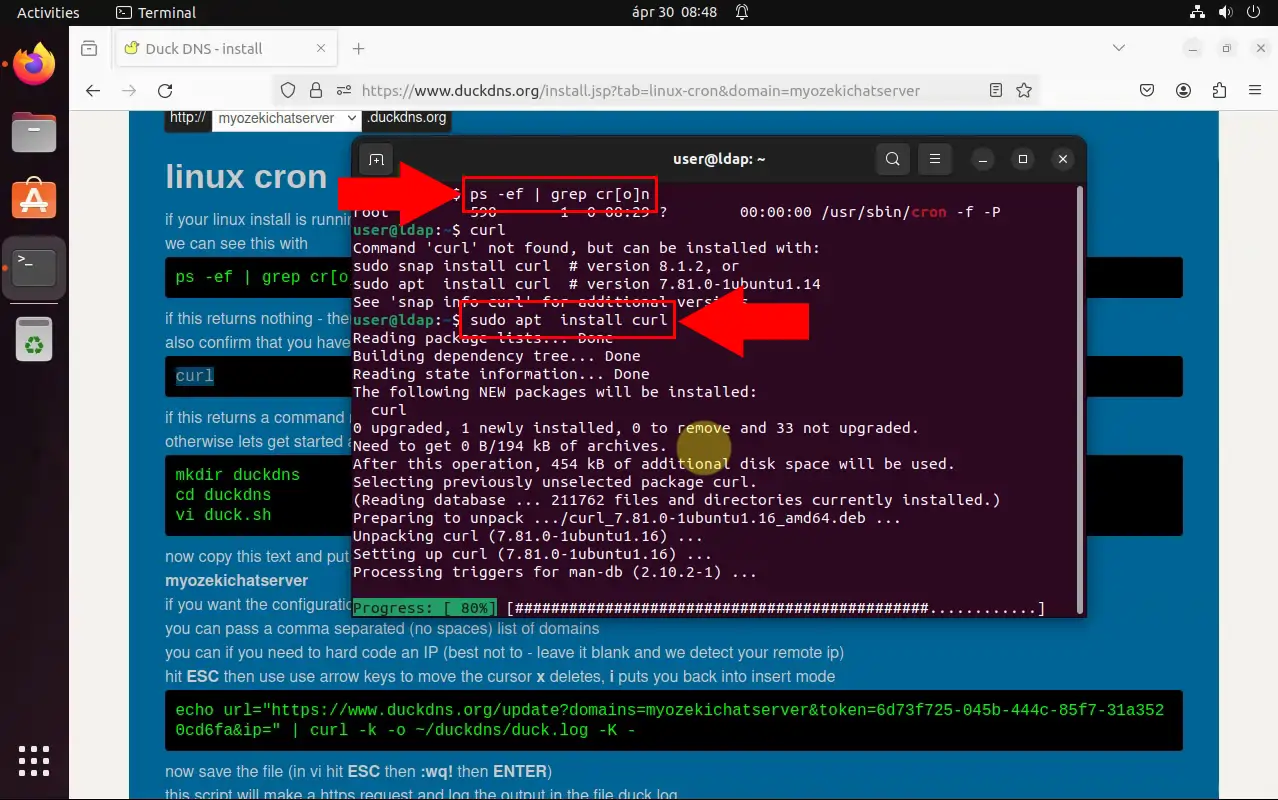
After that your process is done. Copy and paste the main script. Create a directory to put your files in. There you will store your shell script (.sh) file. This script will contain the commands needed to update your DNS records with DuckDNS.
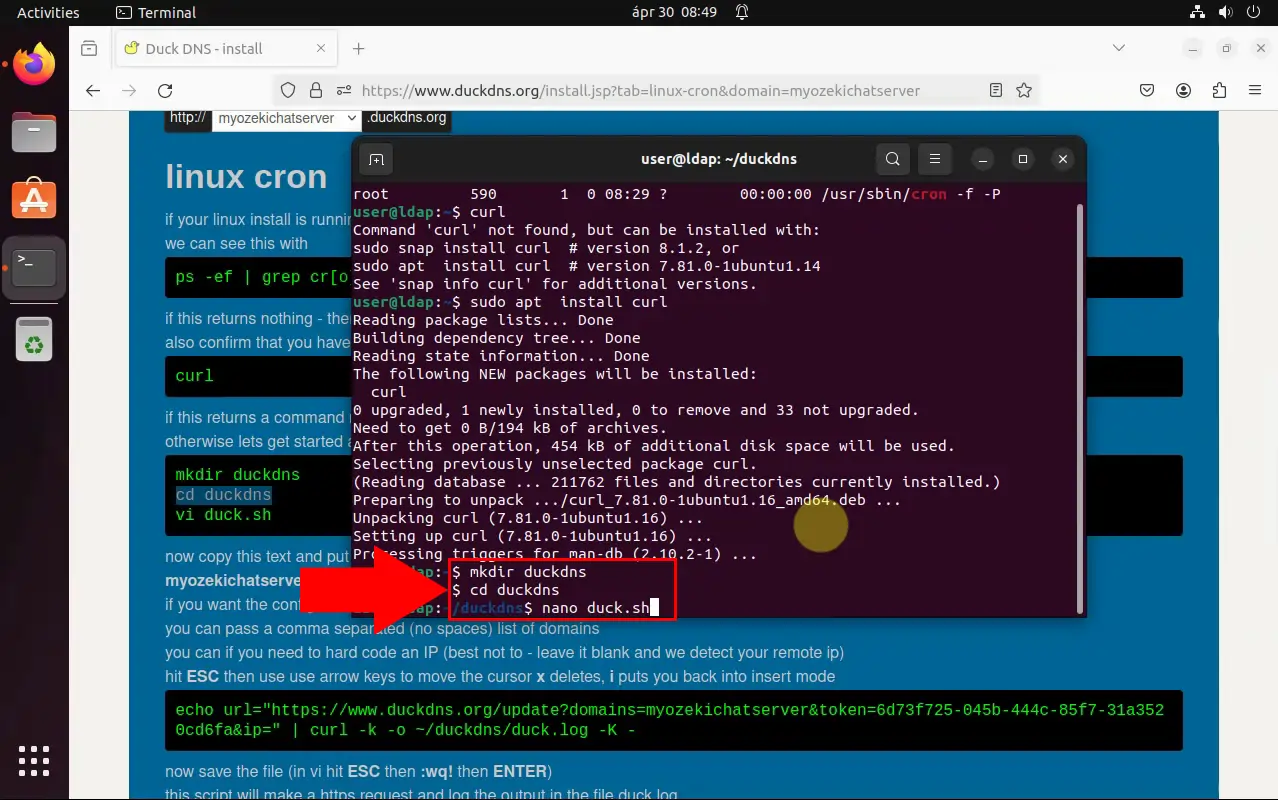
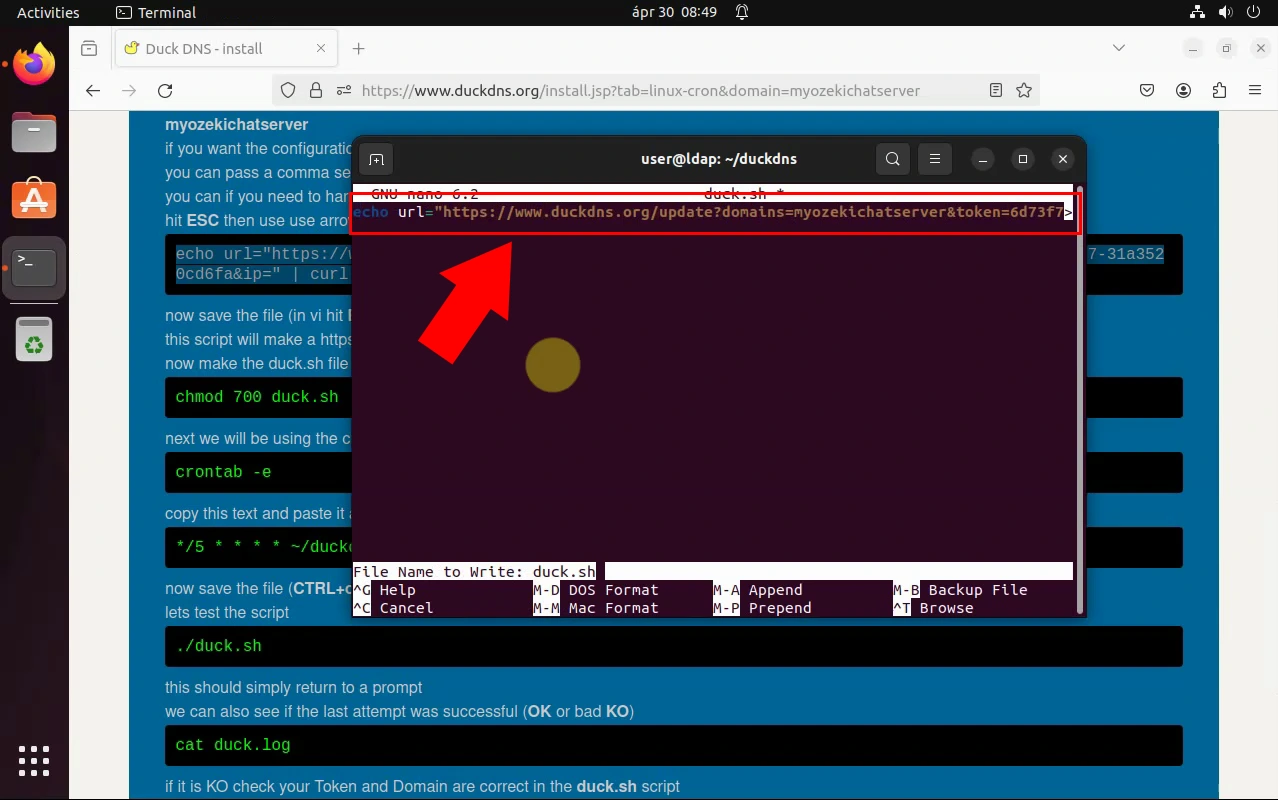
Within the .sh file, insert the command that updates your DNS records with DuckDNS. This command typically involves using Curl to make an HTTP request to DuckDNS's update URL with your authentication token and domain name.
Set the necessary permissions on the .sh file to allow it to be executed as a script. Enabling automated updates for your DDNS client, prevents unauthorized execution while using it's functionality.
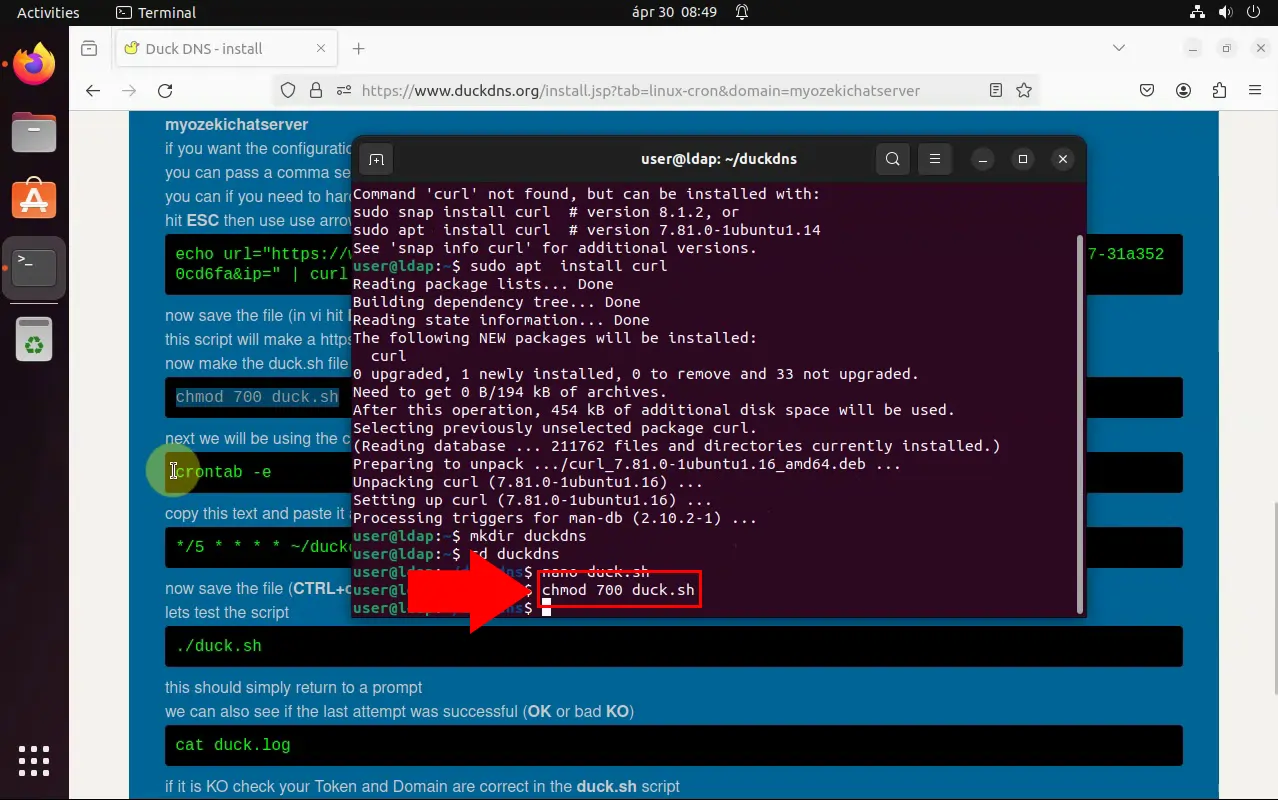
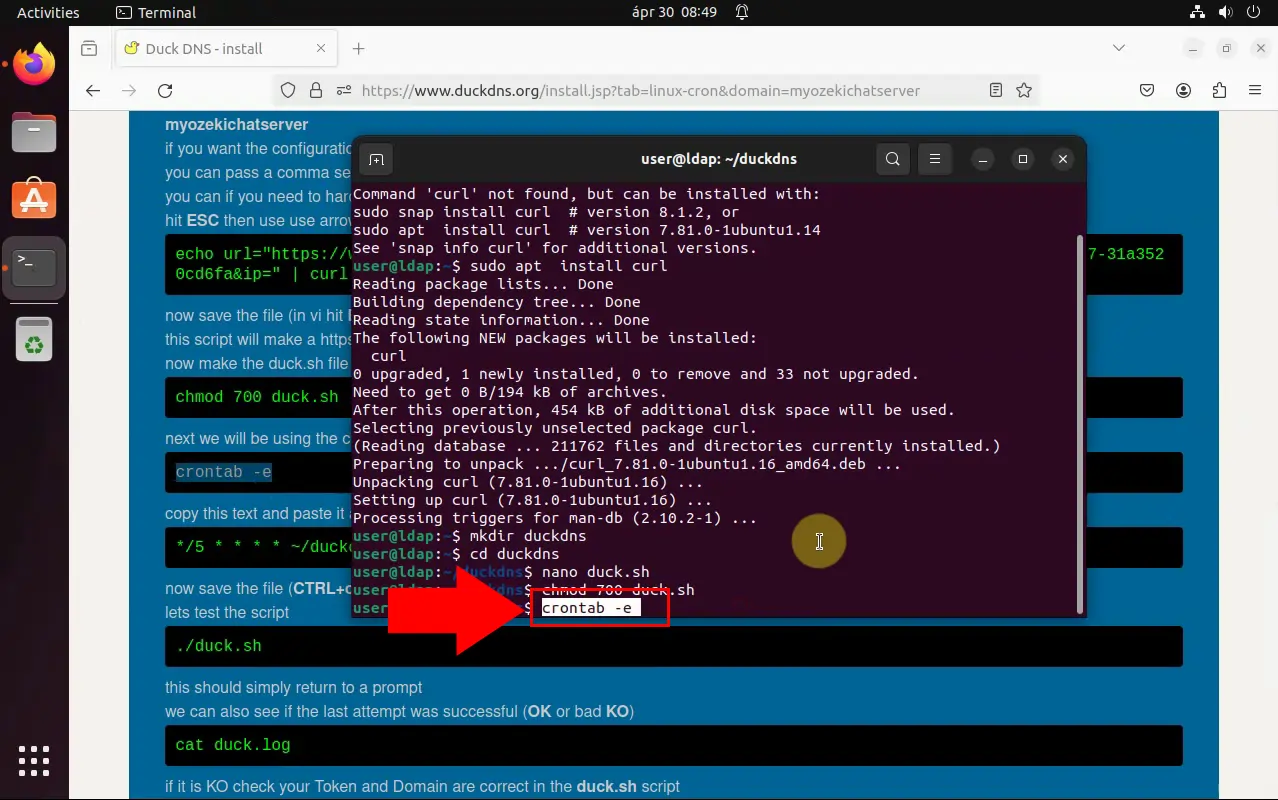
Open the Crontab file, which is used to schedule periodic tasks in Linux. Opening the Crontab file is necessary as it allows users to schedule and automate recurring tasks, such as updating DDNS records, at specific intervals in a Linux environment.
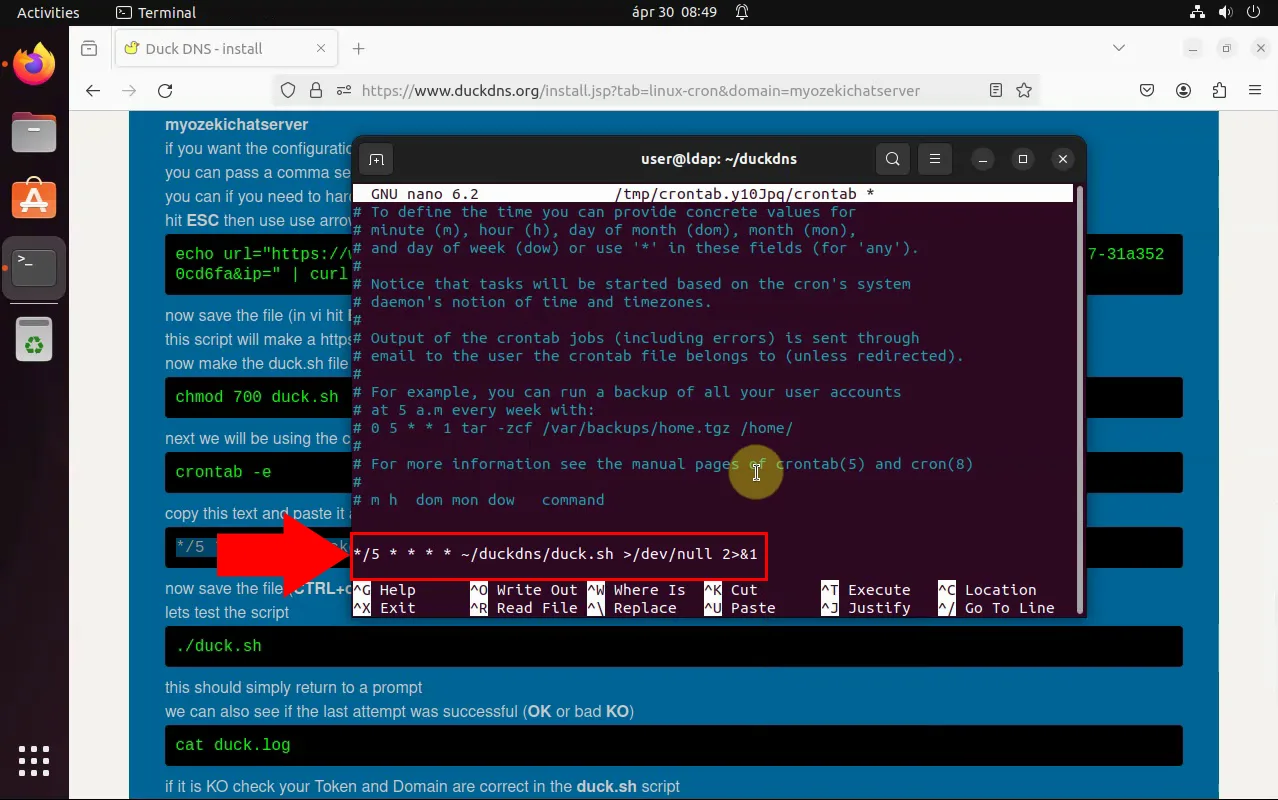
Insert a command into the Crontab file that specifies when and how often the .sh script should be executed. This ensures that your DNS records are regularly updated with the correct IP address.
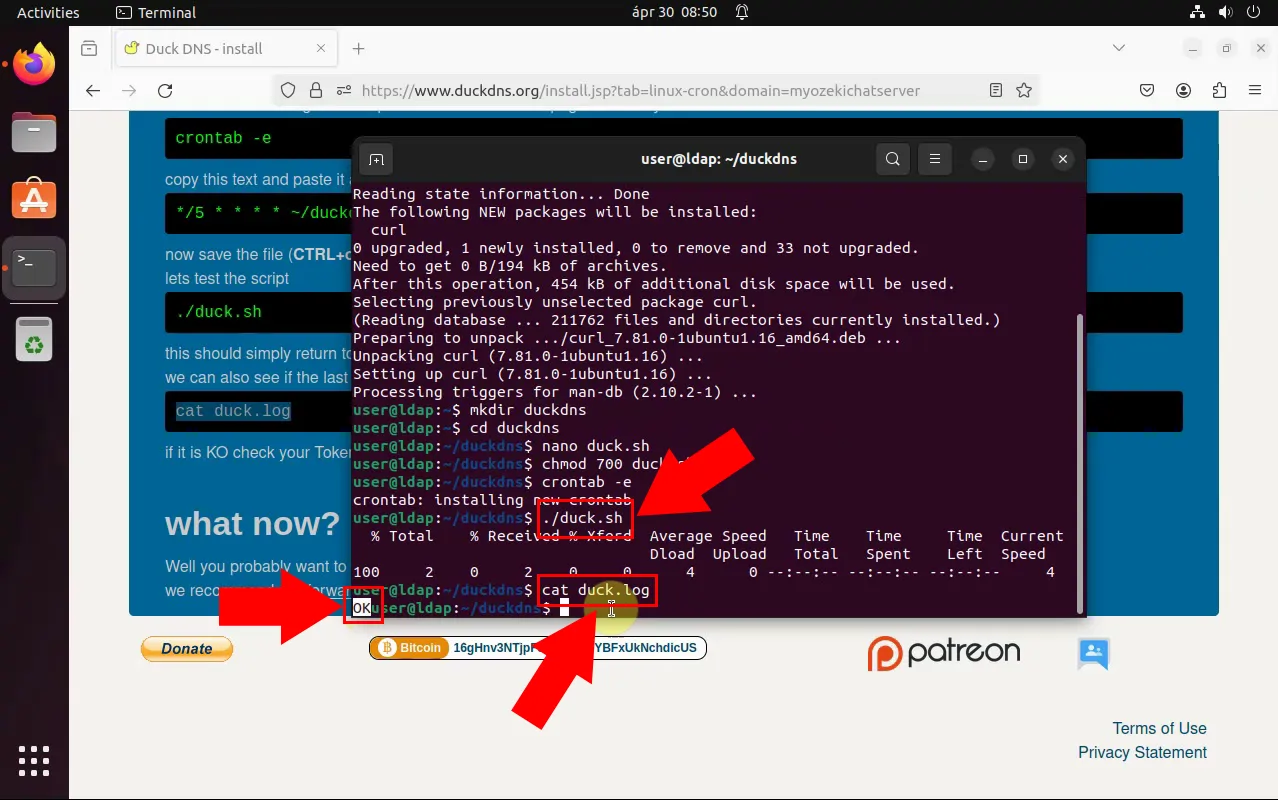
Execute the .sh script to test if it successfully updates your DNS records with DuckDNS. Verify the result to ensure that your configuration is working as expected.
Inserting a command into the Crontab file is essential as it allows you to define the schedule and frequency at which your .sh script, responsible for updating DNS records, should run. By specifying these parameters within the Crontab file, you ensure that the script executes at regular intervals, guaranteeing that your DNS records stay current with the accurate IP address.
FAQs
Why do I need DuckDNS for DDNS?
DuckDNS provides a convenient way to maintain access to your network or services by associating a domain name with your dynamically changing IP address. This ensures consistent accessibility, even if your IP address changes.
Is DuckDNS compatible with all operating systems?
Yes, DuckDNS is compatible with all major operating systems. The setup process may vary slightly depending on the operating system, but DuckDNS provides instructions for each platform.
Is DuckDNS secure?
DuckDNS takes security seriously and implements measures to protect user data and privacy. However, users should follow best practices, such as using strong passwords and keeping software up-to-date, to enhance security.
How often should I update my DDNS records with DuckDNS?
It is recommended to update your DDNS records regularly to ensure they accurately reflect your current IP address. Using automated updates with tools like Cron ensures that your DNS records stay up-to-date without manual intervention.
Summary
This guide provided step-by-step instructions for setting up a DDNS (Dynamic DNS) client using DuckDNS. Users started by signing into DuckDNS and connecting their domain, followed by installing Linux cron, creating necessary directories, and setting up automated updates using the Crontab file. With our quick steps and clear instructions, users gained the expertise needed to manage their dynamic DNS needs effortlessly. Access the tutorial for configuration of DNS records.

