How to setup a DDNS client - Example 1 (Dynu)
In today’s world, being able to access your devices and services online is very important. Setting up a Dynamic Domain Name System (DDNS) client is a helpful skill for anyone who manages a home or business network. This guide provides a comprehensive walkthrough for setting up and managing a Dynamic DNS (DDNS) service using Dynu. It covers account creation, domain configuration, and installing the Dynu IP Update Client, ensuring your hostname always resolves to the correct IP address. This knowledge lets you reach your devices from anywhere, even if your internet provider changes your IP address often. This is important for hosting servers, checking security cameras, or controlling smart home devices remotely.
What is Dynamic DNS?
Dynamic DNS (DDNS) is a service that automatically updates the Domain Name System (DNS) to reflect changes in the IP addresses of devices connected to the internet. This is particularly useful for users with dynamic IP addresses provided by ISPs, allowing them to maintain a consistent domain name that points to their ever-changing IP address.
How to setup DDNS client (Quick steps)
To setup DDNS client- Create a Dynu account
- Log in to the Dynu Control Panel
- Add a new Dynamic DNS service
- Install the Dynu IP Update Client
- Configure the client with your Dynu account details
- Verify the hostname resolution
Setup DDNS client (Video tutorial)
In this video, we demonstrate how to set up a Dynamic DNS service using Dynu. The tutorial covers the entire process from account creation to domain configuration and installing the Dynu IP Update Client. By the end of the video, you will have a fully functional DDNS setup that keeps your domain name updated with your current IP address.
Register to Dynu (Step-by-step tutorial)
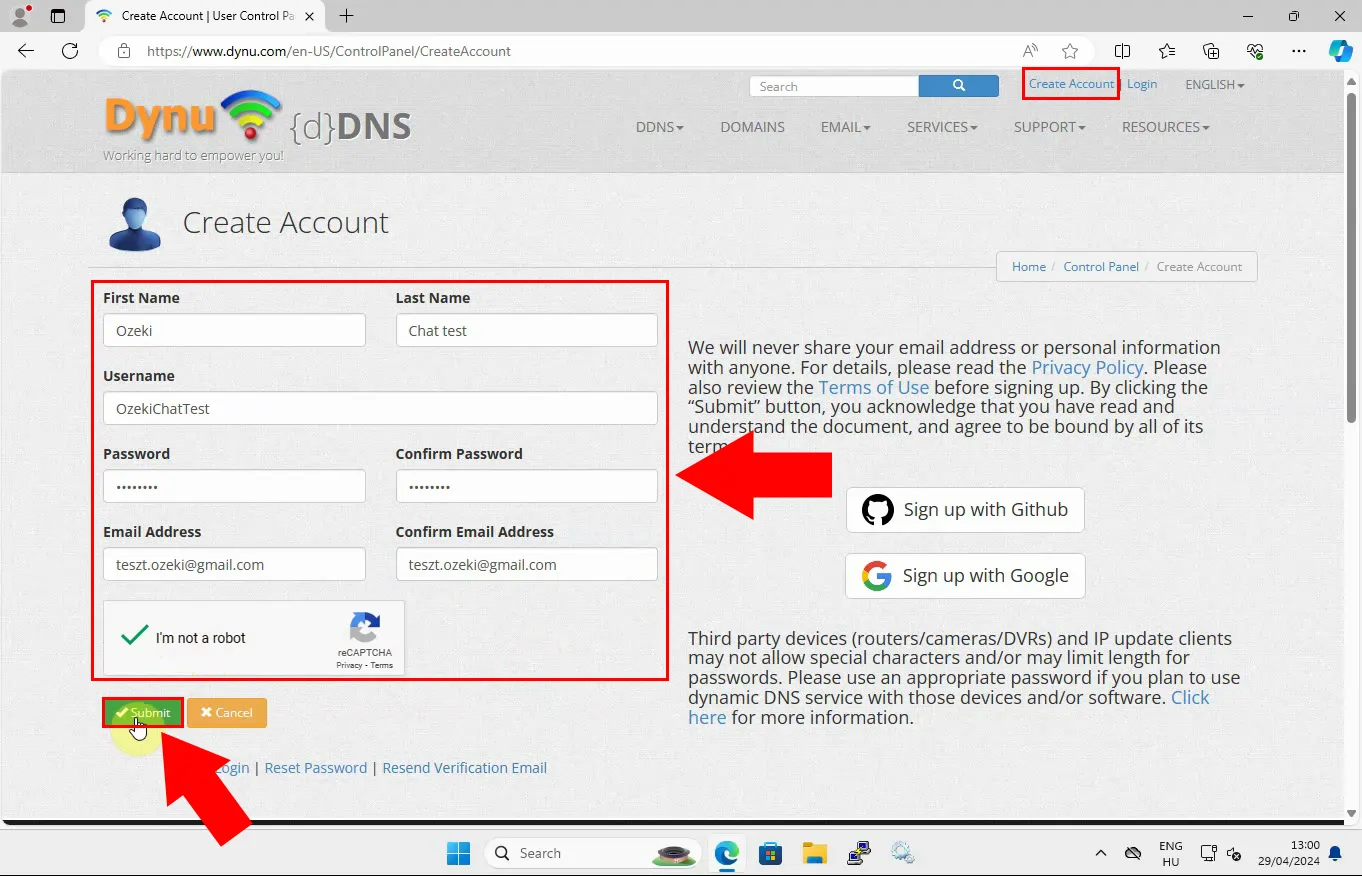
In order to begin the whole process, you first need to browse the Dynu website. Once the page loaded, locate the 'Create Account' link in the upper right corner and give it a click. This will take you to the next step, where you need to fill out the registration form. Start with providing your first and than your last name into the correct text boxes. You will also be required to enter a username for the account. Next, you need to provide and a password and confirm it. Lastly please enter an E-mail address and confirm it. Be sure to check the "I’m not a robot" box to verify yourself. Once you have filled in all the information, double-check it for accuracy, and then click the green 'Submit' button show in Figure 1 to complete the registration.
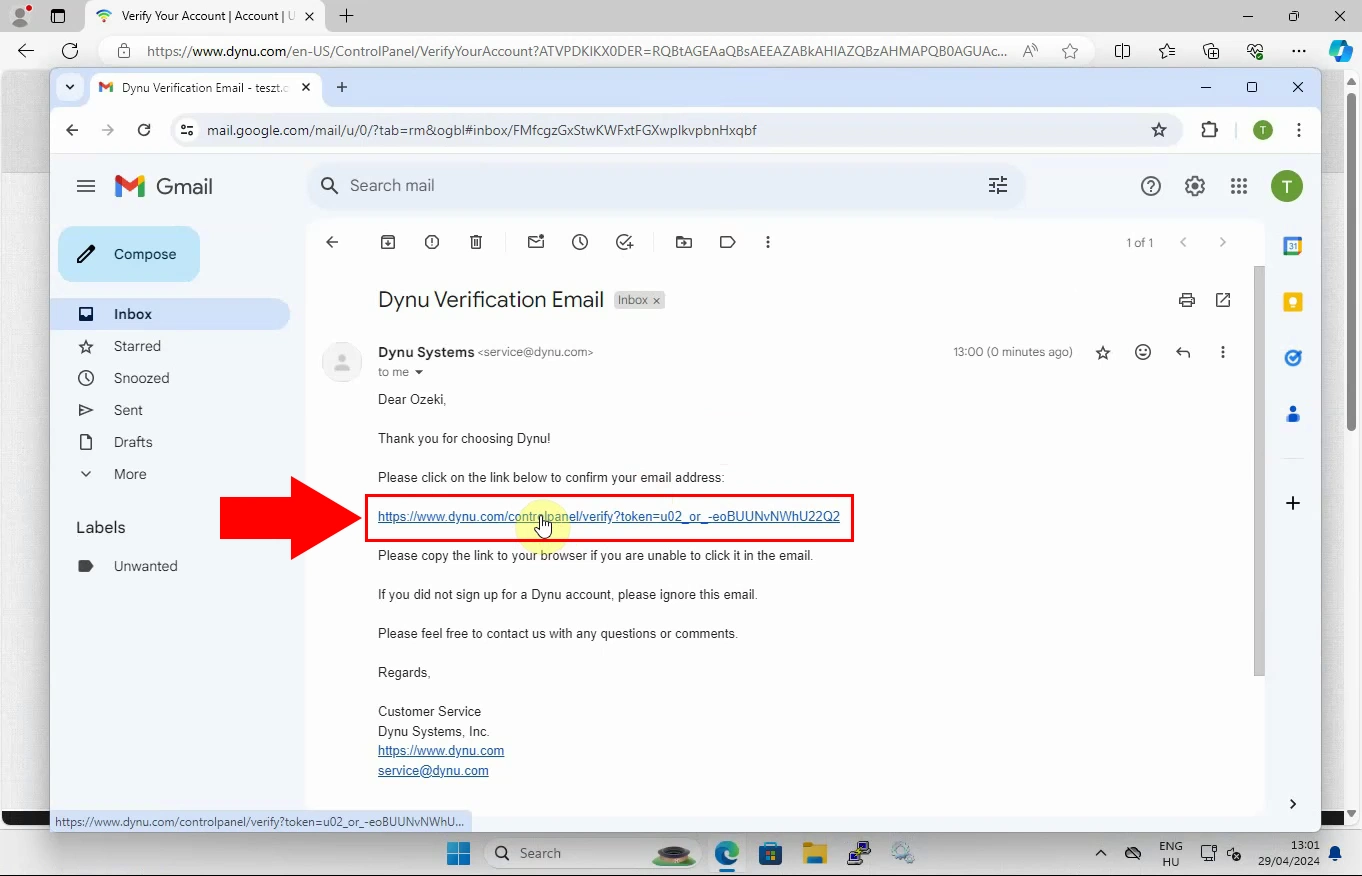
Once you have submitted your registration, check your email inbox for a confirmation message from Dynu. Open the email, and to verify your email address, click on the link provided, as shown in Figure 2. This verification step is essential to complete your account setup and activate your Dynu services.
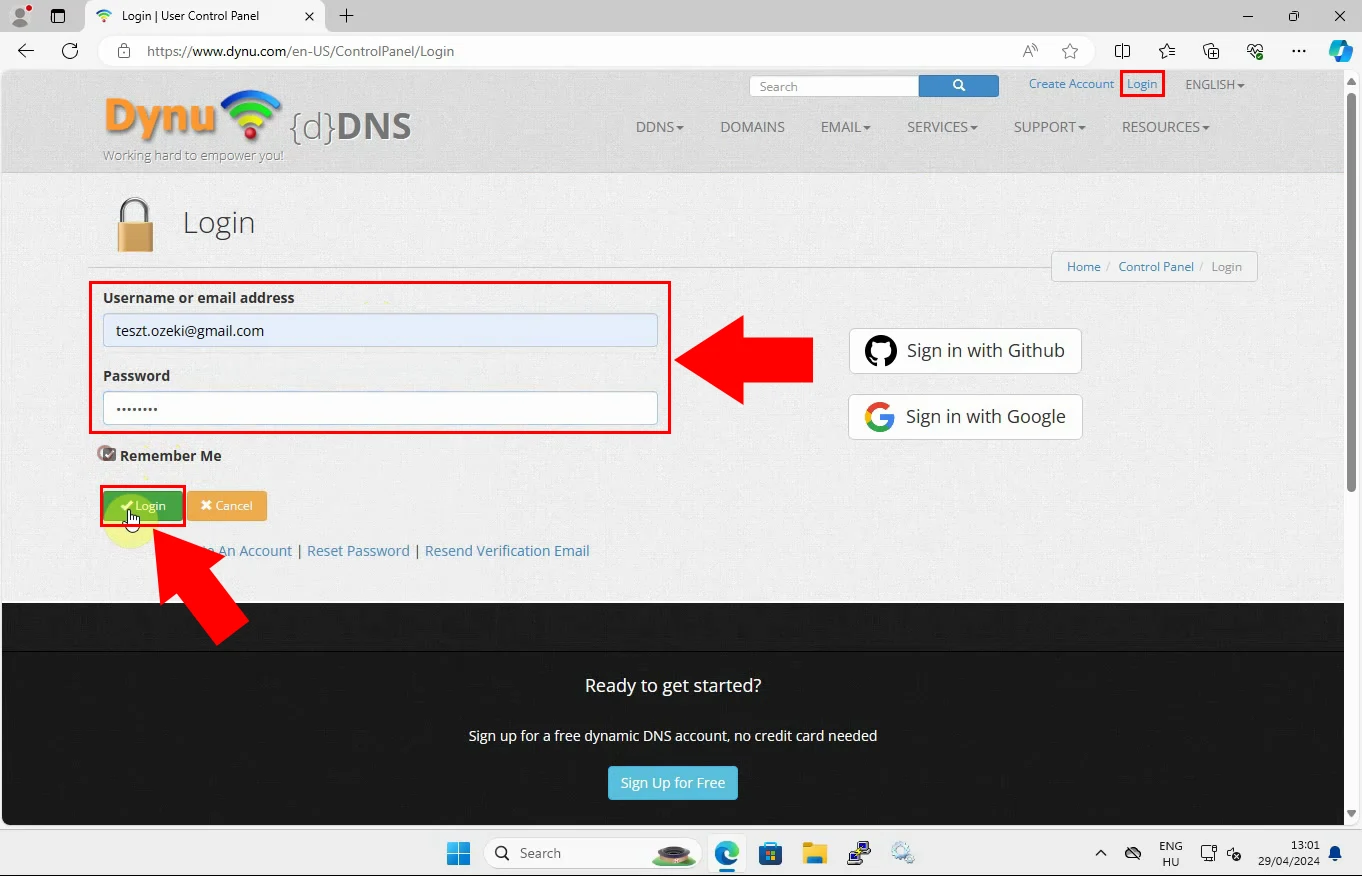
As shown in Figure 3, clicking on the link will take you to a login page where you will need to enter your new username or email address along with your password. You also have the option to select 'Remember Me' for quicker access in the future. Once your details are entered, click the green 'Login' button to continue.
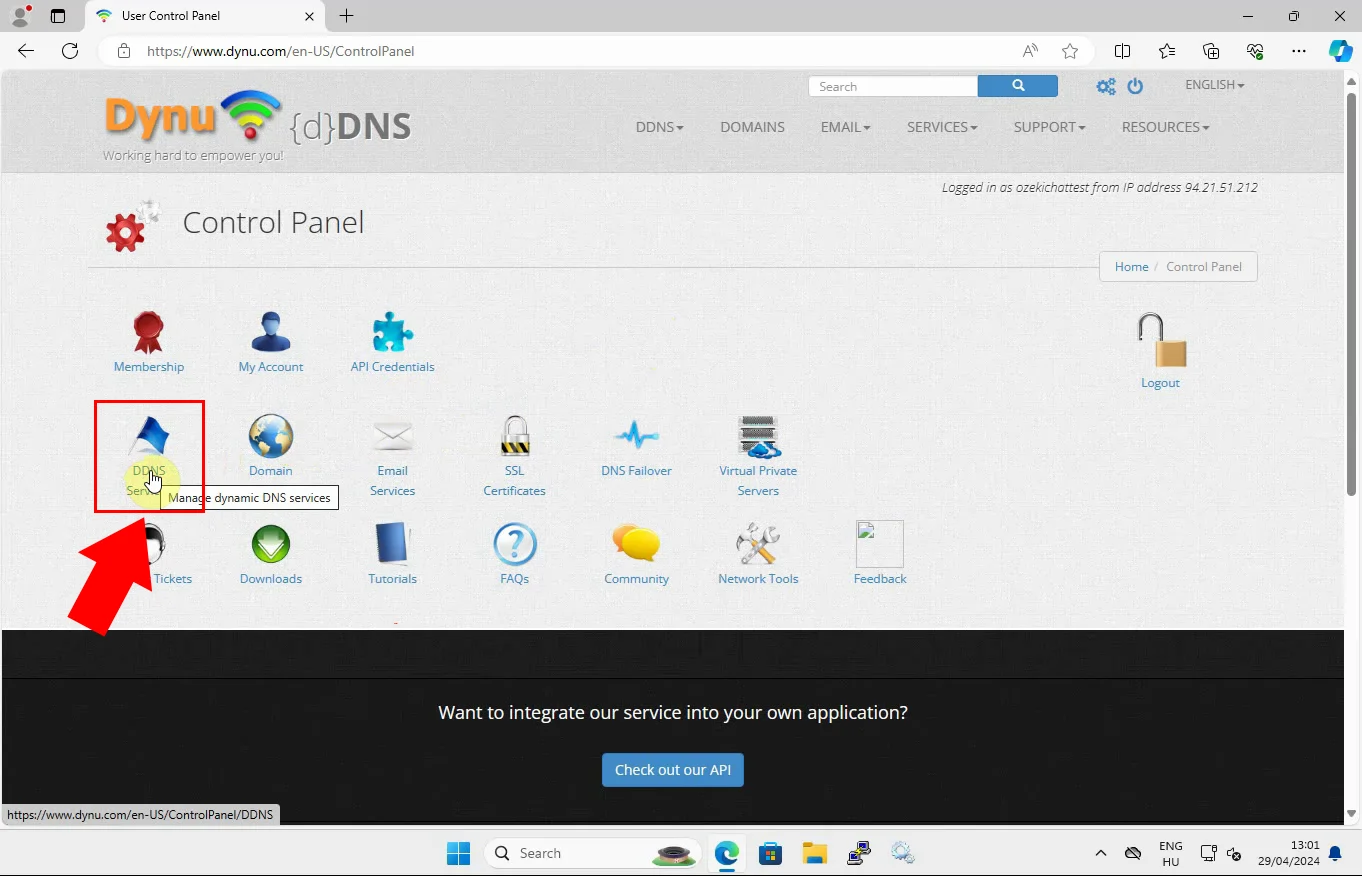
After logging in, you will be directed to the Control Panel page. Here, look for the DDNS Services option, which is marked with a blue flag icon, as shown in Figure 4. Selecting DDNS Services will allow you to begin configuring your DDNS settings to create and manage your domain name for remote access.
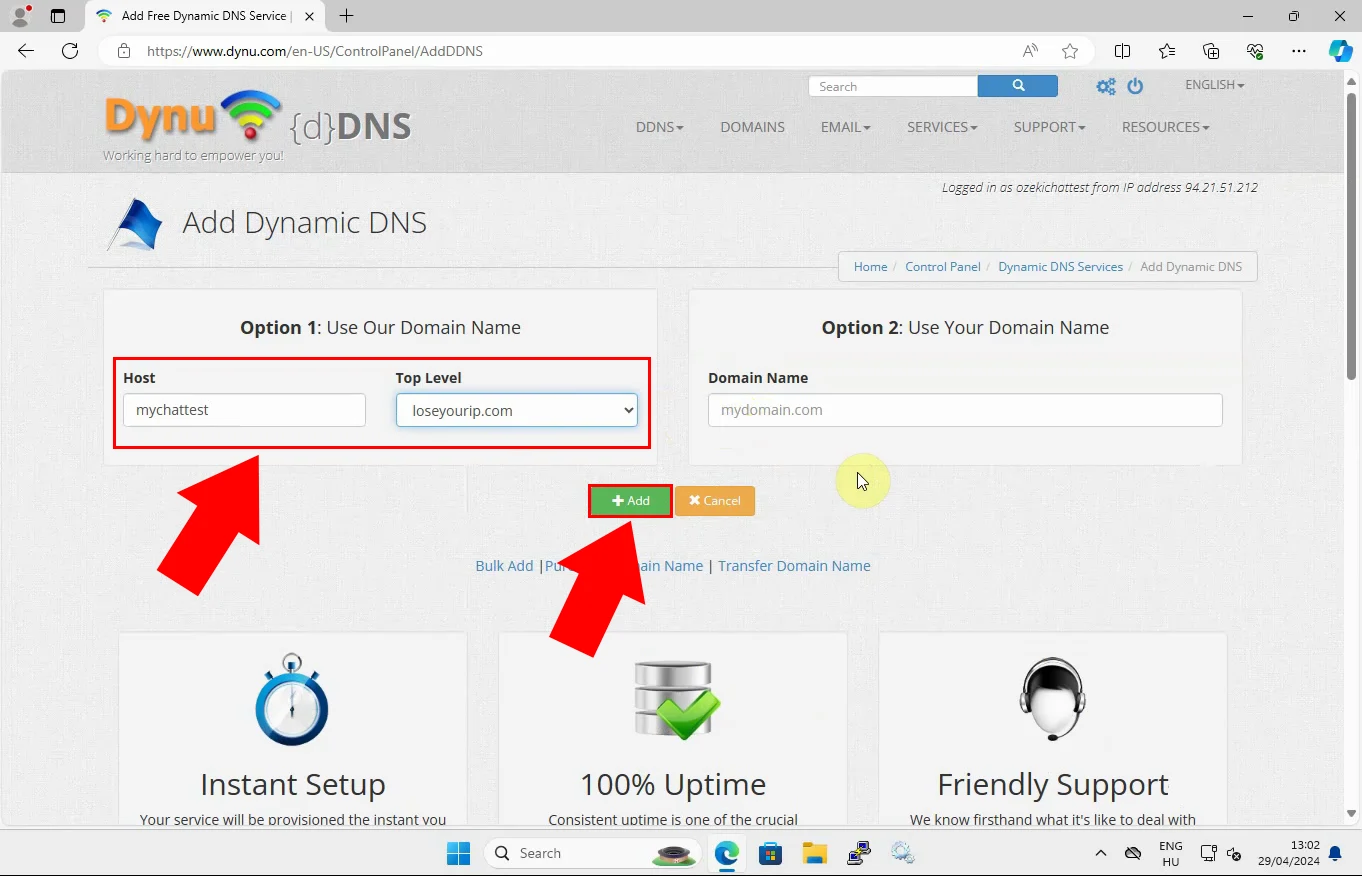
The next step is to add a domain name. You have two choices: you can either use a domain name provided by Dynu or use your own custom domain. For this setup, select the first option to use Dynu's domain. You will need to enter a Host name, which will be the first part of your domain address. After entering the host name, select loseyourip.com from the 'Top Level' dropdown list, as shown in Figure 5. This will create a full domain address that you can use to access your network remotely. Click the green 'Add' button to add the domain name.
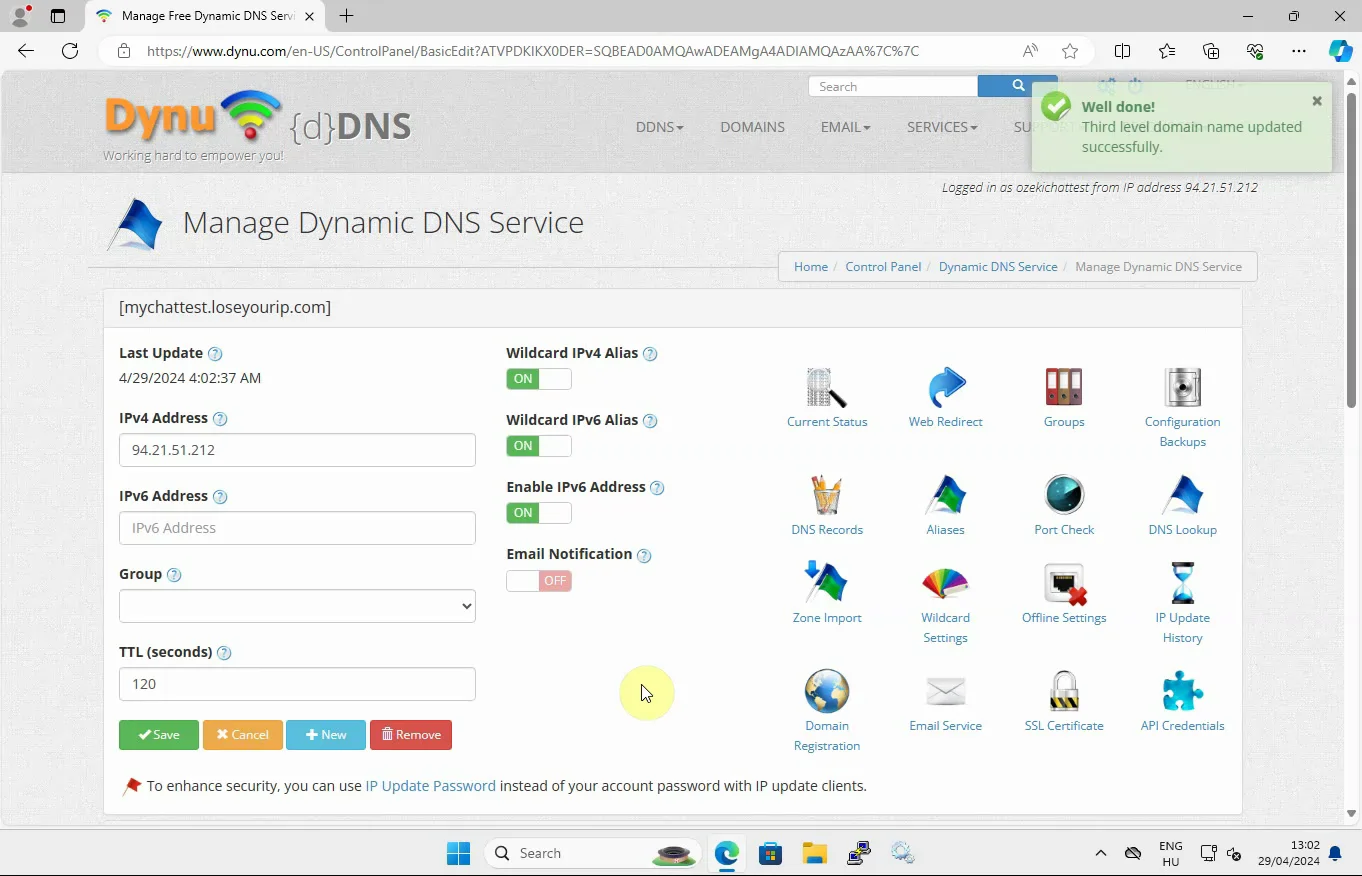
After adding the domain, allow a few seconds for the system to process the information. Once complete, you should see a notification message, as shown in Figure 6, confirming with the text: "Third level domain name updated successfully". This message indicates that your domain setup is complete and ready for use.
Download Windows client (Video tutorial)
In this short video guide, we are going to continue the process of setting up a DDNS client. With the help of our tutorial you will learn how to download the Windows client step-by-step, from installing the client, signing in and finally running the Windows Client. It is important to know how to download the Windows client so you can use the software on your computer.
Downloading the Windows Client (Step-by-step tutorial)
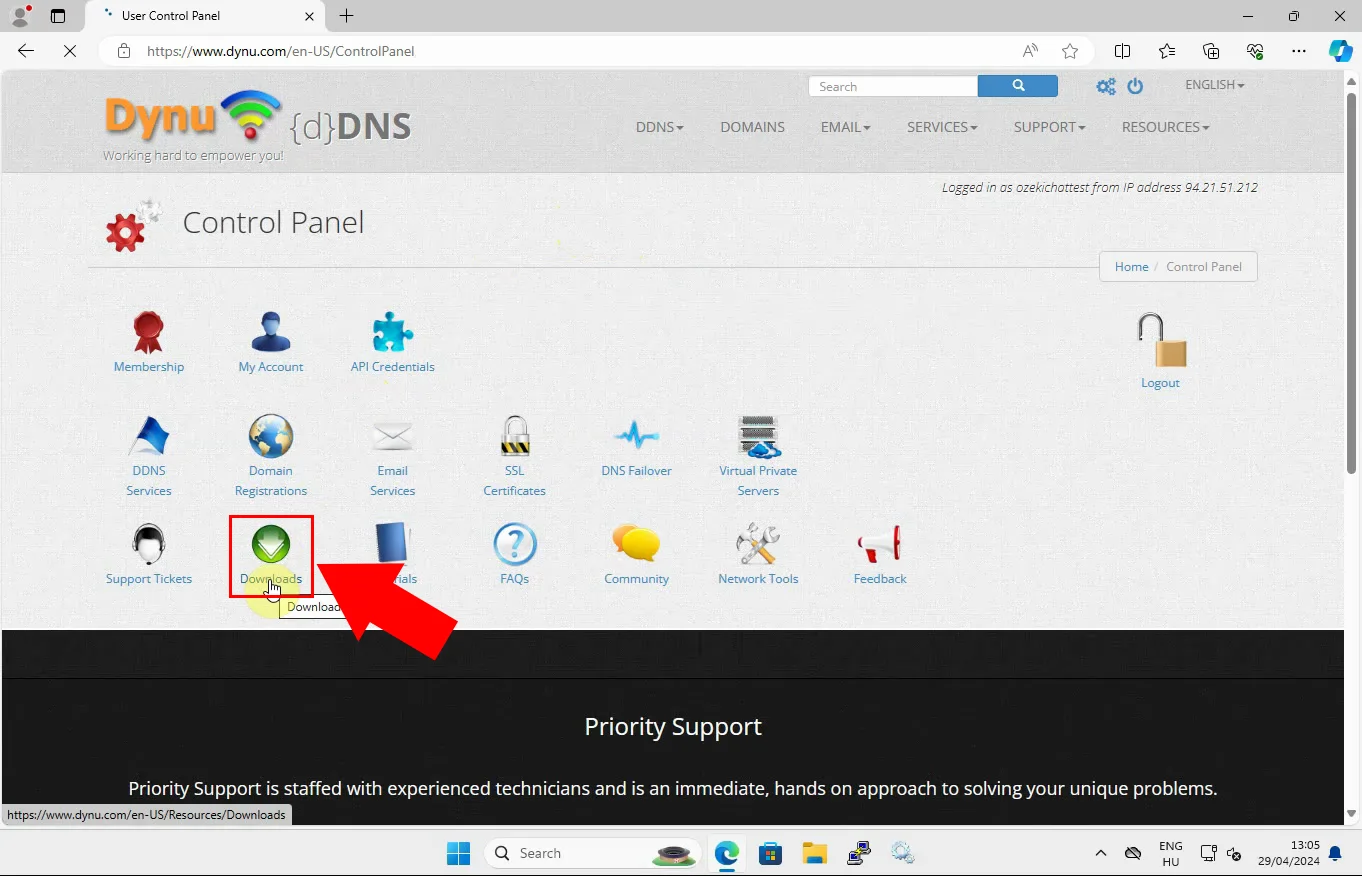
First, you need to open the Dynu website. There, click on the gears in the upper right corner next to the search bar. This will direct you to the 'Control Panel' where you can open your downloads. As shown by the red arrow in Figure 7, locate the green 'Downloads' icon to open them.
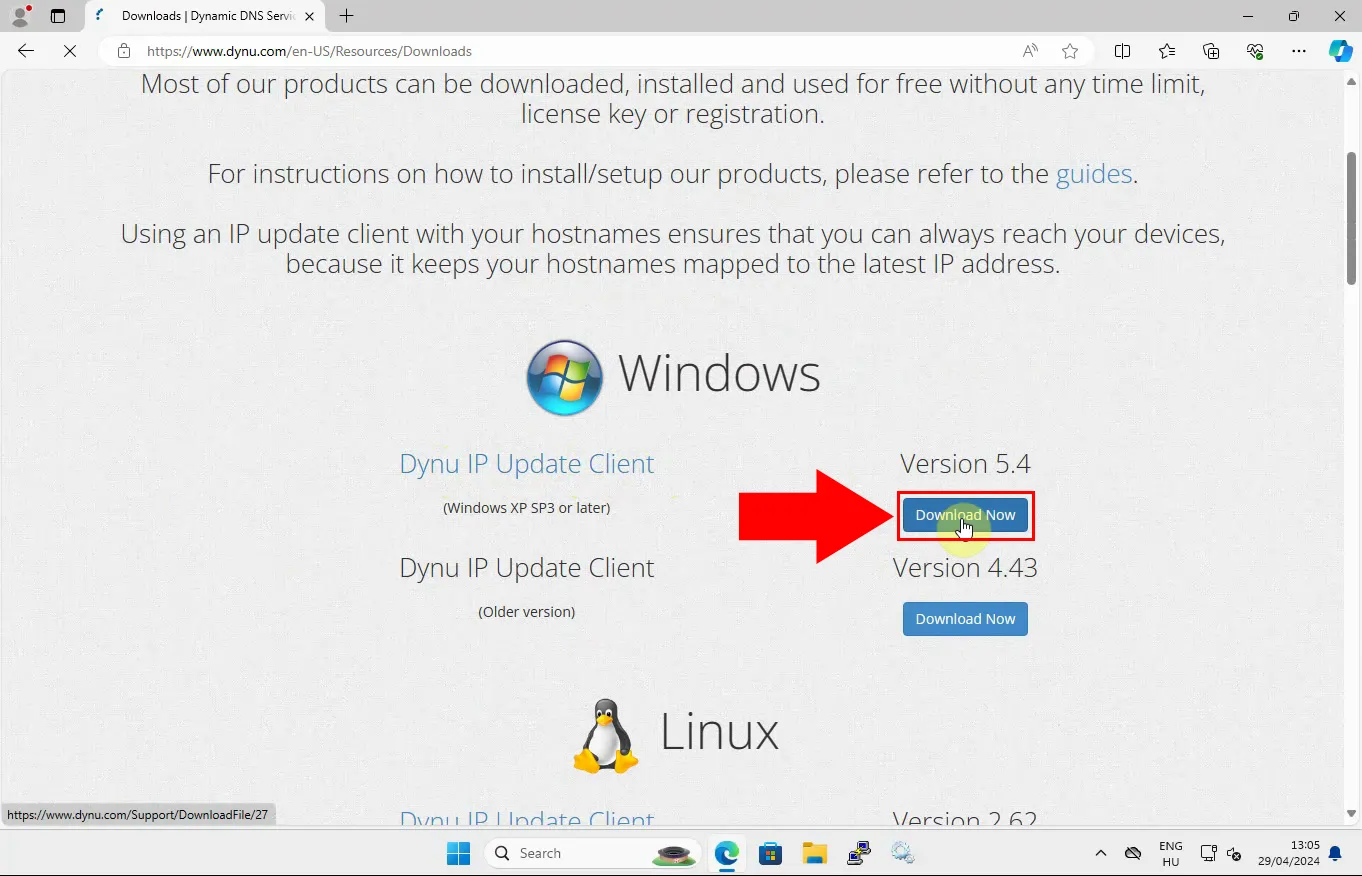
Look for the latest version of Windows Client. After that, press the blue 'Download Now' button as represented in Figure 8, to download the client. You may be asked to choose where to save the file. Make sure to download the latest version for the newest features and updates.
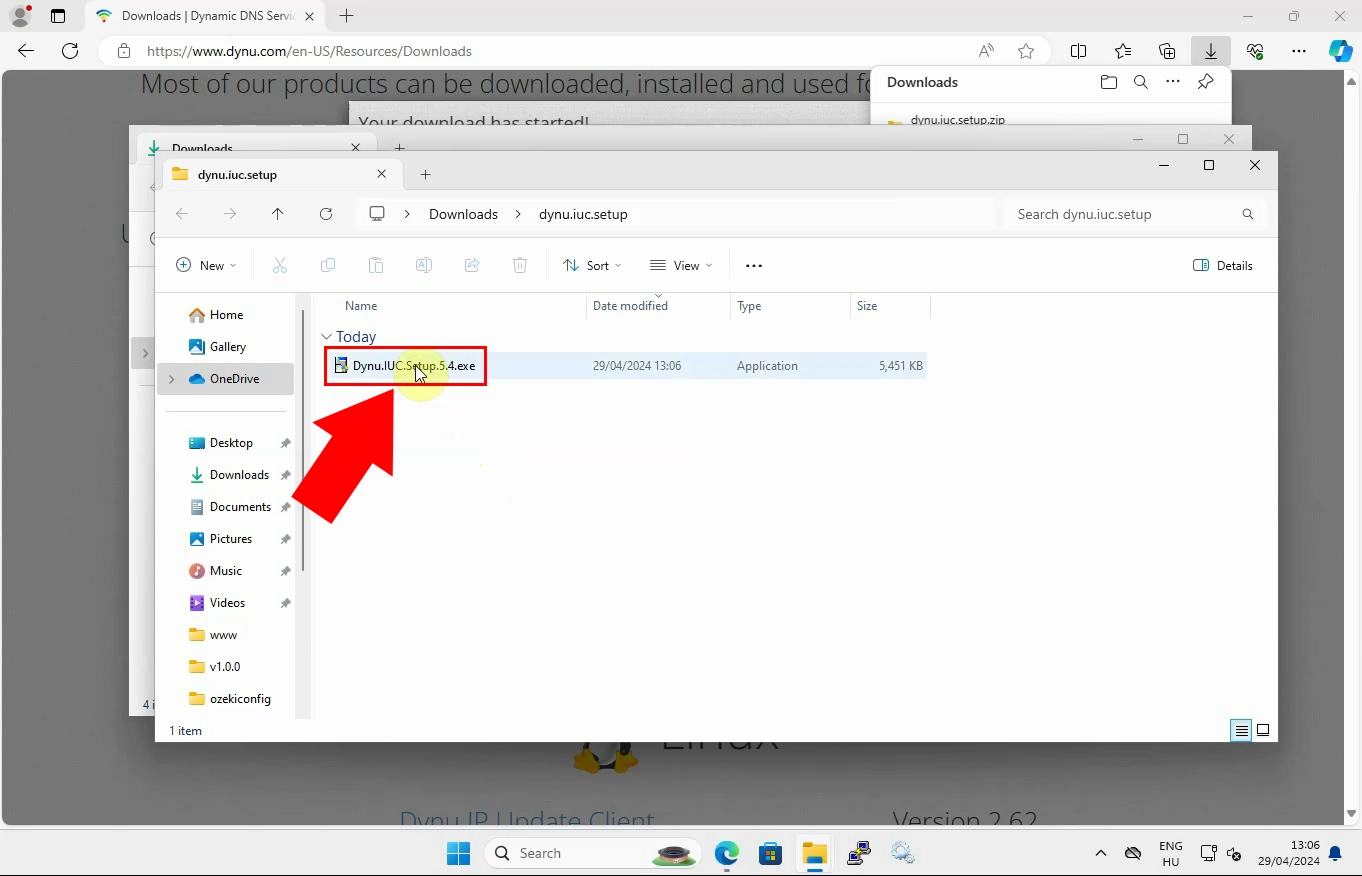
Next, go to your Downloads folder, as shown in Figure 9, and locate the file you just downloaded. Once you find it, double-click the file to start the installation process.
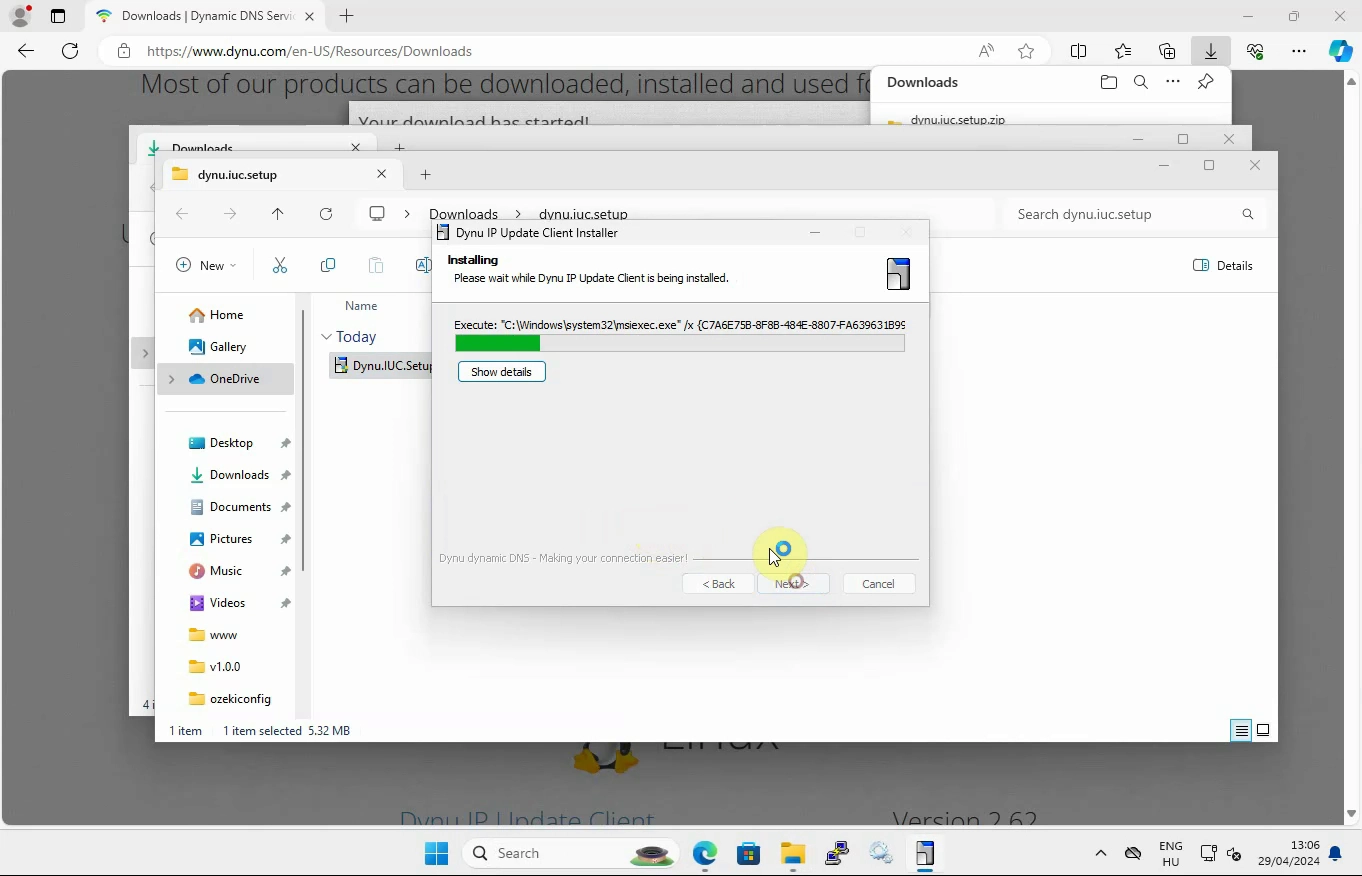
Now, wait for the Dynu IP Update Client to install. You can track the installation progress, similar to what is shown in Figure 10, to monitor its load.
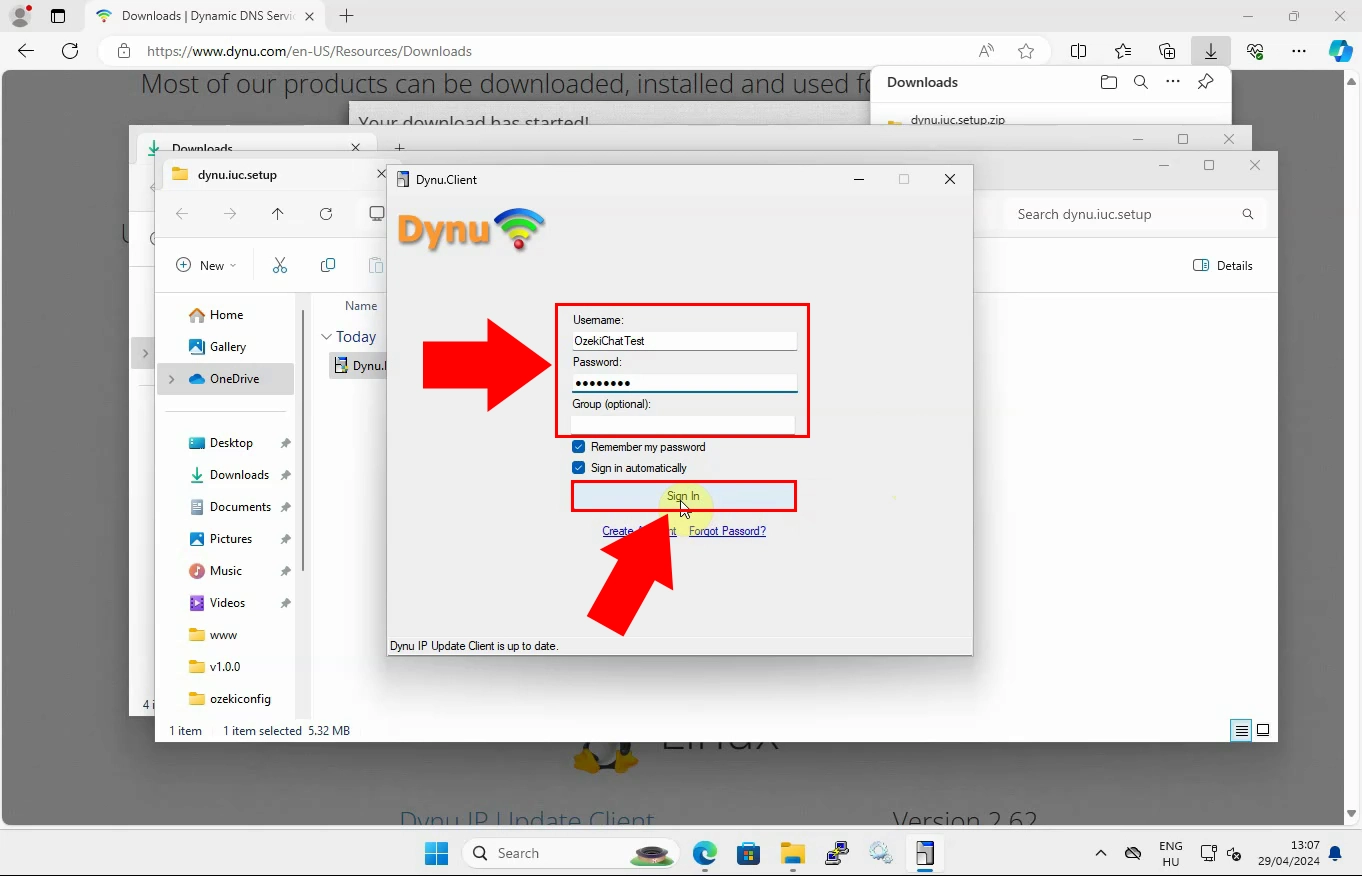
In this step, sign into the Windows client by entering your username and password into the appropriate text boxes. You can select the 'Remember my password' option to avoid entering it each time. There is also an option for 'Sign in automatically', which simplifies the sign-in process. Once you have filled in your details, click the 'Sign in' button, as shown in Figure 11.
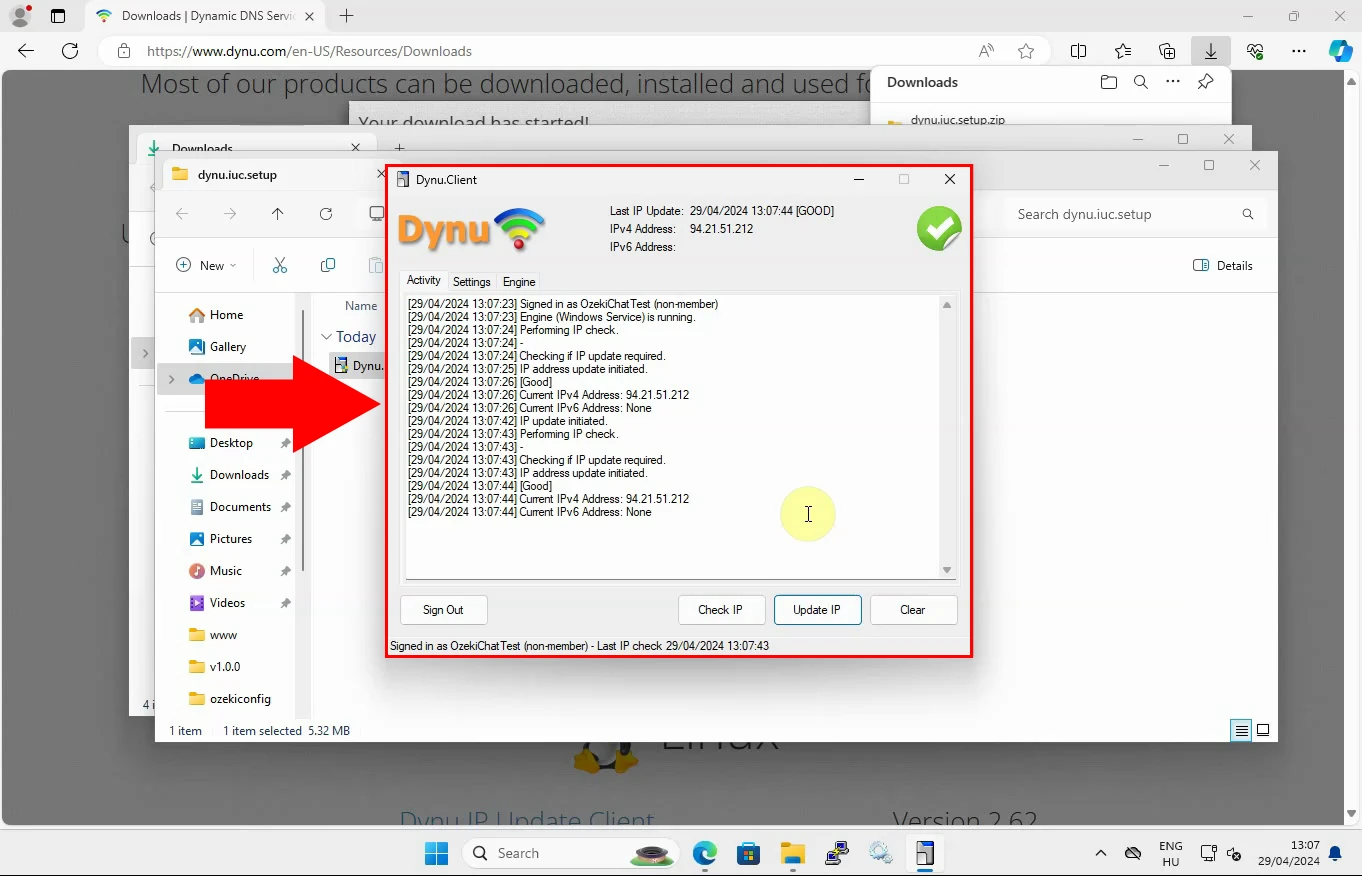
Once you are signed in, you will see that the Windows Client is running, similar to what is shown in Figure 12. If you click the 'Update IP' button, you can update the client.
Check domain IP address (Video tutorial)
The last part of the entire process of setting up a DDNS client is to check your domain IP address. We are going to walk you through the most vital steps of doing this, from opening the Command Prompt on your device to checking your domain IP address. By doing this, you ensure that your DDNS service is working correctly and your network stays accessible.
Checking domain IP address (Step-by-step guide)
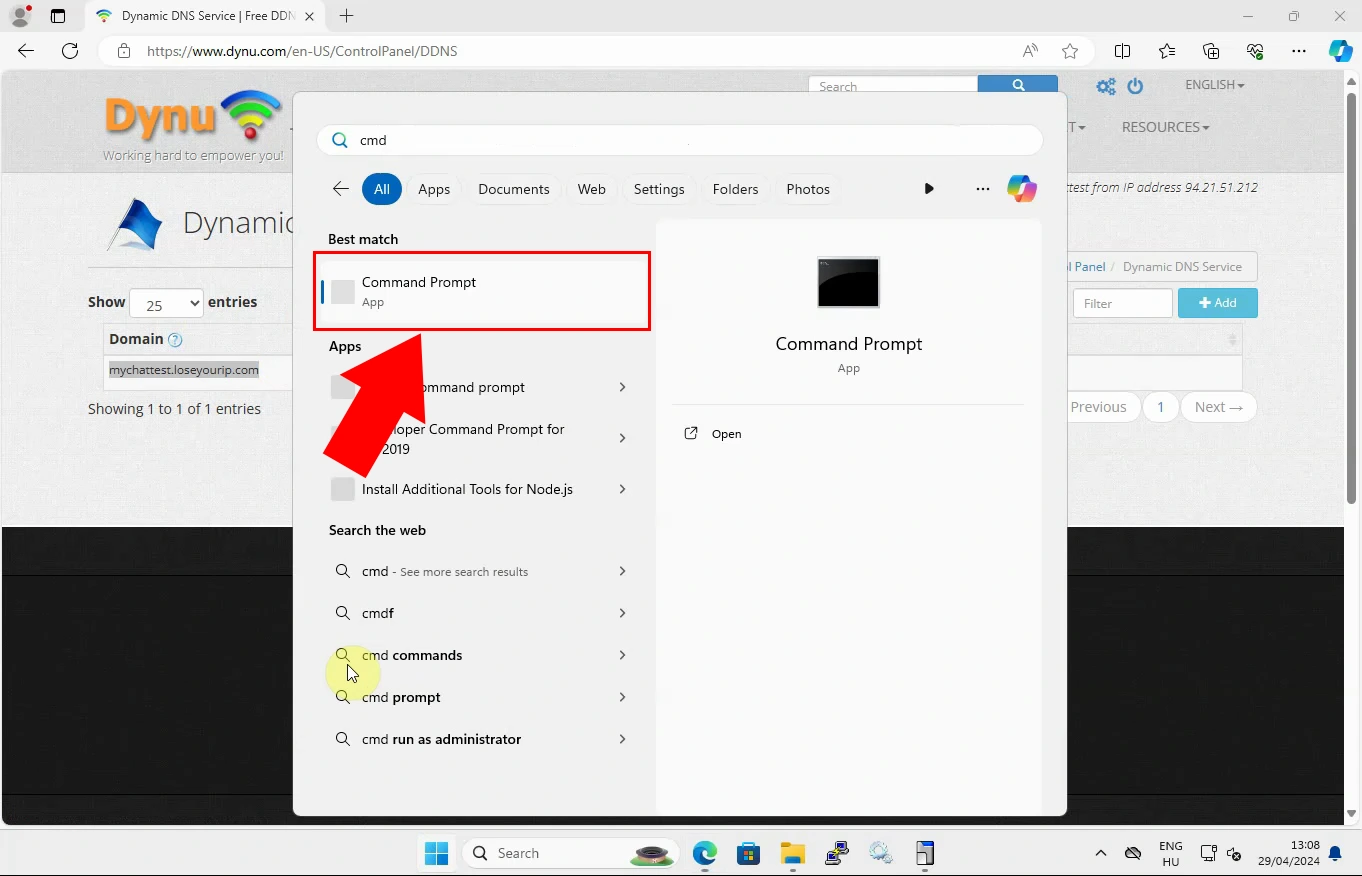
To begin, go to the 'DDNS Services' section on the Dynu website. Once you are there, copy your domain name. Next, open the search bar on your device, similar to what is shown in Figure 13. Type 'Command Prompt' into the search bar and open the Command Prompt application.
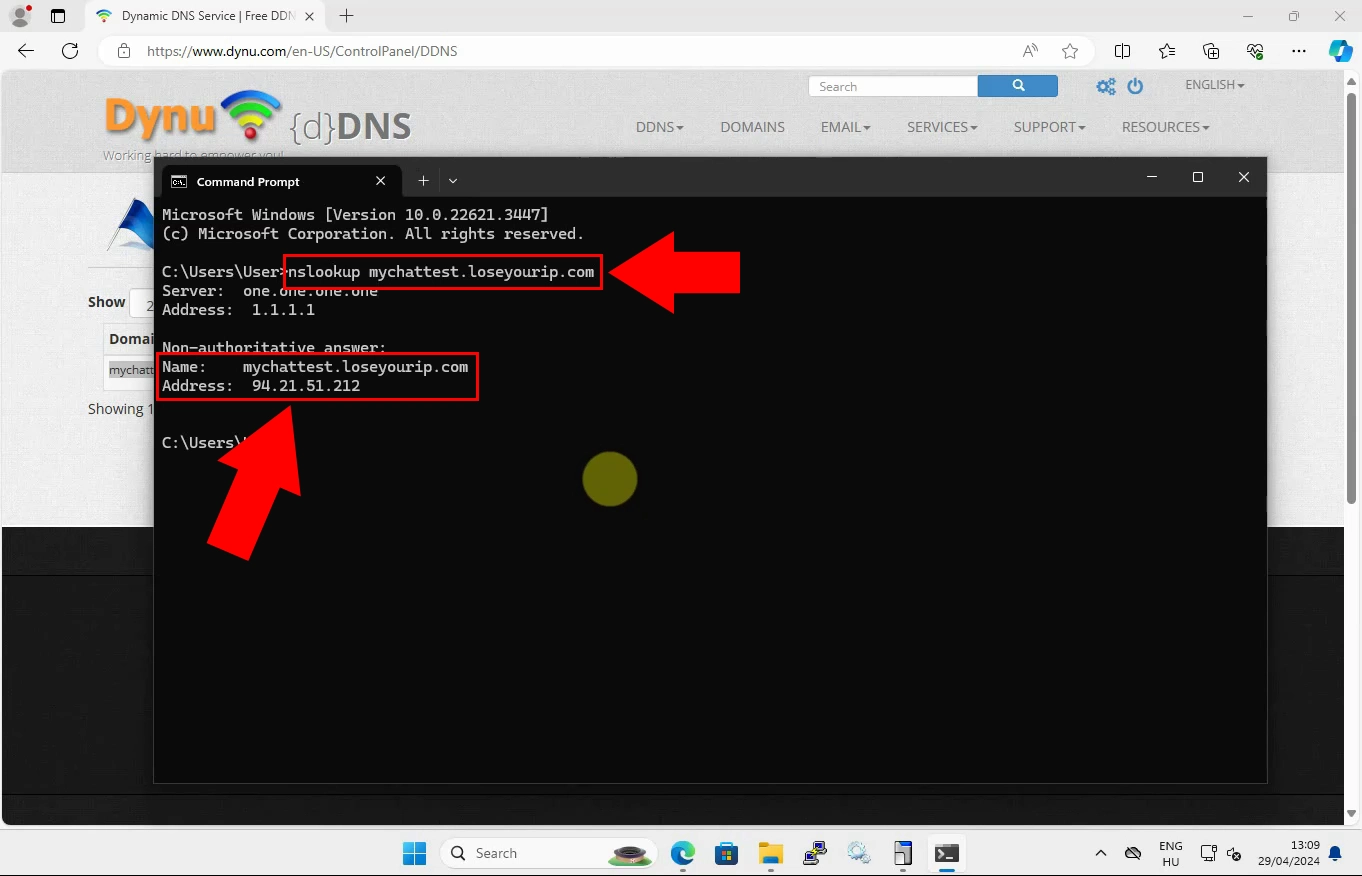
In the Command Prompt window, type nslookup followed by the domain name, then press Enter. You will see details of the server used and the IP address associated with the domain name just like in Figure 14.
FAQs
What is Dynu Dynamic DNS?
Dynu Dynamic DNS is a service that updates your domain name to point to your current IP address, even if it changes frequently.
Why do I need a Dynamic DNS service?
If your internet service provider assigns you a dynamic IP address, a Dynamic DNS service ensures that your domain name always points to the correct IP address.
How do I install the Dynu IP Update Client?
You can download the client from the Dynu control panel and follow the installation instructions provided in this guide.
How do I verify my hostname is resolving correctly?
You can use the nslookup command in the Command Prompt to check if your hostname resolves to the correct IP address.
Summary
Setting up a DDNS client with Dynu allows you to access your devices and services online, even if your IP address changes frequently. This is particularly useful for managing servers, monitoring security cameras, or controlling smart home devices remotely. This guide explains each step, starting with creating a Dynu account, logging in, and setting up a domain name. You’ll also learn how to download, install, and run the Dynu Windows client to keep your computer connected. Finally, it covers how to verify your setup by checking your domain’s IP address using the Command Prompt, ensuring your DDNS service is functioning correctly.

